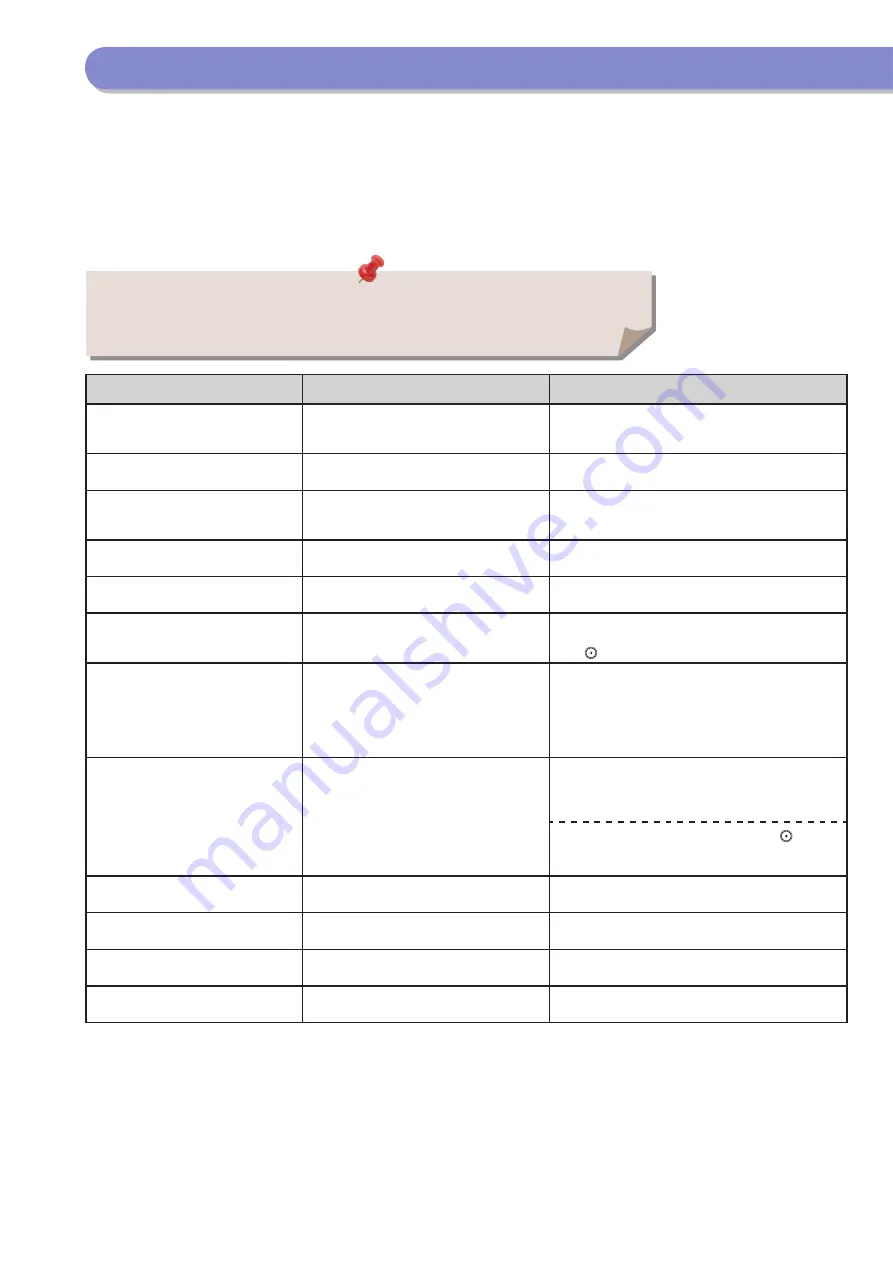
Self-Diagnostic Display
This section describes the messages that appear on the touch panel display and the method for resolving them. Follow the message that appears to
perform the required operation.
A message appears in the following cases:
When scanning or printing could not be performed due to a mistaken operation
When a user decision or operation is required during the scanning or printing operation
When a user decision or operation is required while accessing a network
A list of messages, causes, and remedies is indicated below.
•
•
•
Message
Cause
Remedy
Prepare a new waste toner container
and open the waste toner cover
behind the left part of the device.
Printing cannot be performed because the
waste toner container is full.
Replace the waste toner container. (See p. 73)
Preparing for color printing. Please
wait.
The machine is performing automatic
adjustment.
Please wait. When the adjustment is complete, colour
printing will automatically resume.
Place the original on the platen glass.
A mode requiring an original to be placed on
the platen glass is set. There is no original on
the platen glass.
Place the original on the platen glass.
Remove the original from the platen
glass.
An original remains on the platen glass.
Remove the original remaining on the platen glass, and
place the original again.
Original scanning area (thin glass
strip) is dirty.
The original scanning area (thin glass strip) is
dirty due to foreign material.
Clean the original scanning area of the feeder. (See p. 75)
Return the originals to their correct
order, then press the [Start] key.
Scanning stopped because an unspecified
problem occurred in the feeder.
Return the originals to their correct order. Place the
originals back into the feeder’s original supply tray, and
press .
Return the originals to their correct
order, then press the [Start] key. (The
data size of the scanned original
exceeded the limit. Settings will be
automatically corrected and the
originals will be scanned again.)
Scanning was cancelled because the data
size of the scanned originals exceeded the
maximum size that the machine can handle.
Scan the originals again from the first page. If you still
cannot scan the originals, you may be able to resolve
the problem by decreasing the sharpness or setting the
original type to the Text mode.
The most proper size A is not
available.
The optimal paper size selected with
automatic paper selection is not loaded.
If this message appears even though the displayed paper
size is loaded, set [Paper Drawer Auto Selection On/Off]
for the desired paper drawer to ‘On’. (See e-Manual >
Settings/Registration.)
Load paper of the displayed size. If you press without
loading the paper, the paper loaded in the currently
selected paper drawer will be printed on.
Adjusting gradation. Wait a moment... The machine is performing automatic
adjustment.
Please wait. When the adjustment is complete, printing
will automatically resume.
Yellow toner is low. Replacement not
yet needed.
Toner of the displayed colour is running low.
Prepare a toner cartridge of the displayed colour. (See
p. 69)
Replace toner cartridge. (Magenta)
Printing will soon not be possible because the
toner of the displayed colour is running out.
Replace the toner cartridge of the displayed colour. (See
p. 69)
Insert toner cartridge. (Cyan)
The toner cartridge of the displayed colour is
not inserted correctly.
Insert the toner cartridge correctly.
(See p. 69)
For information on messages that are not included here, see e-Manual > Scan and Send, Sending/Receiving
a Fax, and Network.
Содержание imageRUNNER Advance C2020i
Страница 149: ...148 Frequently Asked Questions MEMO ...
Страница 158: ...157 MEMO ...
Страница 159: ......


