


Chapter 15
15-58
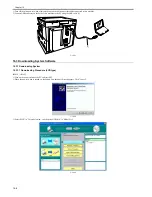
F-15-24
Lamp test (6-8: LAMP TEST)
Press numeric keypad key 8 on the FACULTY menu to select the scan lamp illumination mode. The test checks to see if the scan lamp is on or not.
Numeric keypad key 1 selects LAMP TEST ALL. Press the start key to turn on all scan lamps. LAMP TEST AGC is not used.
Line signal reception test (6-9 LINE DETECT)
Press numeric keypad key 9 on the FACULTY menu to select the line signal reception test. In this test, verify the successful operations of the NCU signal sensor
and the frequency counter. Menu 1 detects the CI state, while menu 3 detects the CNG signal.
Test menu 1
Press numeric keypad key 1 on the LINE DETECT menu to select test menu 1. When CI is detected on the telephone line connection terminal, the touch
panel (LCD) display changes from OFF to ON, indicating the received frequency. The touch panel (LCD) also displays the on-hook or off-hook state of an
external telephone set as detected. The touch panel (LCD) displays, from left to right, CI, CI frequency, hook port and FC with indications of 1:ON and
0:OFF.
Test menu 2
Press numeric keypad key 2 on the LINE DETECT menu to select test menu 2. When the CNG signal is detected on the telephone line connection terminal,
the touch panel (LCD) display changes from OFF to ON, indicating the received frequency. The touch panel (LCD) displays the status of CML, CNG and
FED detection, from left to right, with ON/OFF indications. Numeric keypad key 2 turns on the CML relay to detect CNG.
Test menu 3
Press numeric keypad key 3 on the LINE DETECT menu to select test menu 3. When the CNG signal is detected on the telephone line connection terminal,
the touch panel (LCD) display changes from OFF to ON, indicating the received frequency. The touch panel (LCD) displays the status of CML, CNG and
FED detection, from left to right, with ON/OFF indications. Numeric keypad key 3 turns off the CML relay to detect CNG.
15.19.9 Roller cleaning mode ((0) ROLLER CLEAN)
0017-6204
iR2022i / iR2025 / iR2030 / iR2018 / iR2022 / iR2018i
Roller cleaning mode ((0) ROLLER CLEAN)
Press numeric keypad key 0 in test mode to select roller cleaning mode. Press numeric keypad keys 1 and 2 during this test to enter the following menus:
Numeric keypad key 1
Press the start key clean the ADF pickup/feed rollers by idling.
Press the stop key to exit this mode.
Numeric keypad key 2
Press the start key clean the unit transfer rollers by idling.
Press the stop key to exit this mode.
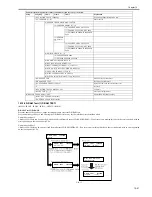
6-6: SPEAKER
FREQ [1] VOL [2]
Press numeric
keypad key 1.
SPEAKER
FREQ TEST
SPEAKER
VOL[*] :MIN [#]:MAX
Press numeric
keypad key 2.
Press the start key
to change the
transmission frequency
Signal tone volume adjustment.
* denotes the minimum, #, the maximum.
The volume is adjustable level by level
using the start key.
Содержание imageRunner 2022
Страница 1: ...Aug 8 2007 Service Manual iR2030 2025 2022 2018 Series ...
Страница 2: ......
Страница 6: ......
Страница 20: ...Contents ...
Страница 21: ...Chapter 1 Introduction ...
Страница 22: ......
Страница 57: ...Chapter 1 1 33 ...
Страница 60: ......
Страница 61: ...T 1 11 ...
Страница 64: ......
Страница 65: ...T 1 12 ...
Страница 68: ......
Страница 69: ...Chapter 2 Installation ...
Страница 70: ......
Страница 72: ......
Страница 125: ...Chapter 2 2 53 ...
Страница 126: ......
Страница 127: ...Chapter 3 Main Controller ...
Страница 128: ......
Страница 130: ......
Страница 142: ......
Страница 143: ...Chapter 4 Original Exposure System ...
Страница 144: ......
Страница 170: ......
Страница 171: ...Chapter 5 Laser Exposure ...
Страница 172: ......
Страница 174: ......
Страница 181: ...Chapter 6 Image Formation ...
Страница 182: ......
Страница 184: ......
Страница 196: ......
Страница 197: ...Chapter 7 Pickup Feeding System ...
Страница 198: ......
Страница 217: ...Chapter 8 Fixing System ...
Страница 218: ......
Страница 220: ......
Страница 234: ......
Страница 235: ...Chapter 9 External and Controls ...
Страница 236: ......
Страница 255: ...Chapter 10 RDS ...
Страница 256: ......
Страница 258: ......
Страница 268: ......
Страница 269: ...Chapter 11 Maintenance and Inspection ...
Страница 270: ......
Страница 272: ......
Страница 275: ...Chapter 12 Standards and Adjustments ...
Страница 276: ......
Страница 278: ......
Страница 281: ...Chapter 12 12 3 ...
Страница 282: ......
Страница 283: ...Chapter 13 Correcting Faulty Images ...
Страница 284: ......
Страница 286: ......
Страница 299: ...F 13 11 F 13 12 1 2 3 4 5 6 7 8 9 10 11 12 13 14 15 16 17 ...
Страница 300: ......
Страница 301: ...Chapter 14 Self Diagnosis ...
Страница 302: ......
Страница 304: ......
Страница 317: ...Chapter 15 Service Mode ...
Страница 318: ......
Страница 381: ...Chapter 16 Upgrading ...
Страница 382: ......
Страница 384: ......
Страница 411: ...Chapter 17 Service Tools ...
Страница 412: ......
Страница 413: ...Contents Contents 17 1 Service Tools 17 1 17 1 1 Special Tools 17 1 17 1 2 Oils and Solvents 17 1 ...
Страница 414: ......
Страница 417: ...Aug 8 2007 ...
Страница 418: ......


