


Special Features
10-9
M
aki
ng Cop
ies
10
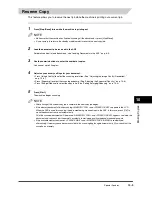
Reserve Copy
This feature allows you to reserve the next job while the machine is printing out a current job.
1
Press [Stop/Reset] twice while the machine is printing out.
NOTE
•
Make sure that the machine has finished scanning all the documents
➞
press [Stop/Reset].
•
It is necessary to return to the standby mode in order to reserve the next copy job.
2
Load the document to be reserved in the ADF.
For details on how to load documents, see “Loading Documents in the ADF,” on p. 6-3.
3
Use the numeric buttons to enter the number of copies.
You can set up to 99 copies.
4
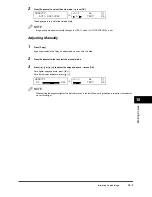
Adjust any necessary settings for your document.
•
Press [Image Quality] to select the scanning resolution. (See “Adjusting the Image Quality (Resolution),”
on p. 10-6.)
•
Press [Exposure] to select the scanning exposure. (See “Adjusting the Exposure (Density),” on p. 10-6.)
•
Press [Enlarge/Reduce] to select the copy ratio. (See “Setting Enlarging/Reducing,” on p. 10-4.)
5
Press [Start].
The machine begins scanning.
NOTE
•
After printing of the current copy job is complete, the next copy job begins.
•
If the memory becomes full while scanning, <MEMORY FULL> and <PRESS OK KEY> appears in the LCD.
When the ADF is used for scanning, the document being scanned stops in the ADF. In this case, press [OK] to
make the document come out automatically.
All of the scanned documents will be erased if <MEMORY FULL> and <PRESS OK KEY> appears, so divide the
document and copy each part separately, or select a lower image quality mode and make copies again.
•
If the available memory decreases, <PLEASE WAIT> and <MAKING SPACE IN MEM> are displayed
alternatively. If memory space becomes available, the scanning begins again automatically. Also, check that the
cassette is not empty.


