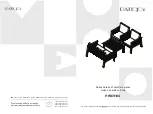
manualshive.com logo in svg
background image

Zusammenfalten:
Ziehen Sie den mittleren Streifen des Bettes und heben Sie ihn an, um das Bett zu falten.
Siehe folgende Anweisungen:

Wichtige Informationen zu den Batterien

1. Lassen Sie Kinder nicht auf die Batterien zugreifen und mit ihnen spielen!
2. Sichern Sie das Batteriefach nach dem Einlegen der Batterien immer mit der Abdeckung.
3. Mischen Sie keine alten und neuen Batterien und verschiedene Batterietypen.
4. Laden Sie nicht wiederaufladbare Batterien nicht auf.
5 . Beachten Sie immer die Polarität der Batterien.
6. Entfernen Sie beschädigte und verbrauchte Batterien.
7. Verwenden Sie immer 4 * 1,5 V ”C” -Batterien
Austauschen der Batterien: Lösen Sie die Schraube an der Batteriefachabdeckung mit einem 
Schraubendreher, drücken Sie auf den Pfeil, um die Abdeckung zu öffnen. Achten Sie dabei auf 
die Polarität der Batterien, legen Sie die beiden Batterien ein und setzen Sie die 
Batteriefachabdeckung wieder ein.

Entsorgen Sie gebrauchte 

Batterien und recyceln Sie 

diese.

Entsorgen Sie sie nicht mit 

dem Hausmüll.

Nicht im Feuer entsorgen.

Legen Sie die 
Batterien ein.

Machen Sie die 
Abdeckung zu.

Wartung und Reinigung

1.Vor der ersten Verwendung des Produkts überprüfen Sie bitte, ob alle Teile sicher befestigt sind und 
ob die Befestigungselemente gut angezogen sind.
2. Überprüfen Sie regelmäßig den Zustand der Hauptteile und Verriegelungsmechanismen, ob etwas 
angebrochen oder abgebrochen ist und ob sie nicht beschädigt sind. 
Wenn ein Schaden vorliegt, verwenden Sie die Babyschaukel bitte nicht mehr, bis das beschädigte Teil 
ersetzt ist. Reparieren Sie das Produkt nicht selbst, sondern wenden Sie sich an ein autorisiertes 
Servicecenter oder den Vertriebsmitarbeiter, bei dem Sie das Produkt gekauft haben. Andernfalls 
erlischt Ihre Garantie.

14. Nu efectuati singuri reparatii pe patutul pentru copii. Daca constatati vreun defect, va rugam sa
contactati centrul de service autorizat sau agentul de vanzari de la care ati achizitionat produsul.
15. Nu folositi accesorii sau piese de schimb, altele decat cele aprobate de catre producator.
16. Dupa despachetarea produsului, eliminati toate ambalajele din plastic si aruncati-le in locurile
desemnate pentru acest scop. Pastrati-le departe de copii pentru a preveni sufocarea copiilor.
17. Nu folositi saltea pentru patut, alta decat cea furnizata cu produs si aprobata de catre producator.
18. Nu pliati patutul, timp in care copilul se afla inauntru.
19. Asigurati-va ca mecanismul de blocare al sistemului de pliere este complet blocat inainte de 
utilizare!
20. Atunci cand copilul se afla in patutul leagan, nu ridicati patutul leagan in sus!
21. Nu este permisa atasarea obiectelor, timp in care copilul se afla in patutul leagan.
22. Asigurati-va ca toate piesele sunt in stare buna de functionare.
23. Suprasolicitarea sau plierea incorecta, precum si utilizarea unor piese incorecte poate provoca
deteriorarea patutului leagan!
24. Acest produs este strict interzis pentru a fi utilizat in locuri inalte (cum ar fi blaturi, mese, scari sau
alte locuri aflate la inaltime de sol) pentru a preveni pericolul de cadere!
25. Acordati atentie la pericolul de sufocare: va rugam sa nu-l folositi pe obiecte moi, pentru a preveni
sufocarea cauzata de rasturnare (cum ar fi un pat, canapea, etc.)
26. Este interzisa utilizarea acestui patut leagan in apropiere de scari si pe suprafete si locuri inegale!
27. Acest produs este destinat pentru uz interior si nu este permis sa fie utilizat in aer liber sau in alte
locuri publice.
28. Pastrati departe de foc.
29. Dupa activarea produsul sau apasarea comutatorului, trebuie sa asteptati 3-5 secunde, pentru ca 
sa inceapa sa functioneze si celelalte butoane functionale!

COMPONENTE

IMPORTANT! Va rugam scoateti toate componentele din ambalaj si verificati conform 

listei, ilustrate in manual, daca totul este disponibil.

Cos

Partea de actionare

2 bucati tuburi frontale 
(stanga si dreapta)

Roti spate

Plasa pentru tantari cu 
jucarii

Adaptor

21

37

Содержание Blessed TY218

Страница 1: ...initial usage of the product to ensure its correct use Keep this manual for future reference Bitte lesen Sie diese Anweisungen sorgf ltig durch bevor Sie das Produkt verwenden um die ordnungsgem e Ver...

Страница 2: ...I 1 0 2 2 3 4 5 6 7 8 200 9 3 8 2 5 10 11 12 13 BG 2 3 4 5 6 7 8 9 10 1 2 3 4 5 1 359 2 936 07 90 56...

Страница 3: ...14 15 16 17 18 19 20 21 22 23 24 25 26 27 28 29 3 5 2 1 2 3 4 5 6 7 4 1 5V C 1 2 3 55...

Страница 4: ...1 2 7 1 1 30 2 3 1 4 54...

Страница 5: ...3 1 USB 1 2 8 15 30 3 4 USB 5 U 6 U APP 3 1 USB 1 2 8 15 30 3 4 USB 5 U 6 U APP 5 53...

Страница 6: ...7 1 1 30 2 3 1 1 2 6 52...

Страница 7: ...1 2 3 4 5 6 7 4 1 5V C 1 2 14 15 16 17 18 19 20 21 22 23 24 25 26 27 28 29 3 5 2 7 51...

Страница 8: ...3 4 5 6 7 8 y 9 10 1 2 3 4 5 1 359 2 936 07 90 I 1 0 2 2 3 4 5 6 7 8 200 9 3 8 2 5 10 11 12 13 RU 50 8...

Страница 9: ...he damage has been repaired and the broken parts replaced EN ATTENTION READ THE INSTRUCTIONS CAREFULLY AND KEEP THEM FOR FUTURE REFERENCE ATTENTION YOUR CHILD WILL BE BEST PROTECTED IF YOU FOLLOW THE...

Страница 10: ...rts of the package and check according to the list illustrated in the manual if all are available Cot Drive part 2 pieces of front tubes left and right Rear wheels Mosquito net with toys Adapter M tho...

Страница 11: ...lower tubes correctly with the upper ones that are attached to the cot Press the button as shown in the photo for correct positioning Make sure the two buttons are completely out of the tube The same...

Страница 12: ...est pr sent sur les photos ci dessous Remarque La moustiquaire est un accessoire en plus Ce lit peut tre utilis aussi sans moustiquaire Fonctions 1 Tableau de commande Indicateurs lumineux Emetteur Ac...

Страница 13: ...TILISEZ PAS si une des pi ces manque ou si elle est cass e Si vous avez besoin d une consultation ou de pi ces de rechange veuillez contacter l agent commercial aupr s duquel vous avez achet le produi...

Страница 14: ...par le fabricant 16 Apr s le d ballage du produit veillez mettre de c t tous les emballages en mati res plastiques et jetez les aux endroits indiqu s cette fin Tenez les hors de la port e des enfants...

Страница 15: ...sol horizontal 6 Tous les dispositifs de montage doivent tre toujours attach s Il faut veiller ne pas avoir des vis non serr s parce qu il est possible que des parties du corps de l enfant ou des v te...

Страница 16: ...ebrochen abgebrochen sind oder fehlen Wenn Sie solche Sch den feststellen stellen Sie die Verwendung des Kinderbetts bitte ein bis die Sch den behoben und die defekten Teile ersetzt sind DE ACHTUNG LE...

Страница 17: ...lters m ssen Sie 3 5 Sekunden warten bis die anderen Funktionstasten funktionsbereit sind TEILE WICHTIG Bitte nehmen Sie alle Teile aus der Verpackung und berpr fen Sie anhand der im Handbuch aufgef h...

Страница 18: ...indungsrohr Achten Sie auf die linke und rechte Richtung Installieren Sie die unteren Rohre korrekt mit den oberen die am Korb befestigt sind Dr cken Sie die Taste wie im Bild gezeigt um die richtige...

Страница 19: ...utst rke N chster Titel um die Lautst rke anzupassen Verwenden Sie dieselbe Methode um die Lautst rke im U Disc und APP Modus einzustellen 3 Montarea plasei pentru tantari Deschideti banda elastica af...

Страница 20: ...lipsa sau margini ascutite Dupa fiecare actiune va sfatuim sa verificati daca piesele montate sunt bine fixate NU UTILIZATI daca anumita piesa lipseste sau este rupta Daca aveti nevoie de sfaturi sau...

Страница 21: ...centrul de service autorizat sau agentul de vanzari de la care ati achizitionat produsul 15 Nu folositi accesorii sau piese de schimb altele decat cele aprobate de catre producator 16 Dupa despachetar...

Страница 22: ...Patutul pentru copii trebuie sa fie blocat intr o pozitie fixa atunci cand copilul este lasat nesupravegheat in acesta 4 AVERTISMENT Nu utilizati patutul pentru copii daca anumita componenta este rup...

Страница 23: ...de de 2 5 cm entre el colch n y los lados de la cuna infantil el colch n debe cubrir toda la superficie y estar ce ido a los lados y los rincones de la cuna 10 PRECAUCI N No debe colocar la cuna infan...

Страница 24: ...el plegado incorrecto as como el uso de partes inadecuadas pueden causar da os en la cuna 24 Queda estrictamente prohibido el uso de este producto en superficies elevadas como encimeras mesas escaler...

Страница 25: ...no le hayan sido suministradas por el fabricante el importador o el distribuidor de donde haya comprado el producto 1 Abra ambos lados del soporte y presione el centro de la cuna con la mano hasta esc...

Страница 26: ...a 30 minutos Al agotarse el tiempo todas las funciones van a apagarse 3 Bot n de encendido apagado de la cuna Al encender la cuna la luz indicadora va a iluminarse lo que demuestra que la cuna est enc...

Страница 27: ...uede moverse hacia adelante y hacia atr s a una distancia de unos 30 mm 2 Nota Este modo debe usarse en una superficie plana y dura no en c sped alfombra u otra superficie blanda 3 Mantenga lejos de o...

Страница 28: ...a flecha para abrir la tapa y observando la polaridad de las pilas inserte dos pilas y reinstale la tapa del compartimiento de pilas Remueva las pilas agotadas y depos telas en los lugares designados...

Страница 29: ...ave y seco 8 Mantenga el producto en un lugar limpio y seco No exponga el producto a la luz solar directa a la lluvia ni a temperaturas extremas 9 El adaptador de la cuna debe ser inspeccionado de man...

Отзывы: