background image

6

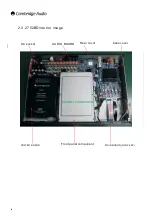
2.3.2 752BD interior


image

Loader component

MAIN BOARD (OLNY 480)

AUDIO  BOARD 

POWER  BOARD 

Rear cover

AC socket

Front panel component

base cover

-4-

Содержание Azur 752BD

Страница 1: ...Service Manual Azur 752BD Universal Upsampling Blu ray DVD CD player Issue date February 2013 ...

Страница 2: ...ircuit 12 Video Processing Circuit 13 Other Control Circuits of Main Board 15 Panel and Button Control Circuits 16 Troubleshooting Flowcharts and Cases 17 Install Barcode 20 Precautions for Player Disassembly and Reassembly 24 Internal Structure of Unit 25 Remove the Audio Board 27 Replace the Main Board 29 Replace the Front Panel Assembly 31 Replace the Power Board 32 Circuit Diagrams 33 Parts Ta...

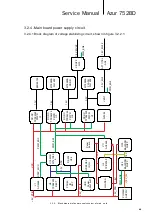
Страница 3: ...such as loudspeaker or magnet 3ǃPositions for placement should best able and secure 1 2 3 Electro static precautions 1ǃMaintenance facility and working table must be earthed 2ǃMaintenance man must wear electrostatic ring and he can use antistatic gloves instead when electrostatic ring is unavailable or inconvenient to use 3ǃWhen repairing accessories antistatic bag is required to pack the accessor...

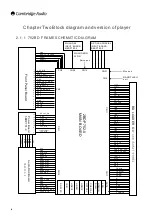
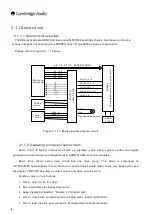
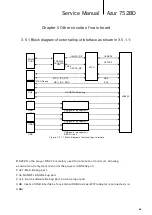
Страница 4: ...AD LOAD A A B B GND U V W COMMON 5BDP751 0 Power Board RELAY_ON GND 15V_IN GND GND GND 5V_STB 5V_STB 15V GND GND 15V GND 12VF BD LOADER KEM 480 S ONY TO H EI Front Panel Board 3 3V_STB IR_FP STBY_KEY OPEN CLOSE_KEY GND PLAY_LEFT_RIGHT UP_DOWN 3D INDICATE GND 4K_2K INDICATE VCC VCC VCC GND GND VDATA VSTB VCLK CN12 CN1 CN17 CN18 CN11 LAN HDMI2 DIAG IR IN USB1 2 HDMI IN HDMI1 OPTCAL RS 232C Chapter T...

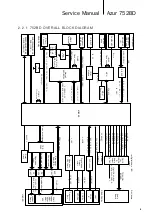
Страница 5: ...Terminal TPIC 2050 50P CN11 P9 CN18 SONY Loader KEM 460 or KEM 480 P5 CN17 Loader Frame Marvell 88DE2755 HDMI output CVBS_OUT COXIAL ASPDIF TO AUDIO BOARD TO BD loader Spindle sled motor 3 Axis actuator Open close Driver RF Servo signal RESET USBM1 USBP1 USBM0 USBP0 USB IR_MCU IR_FP IR_MCU SDA SCL Key in UARXD UATXD TD TD RD RD 12MHZ Clock circuit 27MHZ Clock circuit 25MHZ Clock circuit DDR_DATA M...

Страница 6: ...6 2 3 2 752BD interior image Loader component MAIN BOARD OLNY 480 AUDIO BOARD POWER BOARD Rear cover AC socket Front panel component base cover 4 ...

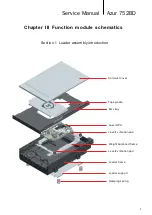
Страница 7: ...apter III Function module schematics Section 1 Loader assembly introduction Disc tray Laser OPU Loader frame Top spindle Level1 vibration pad Level2 vibration pad Loader support Damping spring Weight balanced frame Anti dust cover 5 ...

Страница 8: ...isc or Unkown disc 4 Fail to view servo software version in setup menu loader malfunction 5 Fail to load disc for poor contact of flat cable that connects the loader A B C D E F G H DVDRFO BDRFO TPIC2050 Mt8580 752BD player adopts SONY 480 loader and MT8580 decoding scheme And its servo circuit is mainly composed of decoding chip Mt8580 driver IC tpic2050 and other components Please refer to Figur...

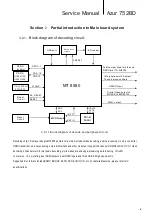
Страница 9: ...ESET RESET 27MHZ Reset Circuit USB port Servo drive circuit 3 2 1 1 Block diagram of decode and peripheral circuit Decoding chip This player adopts MT8580 as main chip which includes a and other modules It supports 2 e 2D to 3D conversion 4K up scaling dual HDMI outputs dual HDMI inputs and three USB 2 0 high speed ports Supported disc formats include etc For detailed features please refer to IC s...

Страница 10: ...lar network applications MT8580 also implements 10 100 Ethernet interface and support WLAN connection thru its USB port Besides the connectivity features audio and video output quality and flexibility is another focus of state of the art Blu ray devices MT8580 embeds 4 channels of 148MHz 12 bit video DAC and also an HDMI 1 4 compliant transmitter for 2D 3D video output And MT8580 also embeds an HD...

Страница 11: ... DC TPS54325 PWPR U8 DC DC TPS54325 PWPR U7 3 3V_MVL 12V V1 AO4468 PWR_EN1 88DE2755 5V_STB 15V_IN V11 AO4468 STBY_MCU Sil1292 VCC PWR_EN3 USB Power u24u14u27 Panel board HDMI CEC IR IN U5 TPS62203 DBVT RS232 U36 U2 TPIC2050 LOADER U26 BAJ2DDO WHFP U30 BAJ2DDO WHFP 8V 5V_STB 5V_STB VCC PWR_EN2 3 3V_STB MT8580 SIL1292 MT8580 DDRIII MT8580 FLASH SIL1292 V4 Q7 V8 Q29 Q30 1 5V_MVL PWR_EN2 PWR_EN4 1 8V_...

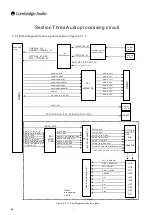
Страница 12: ...ATA_C_SW_DAC SDATA_LSB_RSB_DAC SDATA_LDOWNMIX_RDOWNMIX_DAC U17 U20 U23 U23 U26 Wm8740 DAC1 DAC5_MCLK Output Amplifier Audio output terminal Audio processing board U18 U19 U21 U22 U24 U25 U27 U28 U30 U31 LEFT_DOWNMIX RIGHT_DOWNMIX LEFT_FRONT RIGHT_FRONT CENTER SW LS RS SBL SBR COXIAL OPTICAL U33 88DE2755 HDMI1 HDMI2_TX2 HDMI2_TX2 HDMI2_TX1 HDMI2_TX1 HDMI2_TX0 HDMI2_TX0 HDMI2_TXC HDMI2_TXC SPDIF_OUT...

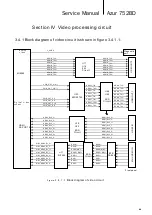
Страница 13: ...1 HDMI1_TX1 HDMI1_Tx2 HDMI1_Tx2 HDMI1_TXC HDMI1_TXC Diagnostic port Figure Block diagram of video circuit 3 4 1 1 HDMI IN ESD Circuit U19 U20 HDMI_Rx2_2 HDMI_ HDMI_ HDMI_ HDMI_ HDMI_ HDMI_ HDMI_ Rx2_2 Rx2_1 Rx2_1 Rx2_0 Rx2_0 Rx2_C Rx2_C HDMI_Rx2_2 HDMI_ HDMI_ HDMI_ HDMI_ HDMI_ HDMI_ HDMI_ Rx2_2 Rx2_1 Rx2_1 Rx2_0 Rx2_0 Rx2_C Rx2_C MHL HDMI IN HDMI RX PORT 2 Sil1292 U11 MHL_HDMI_Rx_2 MHL_HDMI_Rx_2 M...

Страница 14: ...ut and output video signal distortion HDMI MHL input Mt8580 incorporates two sets of HDMI input one HDMI input port locates on the rear panel and goes directly into MT8580 s HDMI input port For compatibility with MHL port of mobile device a MHL HDMI conversion IC sil1292 is added to the other HDMI input port on the front panel Mobile High Definition Link MHL is a proposed industry standard for a m...

Страница 15: ...llowing external control system to control the player via RS232 port Cn21 MCU Debug port Cn6 NANDFLASH Debug port Cn14 Servo software Debug port barcode input port USB 3 sets of USB interfaces for external USB devices WIFI adapter is connected via USB U36 UATXD_RP CN20 CN21 MCU_ISP_SCL MCU_ISP_SDA SDA SCL CN6 Rear USB2 Front USB CN14 NANDFLASH debug Server software debug MCU Debug Rear USB1 USB po...

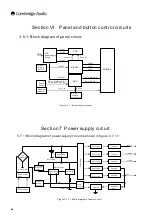
Страница 16: ...rcuit Figure 3 6 1 1 Block diagram of panel KBP206G LM 431A HOST GND HOST GND 5V 15VBD 15VAU 15VAU FB B1 NCP1271P65 HOST GND Section 7 Power supply circuit 3 7 1 Block diagram of power supply circuit is shown in figure 3 7 1 1 Absorbing circuit Power system filter Power socket Overvoltage protection circuit Power off control circuit Switching IC MOS tube Transfo rmer Opto coupler Rectifying Rectif...

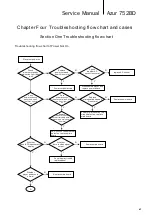
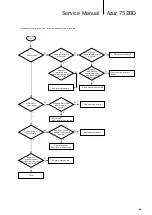
Страница 17: ... Press power button on remote control and see if the filter light is on Replace main board and see if it is normal Replace power board Replace panel or check whether flat cable between panel and main board is normal Power of main board or MCU circuit defective replace main board MCU circuit or panel socket defective replace main board Whether panel VFD has character display Whether there is video ...

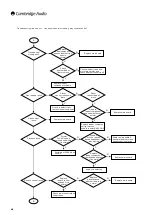
Страница 18: ...e whether it is normal Replace main board Replace main board Replace loader component during that you need to reenter BARCODE Format FLASH update again and see whether it is normal Whether stuck or pause issues happen during disc playing Replace main board if abnormal audio or video happens during playing Software or FLASH has trouble Replace loader component test and see whether it is normal Repl...

Страница 19: ... and see whether analog audio output is normal Replace main board or panel Replace main board Audio board is defective Replace main board HDMI MHL input issue Audio issue N Y END Replace main board Whether expansion port or video port functions are normal N Replace MHL HDMI input board is normal Y MHL HDMI Input board is defective N Y Replace main board Optical coaxial input issue N Replace is nor...

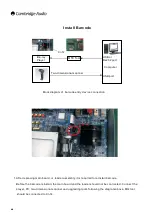
Страница 20: ...onnection Install Barcode 1 After replacing main board or loader assembly it is required to reinstall barcode Before the barcode is the main board and the loader should not be connected Connect the player PC two dimensional scanner and upgrading tools following the diagram above Mtk tool should be connected to Cn14 install Cn14 18 ...

Страница 21: ...SONY 480 COM port according to the connecting port of the MTK tool 3 Use the scanning gun to scan the two dimensional barcode Find the reserved scanning window in the bottom of the loader Note If the barcode label cannot be seen from the window connect the loader cable to the main board and power the device on then the OPU will automatically reset to the initial position and reveal the barcode lab...

Страница 22: ... 64 digits and alphabets 5 After the barcode input is successfully completed the PASS light will turn green and last for a few seconds and logs will be displayed 5 Select WRITE and after the barcode input is successfully completed the PASS light will turn green and last for a few seconds and logs will be displayed ...

Страница 23: ... again the tray open close automatically and a self detection will be conducted If the FA test menu appears you can skip this test by pressing the Stop key Note 1 Please check the device connections if NG or FALL happens during upgrading 2 The device should remain on during upgrading and powering off and standby should beavoided 3 Do not connect the loader or conduct reading test before barcode in...

Страница 24: ...tly Main to p cover e work table and the 4pc r Player y disassemb ools required use a screw cs screws PW r Disasse led or reasse d for disassem wdriver to rem WM4 5 10 embly a embled due t mbly move the 4pc that fix the to and Reas to the structu cs screws PW op cover and ssembly ural design P WT3 6 7 th d the bottom y Please follow at fix the rea m cover at the w ar e 22 ...

Страница 25: ...he ews holding oader assem r s barcode i on and test s back in ke off the tray g the manual Audio boa Fron Loa Top View e flact cable the loader a mbly bef into the main its function lnstall the to y door If the l tray openin rd nt panel comp ader compon connecting t ssembly fore which ple n board C Reinstall op cover device won g window in Main b ponent nent the loader to Take off the ease follow...

Страница 26: ...installation r depressed to the cente racket screw necting the m he socket an he 4 screws ber to input t please flip t ket while plug be taken for r n check if th please use t er position If ws main board to d flip it up by holding the lo the new load the socket co gging it in Av reference Pl e tray door is the Philips h the tray doo o the loader y 90 degrees oader assem der s barcode over up by a...

Страница 27: ...ectric ition dio board er and the re ore taking off ews holding to the audio c screwdrive ear panel the f the audio b the PC she board er to remove e audio boar board eet of the pow e the screws rd cannot be wer board f s 8pcs BT3 removed dir lip up the PC 3 8H holding rectly Remo C sheet and g the 7 1ch ve the loade d take off the terminals in er e n 25 ...

Страница 28: ...boa disassembly que too stron r disconnecti cable might g the flat cabl power board disconnect th the screws 6 ard removal c y and reasse ng Please u ng the flat ca get damage le that conne d will hinder he flat cable 6pcs PM 3 completed embly se proper to able please ed ects the audi Remove a sc 7H holding rque ensure it is c o board to th crew holding the 7 1ch au completely a he power boa g the...

Страница 29: ...ws holding t move the loa e main board he loader ba oard Insta nd loader as nnected to th cover is flipp wer board and the main boa ader assemb d Remov arcode In all the top co ssembly remo e main board ped up by 90 d the main b ard bly Remo ve the screw nstall the cab over oval flow wo d Note that 0 degrees Do oard press a ve the audio s holding the les and test n t be covere the flat cable o not...

Страница 30: ...ent arcode follow to be connec y foreign obje main board c nk won t com l the screws rews used to wing the Barc cted to the m ects in the so check if the h me off during holding the m o hold the ma code Installa main board ho ockets and if heat sink sup g transportati main board a ain board ta tion Guide a orizontally or f the flat cabl pport hooks a on and the outp ke care not t after replacing r...

Страница 31: ...lacem cover Ta nt panel R Connect used to hold ssembly ment flow ake off the tra Remove the t the flat cab Detached the front pan ay door screws holdi les and test d front panel nel assembly Disconnect a ing the front Install th assembly y 2 on the to all the flat ca panel assem e top cover p and 4 on th ables connec mbly Rep he bottom ting the main lace the fron n nt 29 ...

Страница 32: ...ables of th or they may tical Coax axial Input bo ow Remove the s rd the power b d removal an wer of the dev he power bo y get damag xial Input b oard can be screws holdin board and its nd reinstallat vice has bee ard have hoo ed board removed dir ng the power s shield cove ion en cut off befo oks Press a ectly after th r board D r to take off t ore removing nd hold the h e audio boar Disconnect t...

Страница 33: ...42 1K R178 100K 2 3 1 Q22 BC807 ZD1 16V 0 5W R205 47K Q23 BC846 R235 2K D19 RB160M NC R274 10K R275 10K C149 104 1 2 3 V2 AO4184 L1 10R 100M 2A L2 10R 100M 2A FB2 121 0603 2A FB1 121 0603 2A CE44 220uF C316 104 C18 104 2 VFB 3 VREG5 4 SS 5 GND 6 PG 7 EN 8 PGND1 9 PGND2 1 VO 14 VCC 13 VIN 12 VBST 11 SW2 10 SW1 15 E PAD U13 TPS54325PWPR L14 1 5uH 1 5A C20 22μF C23 222 C8 102 R81 330R 1 R86 1 1K 1 R3...

Страница 34: ...04 0603 C274 104 0603 C273 104 0603 R32 10R R31 10R R30 10R R29 10R R28 10R R27 10R R26 10R R25 10R R279 NO FIT R321 NO FIT R322 NO FIT R330 NO FIT R331 NO FIT R332 NO FIT R333 NO FIT R22 1K 0603 C25 104 0603 R91 33R 0603 R17 33R 0603 R92 33R 0603 R18 33R 0603 R94 33R 0603 R19 33R 0603 R95 33R 0603 R20 33R 0603 R98 33R 0603 R21 33R 0603 R99 33R 0603 R24 33R 0603 R176 33R 0603 R51 33R 0603 R271 33R...

Страница 35: ... 5 CLKIN 4 AUX_OUT 3 CLK_OUT 2 GND 1 VD 8 XTI_ CS_ M2 U8 CS200 1 NC 4 GND 5 CLK 8 VCC X1 12MHZ 1 2 U7 A 74VHC14 3 4 7 14 U7 B 74VHC14 5 6 U7 C 74VHC14 9 8 U7 D 74VHC14 13 12 U7 F 74VHC14 11 10 U7 E 74VHC14 FB5 PZ121 0603 1A C35 104 0603 C37 102 0603 R93 120R 100MHZ R97 120R 100MHZ C73 104 0603 R96 10R 0603 C36 104 0603 C38 102 0603 C26 104 0805 R39 10R 0805 R38 10R 0805 R37 10R 0805 R36 10R 0805 R...

Страница 36: ...1 GND 62 DAI_P4 SFS0 63 DAI_P5 SD1A 64 DAI_P6 SD1B 65 DAI_P7 SCLK1 66 VDDINT 67 GND 68 VDDINT 69 GND 70 DAI_P8 SFS1 71 DAI_P9 SD2A 72 VDDINT 73 VDDEXT 74 GND 75 VDDINT 76 GND 77 DAI_P10 SD2B 78 DAI_P11 SD3A 79 DAI_P12 SD3B 80 DAI_P13 SCLK23 81 DAI_P14 SFS23 82 DAI_P15 SD4A 83 VDDINT 84 GND 85 GND 86 DAI_P16 SD4B 87 DAI_P17 SD5A 88 DAI_P18 SD5B 89 DAI_P19 SCLK45 90 VDDINT 91 GND 92 GND 93 VDDEXT 94...

Страница 37: ... R183 TABLE R123 TABLE R125 TABLE R126 TABLE R100 750R 1 R101 750R 1 C120 1 5nf C121 1 5nf 3 2 1 4 8 U18 A NE5532A 5 6 7 U18 B NE5532A R102 3 6K 1 R120 3 6K 1 R103 2K 1 C124 151 R106 2 2K 1 C133 10pf C125 102 C126 102 C123 151 R104 2K 1 R105 2 2K 1 C142 10nf R119 220R 1 R159 220R 1 Q3 2SC3326 Q4 2SC3326 R158 10K 1 R157 10K 1 R116 47K 1 C135 101 R107 750R 1 R108 750R 1 C127 1 5nf C128 1 5nf 3 2 1 4...

Страница 38: ... TABLE R213 TABLE R216 TABLE R218 TABLE R219 TABLE R190 750R 1 R191 750R 1 C182 1 5nf C183 1 5nf 3 2 1 4 8 U24 A NE5532A 5 6 7 U24 B NE5532A R192 3 6K 1 R210 3 6K 1 R193 2K 1 C186 151 R196 2 2K 1 C195 10pf C187 104 C188 104 C185 151 R194 2K 1 R195 2 2K 1 C204 10nf R209 220R 1 R255 220R 1 Q11 2SC3326 Q12 2SC3326 R253 10K 1 R254 10K 1 R206 47K 1 C197 101 R197 750R 1 R198 750R 1 C189 1 5nf C190 1 5nf...

Страница 39: ...B 23 CSB WO 24 MODE 25 MUTEB 26 MD DM0 27 MC DM1 28 ML I2S U29 VM8740 R320 NOT FIT C267 473 0603 C268 104 C270 104 C269 104 C271 104 C246 104 R305 10K 1 R304 TABLE R307 TABLE R301 TABLE R302 TABLE R303 TABLE R306 TABLE R308 TABLE R309 TABLE R280 750R 1 R281 750R 1 C244 1 5nf C245 1 5nf 3 2 1 4 8 U30 A NE5532A 5 6 7 U30 B NE5532A R282 3 6K 1 R300 3 6K 1 R283 2K 1 C248 151 R286 2 2K 1 C257 10pf C249...

Страница 40: ...5 601 3216 A K LED401 LED402 R2 680R K408 LED403 R11 680R LED404 R16 680R C434 102 C435 102 1 2 3 4 5 6 7 8 9 10 11 12 13 14 15 16 17 18 CN401 18P 1 0 R6 22R R21 22R R22 220R R23 220R R24 220R C1 102 C2 102 C3 102 CE2 220uF R53 220R R52 220R C436 102 R8 1R R9 1R 1 2 3 4 5 6 7 8 9 10 T1 ER11 5 Q1 PC817 25 Q2 8050 L4 68uH R5 2 2K R10 2 2K C49 104 CE5 220uF Q3 PC817 25 R12 100K R13 220K R14 100K R15 ...

Страница 41: ...R7 2A C32 104 D4 PESD5V0V1BB D5 PESD5V0V1BB NC CE3 220UF 25V R29 2 2K R9 3 3K R31 22R NC 1 A1 2 GND 3 A2 6 Y1 5 VCC 4 Y2 U5 NC72Z17 R6 33R NC R1 22R L1 4R7 2A NC CN4 C1 475 NC C2 104 NC 5V OPTICAL_IN OPTICAL_INB 3 3V OPTICAL_IN COAXIAL_IN 3 3V OPTICAL_IN COAXIAL_IN 5V 3 3V OPTICAL_INB OPTICAL COAXIAL INPUT BOARD 39 ...

Страница 42: ... 20 23 CN1 HDMI_TYPE A C2 22μF 4 GND 5 CK 17 CE_REMOTE 6 CK 18 D2_SHIELD_CD_SENSE 7 GND 19 RESERVED 8 D0 _MHL 2 DDC_DATA 9 D0 _MHL 3 DDC_CLK_CD_PULLUP 10 GND 11 D1 15 D2 12 D1 14 D2 13 GND 16 GND 1 HP_DET_CBUS CN3 19PIN_FPC CN4 MHL5V MHL HDMI INPUT BOARD 40 ...

Страница 43: ...28 752BD Audio Input Board PB138 54638998 752BD Top Panel Black PB139 54650178 752BD Mech KEM 480AAA SONY TOHEI TB 508 N PB140 54651908 752BD Front Panel Black PB141 54651918 752BD Draw Front Black PB142 50167928 752BD Carton Box PB143 51977508 Owner Manual A for CU PB144 51977518 Owner Manual B for EU PB112 50417408 651 751BD Polyfoam L R PB113 50417418 751BD Pearl Foam Nip PB110 MTK Service tool...

Страница 44: ...ront panel BDP751 1 10 50700468 Carton handle AB001 1 11 50700488 Backing for carton handle AB001 1 12 50706038 Self styled plastic bags 230 335 PE 1 Self styled plastic bags for user manual 13 50801198 Cloth bag 530 485 BLUE CAMBRIDGE AUDIO 1 14 51977508 User manual BDP752 ENGLISH 1 For 752BD CU 752BD EU 15 51977518 User manual German Russian Dutch danish Only for 752BD EU 16 51978118 Quick Start...

Страница 45: ...52BD CU black 1 Only for 752BD CU 11 31034628 Rear cover 752BD EU black 1 Only for 752BD EU 12 38101198 Damping spring Φ11 5 12 5 Φ1 5 4 Base cover and loader support 13 38755538 loader support BDP1105 1 14 38757528 Hexagon steel bar M3 23 5 1 15 40004388 Self tapping screw PWT 3 6 7H black 10 2 for rear cover base cover 4 for base cover aluminum alloy front panel 2 for top cover rear cover 2 for ...

Страница 46: ... 37 54651908 Front panel component BDP752 black 1 38 54651918 Tray door BDP752 black 1 NO Material Code Material name Specification qua ntity Remark 1 18701198 AC socket 2 core Y style SS 7BA cable 160 switch cord 1 2 21231548 Cable 15P290 2 0 T2 BLACK 24 1 Connecting power board and decoding board 3 21231728 Cable 9P50 2 5 T2 BLACK 22 1 Connecting power board and Audio board 4 21405638 Euro power...

Отзывы: