26
3.3 Then
the fla
be dis
3.3 Use
asse
3.4 Prec
3.4.1
3.4.2
3.4.3
n disconnect
at cable direc
sconnected.
the electric
embly
cautions for
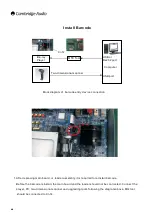
After loader
Installation G
When conn
keep the ca
A black mar
After loader
is inclined, p
and adjust t
adjust it via
the three fla
ctly. Open th
screwdriver
loader assem
replacemen
Guide.
ecting the 50
able parallel w
rk line on the
and tray doo
protruding or
he tray door
the loader b
t cables con
he cover of th
to remove th
mbly:
t, do remem
0P flat cable,
with the sock
e cable can b
or installation
r depressed,
to the cente
racket screw
necting the m
he socket an
he 4 screws
ber to input t
, please flip t
ket while plug
be taken for r
n, check if th
please use t
er position. If
ws.
main board to
d flip it up by
holding the lo
the new load
the socket co
gging it in. Av
reference. Pl
e tray door is
the Philips h
the tray doo
o the loader
y 90 degrees
oader assem
der’s barcode
over up by ab
void skew, a
ease refer to
s placed at th
ead screwdr
r is higher or
assembly. D
s, and then th
mbly
,
Takeof
e following th
bout 90 degr
nd ensure it’
o the left figu
he center. If
river to re-fix
r lower than
Do not pull off
he cable can
ff the loader
he Barcode
rees, and
s in position
ure.
the tray doo
the loader
demanded,
ff
.
r
-24-

