4
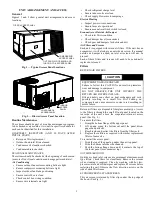
Fig. 3 — Filter Installation
To remove the filter, open the filter clips. Re-install the filter by
placing the frame in its track, then closing the filter clips.
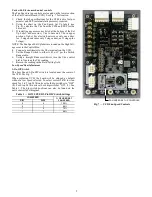
MANUAL OUTSIDE AIR HOOD SCREEN
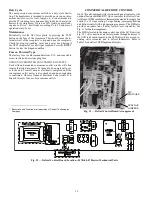
This inlet screen is secured by a retainer angle across the top
edge of the hood. (See Fig. 4.)
Fig. 4 — Screens Installed on Outdoor-Air Hood
To remove the screen, loosen the screws in the top retainer and
slip the retainer up until the filter can be removed. Re-install by
placing the frame in its track, rotating the retainer back down,
and tightening all screws.
SUPPLY FAN (BLOWER) SECTION
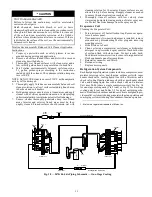
Supply Fan (Direct-Drive)
All 547K units have the Axion™ Fan Technology direct drive
vane axial fan system. The fan is driven by an ECM motor with
speed that is user set through the Unit Control Board (UCB).
Speeds are fully configurable from 40% to 100% of motor’s
maximum speed. See Fig. 5 and 6.
Fig. 5 — Direct-Drive Supply Fan Assembly
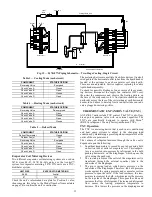
Fig. 6 — ECM Motor Plug Connectors
EVALUATING MOTOR SPEED
The direct drive ECM blower motor uses a constant speed de
-
sign. Motor speed is controlled by a 0-10Vdc signal, where
10Vdc is equal to motor’s maximum RPM.
SELECTING FAN SPEED
All units come factory set for 9.0Vdc or approximately 90% of
the motor’s maximum speed. Fan speed should be set per job
specification CFM (cubic feet per minute) and ESP (external
static pressure) required and per Fan speed set up label includ
-
ed on the unit’s high voltage cover. In some cases, the Fan
Speed Set Up label may already include the field setting if unit
was previously installed. Check the box on the lower half of
the label to see if the field voltage setting was filled in and if
so, set fan speed to that voltage. Otherwise see detailed instruc
-
tions below.
NOTE: Fan Speed Set-Up is for full load airflow. If the unit
has multiple stages of cooling, low cool and ventilation may
operate at lower fan rpms. This offset is factory set and con
-
trolled by the UCB. If fan speed verification is being done with
a strobe, fan speed should be verified in all unit operation
modes.
WARNING
ELECTRICAL OPERATION HAZARD
Failure to follow this warning could result in personal
injury or death.
Before performing service or maintenance operations on
unit, LOCKOUT/TAGOUT the main power switch to unit.
Electrical shock and rotating equipment could cause severe
injury.
17 1/4”
DIVIDER
BAROMETRIC
RELIEF
CLEANABLE
ALUMINUM
FILTER
FILTER
HOOD
FILTER
CLIP
OUT
S
IDE
AIR
SCREWS
MOTOR
PLUG
FAN
ROTOR
ECM
MOTOR
3
2
1
6
5
4
9
8
7
BLUE
YELLOW
BLACK
GRN/YEL
ORANGE
GRAY
Power L3 (3 phase only)
Power L2
Power L1
Earth Ground
WHITE
CTL Signal Common
10vdc Source
0–10vdc Signal
Содержание 547K
Страница 94: ...94 APPENDIX D WIRING DIAGRAMS Fig I 547K 04 06 Power Wiring Diagram 208 230 1 60 ...
Страница 95: ...95 APPENDIX D WIRING DIAGRAMS Fig J 547K 04 07 Power Wiring Diagram 208 230 3 60 ...
Страница 96: ...96 APPENDIX D WIRING DIAGRAMS Fig K 5047K 04 07 Power Wiring Diagram 460 575 3 60 ...


