43
Re-recording only the portion that is mistaken (Punch In/Out)
Section 1
Performing manual punch in and
punch out using a foot switch
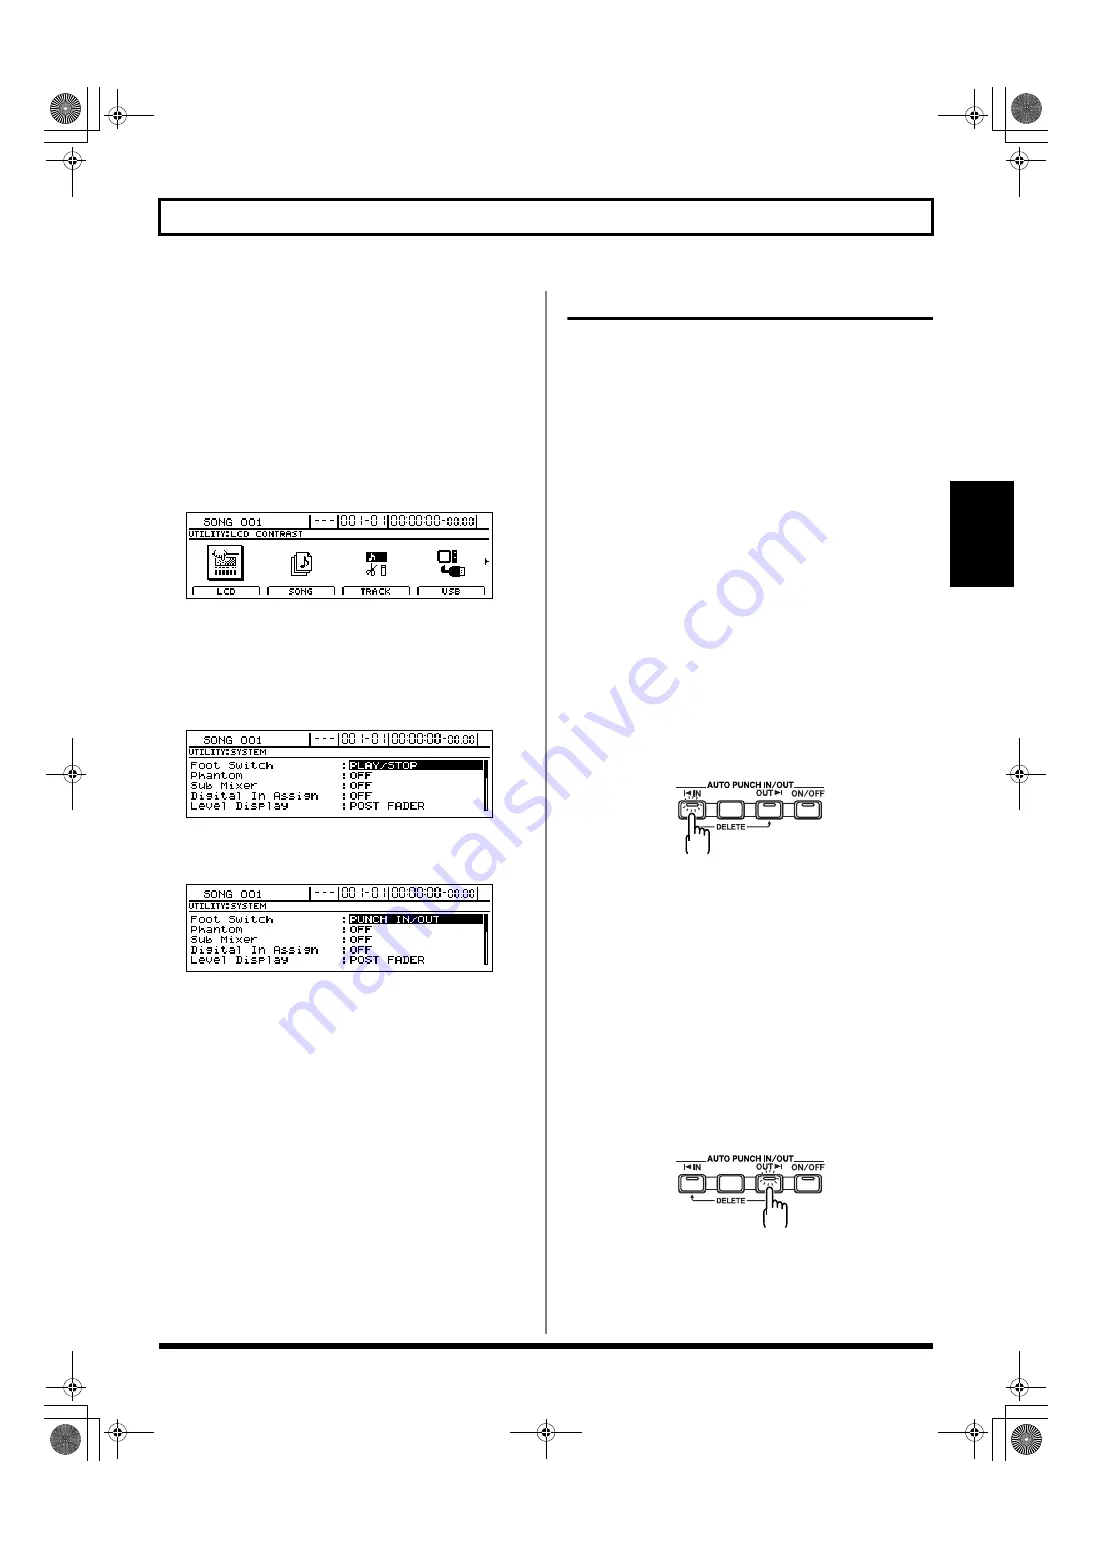
If you intend to use a foot switch (such as the optional
Roland DP-2 or BOSS FS-5U) to activate punch in and punch
out, it should be connected to the BR-1600CD at this time.
Use the following procedure to set the appropriate action for
the foot switch jack.
1.
Press [UTILITY].
The Utility Menu screen will appear.
fig.12-12d
2.
Move the cursor to the SYSTEM icon and press
[ENTER/YES].
Alternatively, you can press [F1] (SYSTEM) if the
SYSTEM icon is currently displayed.
The System screen will appear.
fig.10-03d
3.
Move the cursor to “Foot Switch” and select PUNCH
IN/OUT using the TIME/VALUE dial.
fig.10-04d
4.
Press [EXIT/NO] several times to return to the top
screen.
5.
Start the recorder.
6.
Operate the foot switch.
Each time the foot switch is depressed, the BR-1600CD
either punches in or punches out.
Auto punch in and punch out
The BR-1600CD supports a function known as Auto Punch In/
Out, which will automatically activate punch in and punch out
at specified locations within a song. This function is extremely
useful in situations where punch in and punch out must be
activated at exactly the right time, and where you need to
concentrate on your performance, not the pressing of buttons.
Specifying the section to be re-
recorded
In order to activate punch in and punch out automatically,
you will first of all need to set up the punch in and punch out
positions as described below.
●
Registering the punch in position
1.
Move the current position to the point at which you
want the BR-1600CD to activate punch in and press
AUTO PUNCH IN/OUT [IN].
The current position will now be registered as the
position for punch in, and [IN] will light up to indicate
that a punch in position has been registered.
fig.10-05
* Once a punch in position has been registered, you can jump to
this position at any time by pressing [IN].
* If you want to cancel this position and/or register a new point
for punch in, hold down [DELETE] and press [IN]. The punch
in position will be cleared and [IN] will turn off.
●
Registering the punch out position
2.
Move the current position to the point at which you
want the BR-1600CD to activate punch out and press
AUTO PUNCH IN/OUT [OUT].
The current position will now be registered as the
position for punch out, and [OUT] will light up to
indicate that a punch out position has been registered.
fig.10-06
* Once a punch out position has been registered, you can jump
to this position at any time by pressing [OUT].
BR-1600_R_e.book 43 ページ 2007年12月6日 木曜日 午前9時52分
Содержание Digital Recording Studio BR-1600 CD
Страница 41: ...41 Section 1 Advanced Use Section 1 Advanced Use BR 1600_R_e book 41...
Страница 73: ...73 Section 2 Using Effects Section 2 Using Effects BR 1600_R_e book 73...
Страница 145: ...145 Section 3 Using Rhythm Section 3 Using Rhythm BR 1600_R_e book 145...
Страница 203: ...203 Section 4 Using the CD R RW Drive Section 4 Using the CD R RW Drive BR 1600_R_e book 203...
Страница 220: ...220 MEMO BR 1600_R_e book 220...
Страница 221: ...221 Section 5 Using MIDI Section 5 Using MIDI BR 1600_R_e book 221...
Страница 239: ...239 Section 6 Using USB Section 6 Using USB BR 1600_R_e book 239...
Страница 255: ...255 Section 7 Other Convenient Functions Section 7 Other Convenient Functions BR 1600_R_e book 255...
Страница 272: ...272 MEMO BR 1600_R_e book 272...
Страница 273: ...273 Appendices Appendices BR 1600_R_e book 273...
Страница 309: ...309 MEMO BR 1600_R_e book 309...
Страница 310: ...For EU Countries BR 1600_R_e book 310...


