14
Obtain Signal
Video Signal
The camera can simultaneously have SDI video output and HDMI video output and IP video output.
HDMI HD Video signal
1.
Connect the camera to a HD monitor/TV using HDMI cable.
2.
Turn on the camera, video will display on the monitor after running initializing.
3.
Information of the camera initial setting status will display for 5 seconds.
4.
You can set the video format of the camera to the one you want to display.
SDI Video Signal
The camera can simultaneously stream SDI video output with HDMI video output.
1.
Connect SDI cable in between the camera your SDI Device/display.
2.
You now have SDI video output.
3.
SDI video only supports 1080P.
IP Video Signal
The camera can simultaneously stream IP video output and SDI video output and HDMI video output.
1.
Connect the camera to the network using Cat5/Cat6 network cable.
2.
You need to have a web browser or VMS client software ready for IP video streaming.
3.
PELCO address and Baud Rate setting on the camera must be as same as the setting on camera IP WEB
interface.
4.
To obtain IP video and configure IP video, please refer to Network Camera User Manual Part Two.
CVBS Video Signal
1.
Connect CVBS cable in between the camera and your CVBS Device/display.
2.
You now have CVBS video output.
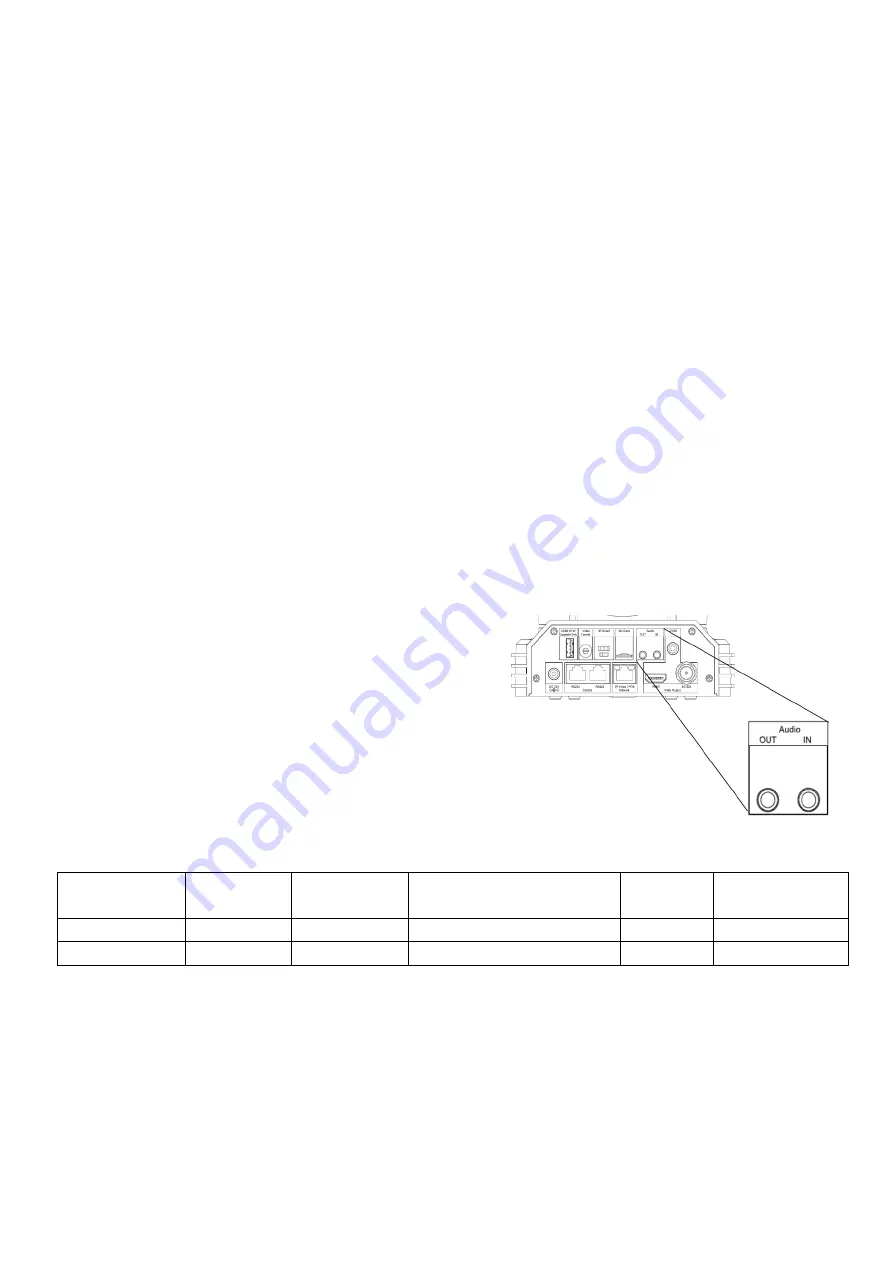
Audio IN / OUT
•
On real panel, a microphone or audio source can be
connected to the
Audio IN
port, which feeds audio into
the camera
•
A speaker can be connected to the
Audio OUT
port,
which will output any audio that is captured on the
Audio
In
port
•
See Manual part 2 for more information about Audio
capture
Table: Audio input & output relationship
Audio Input
SDI Audio
Embedded
HDMI Audio
Embedded
HDBaseT Audio Output
IP Audio
Output
*Audio
Line- out
Mic Built-in
NO
NO
NO
NO
YES, IP Audio
Audio Line-In
YES
NO
YES, Audio Line-out
YES
YES, IP Audio
SD Card (Not Activate, for future supported by software upgrade)
Micro SD card can be inserted to the camera for local recording.
•
Ensure that the Micro SD card’s pins are faced downward (logo faced up)
•
Slide the card into the slot, and click into place
•
To remove the card, click inward, and it will pop outward and may be removed
•
See Manual part 2 for more information regarding SD recording
Содержание VCC-7 Series
Страница 9: ...9 Camera Diagrams...
Страница 36: ...36 GPI connection with VISCA OVER IP control connection...
Страница 55: ...55...
Страница 56: ...56 Dimensions Unit mm...
Страница 57: ...57 www bolintechnology com 2082 TECHNOLOGY LLC dba BOLIN TECHNOLOGY...


