


In “Alarm in Handling” sub menu, press “Confirm” button and return “Alarms” menu. In
“Alarms” menu, press “Confirm” button to save the parameters.
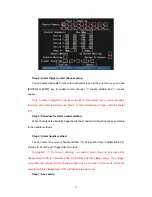
Step 8: PTZ Linkage
Move “Active Frame” to “PTZ Linkage” button, press
[
ENTER
]
key to enter into “PTZ
Linkage” setup menu:
First select one camera, then select one of following PTZ linkage:
z
Preset: Set the flag as “
9
” to enable preset, in the preset number edit box and
input one preset number that has been setup already. Please refer to chapter
5.14 for preset setup.
z
Sequence: Set the flag as “
9
” to enable sequence and input one sequence
number that has been setup already. Please refer to chapter 5.14 for sequence
setup.
z
Cruise: Set the flag as “
9
” to enable cruise. Please refer to chapter 5.14 for
cruise setup.
Press “Confirm” button to save and return “Alarms” menu. Press “Cancel” button or
[
ESC
]
key to abort and return “Alarms” menu.
Note: Please make sure that the PTZ you are using can support preset, sequence
and cruise functions. Also make sure that you setup them in PTZ menu. One external
alarm input can trigger many cameras PTZ linkage.
88
Содержание SVR-80xx-S series
Страница 11: ...1 3 Typical Application 11 ...
Страница 15: ...6 Check all connections and mount back the metal cover of the DVR 7 Switch on the DVR 15 ...
Страница 26: ...How to exit menu Press PREV or ESC key to exit menu and return to preview mode 26 ...
Страница 53: ...In this case press ENTER to return password edit box and input new password again 53 ...
Страница 59: ...59 ...
Страница 60: ...5 4 Day and Time Setup 5 4 1 Day and Time Setting In Display menu you can setup DVR system date and time 60 ...
Страница 69: ...69 ...
Страница 108: ...Step 6 You can preview the image of 192 1 0 2 by using client end software 108 ...
Страница 124: ...In the formula a means alarm occurrence rate 124 ...
Страница 126: ...The corresponding relationship of cross cable 126 ...
Страница 136: ...Suggestions 136 ...