CS6140, CS6140B Series Turning machine Instructions
9-1
9 Lifting, installation and test operation
9.1 Hoisting
When hoisting a crated machine, tie and pass wire ropes per symbols painted on crate. Handle the machine
carefully to avoid any bumps or shocks. Keep it up-right and not tilting. Avoid placing the machine over sharp
objects.
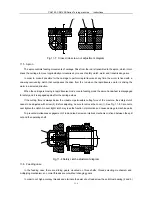
When hoisting a machine after unpacking, tie and pass wire ropes according to the diagram below (Fig.9-1).
Move the carriage back and forth for balance. Place soft substances between the ropes and machine to prevent
damage to machine.
9.2 Unpacking
After unpacking, check the machine for good appearance immediately. Check the accessories and tool for
correct quantities per PACKING LIST.
9.3 Installation
Though the machine was inspected and tested prior to shipment from the factory it must be installed correctly
in order to maintain the accuracy and service life of the machine.
The machine is located by means of several groups of iron wedges on a concrete foundation that is prepared in
advance. See Fig. 9-1 foundation plan. Level the machine using precision levels to within the accuracy of 0.06/1000
in lengthwise direction and 0.03/1000 in width-wise direction by adjusting the jack bolts. After primary adjustments
are finished, pour mortar into holes for anchor bolts. Minute adjustments are to be done only after the mortar is
hardened completely. When the machine is leveled to the required accuracy give every bolt nut an even screw, pour
mortar to iron wedges and on the machine base leaving a smooth face of foundation.
9.4 Cleaning
The anti-rust agent applied on machine must be thoroughly removed with kerosene. Inside of headstock should
be cleaned with warm kerosene. All strings of wool must be cleaned also. After completion of cleaning, fill sufficient
oil to machine according to the lubrication chart.
9.5 Test operation
Before test operation carefully read the OPERATOR’
S MANUAL to lean the function and use of every control
and be sure the machine is properly lubricated.
Operate every operating part by hand for good condition.
Before turning on the electric power of machine, make sure the electrical unit is in good condition and the motor
doesn’
t suffer from damp. After turning on the electric power, check that the motor is rotating clockwise. Otherwise
wiring of phase lines must be rectified.
Dry run is performed only after all the above procedures are completed. Operate the machine first at the
minimum speed for a period of time and gradually increase the speed. Carefully observe working condition of the
lubrication unit, operation unit, electrical unit, cooling unit and other functioning unit during dry run.
Do not start to work unless the machine is operatable, properly lubricated and braked freely with a normal
functioning of controls.
Содержание CS6140 Series
Страница 16: ...CS6140 CS6140B Series Turning machine Instructions 4 3 Fig 4 2 Bearing location diagram ...
Страница 31: ...CS6140 CS6140B Series Turning machine Instructions 6 2 Fig 6 1a Location of electrical parts ...
Страница 32: ...CS6140 CS6140B Series Turning machine Instructions 6 3 Fig 6 1b Location of electrical parts of CS6266B ...
Страница 33: ...CS6140 CS6140B Series Turning machine Instructions 6 4 Fig 6 2a Electric schematic diagram 1 ...
Страница 34: ...CS6140 CS6140B Series Turning machine Instructions 6 5 Fig 6 2a Electric schematic diagram 2 ...
Страница 35: ...CS6140 CS6140B Series Turning machine Instructions 6 6 Fig 6 2b Electric schematic diagram of CS6266B 1 ...
Страница 36: ...CS6140 CS6140B Series Turning machine Instructions 6 7 Fig 6 2b Electric schematic diagram of CS6266B 2 ...
Страница 48: ...CS6140 CS6140B Series Turning machine Instructions 10 2 ...
Страница 60: ...CS6140 CS6140B Series Turning machine Instructions 11 12 Fig 11 12b Structure of spindle nose ISO702 Ⅱ No 8 ...


