background image

49

DuraSweeper

®

Bluff DuraSweeper

®

 Snow Removal System Warranty 

Bluff Manufacturing warranties our products to be free from defects in material and workmanship for 

a period of one year from shipping date to original purchaser. Warranty eligibility requires all products 

are used and serviced in accordance with the company’s recommendations, product selection guides, 

product manuals and installation instructions.  

Steel Structure: limited 10 year warranty
Brush motor: limited one year warranty
Brush: limited 6-month warranty
Electrical Panel: limited one-year warranty
Hoist Motor: limited one-year warranty

Bluff Manufacturing’s obligation under this warranty shall be limited to the repair, by Bluff Manufacturing 

or a Bluff Manufacturing authorized technician, or exchange of any part of parts which may prove 

defective under normal service within the time limitations set forth above, and which our examination 

shall disclose to our satisfaction to be defective. Bluff Manufacturing requires the purchaser to send 

date stamped photographs for initial review of warranty claim products. 
This limited warranty does not cover any defects, malfunction or failure caused by or resulting from 

improper or unauthorized service, maintenance, installation repair or use not in conformance or 

accordance with Bluff Manufacturing’s recommendations, product selection guides, product manuals 

or installation instructions and the intended use and capacities or specifications or from abuse, neglect, 

accident, weather related issues or any other cause beyond the control of Bluff Manufacturing. This 

limited warranty is made only to the original purchaser, which shall be deemed to mean that person or 

organization to which the product is originally shipped or installed. 
Bluff Manufacturing does not approve nor authorize any other person or entity to obligate Bluff 

Manufacturing to any other liability not described herein concerning the sale of its products. 
Bluff Manufacturing shall not be liable for any incidental or consequential damages. And liability 

hereunder is expressly limited to repair or replacement of any part or parts which may prove defective 

within the time prescribed hereon. 
This warranty is expressly in lieu of all other warranties, expressed or implied, including the warranties 

of merchantability and fitness for a particular purpose and all other obligations or liabilities on our part. 

Содержание DuraSweeper DS-15-A-PERM

Страница 1: ...South Freeway Fort Worth TX 76140 www bluffmanufacturing com 20150422 This manual has been most recently updated DuraSweeper Snow Removal System DS 15 A PORT DS 15 A PERM DS 20 A PORT DS 20 A PERM OWNER S MANUAL AND INSTALLATION GUIDE FOR ...

Страница 2: ...cations 6 Product Specifications 7 Ejected Material and Clear Lane 8 Tools and Equipment 9 Site Location Requirements Portable Model 9 Site Location Requirements Permanent Model 10 Pad Suggestion for Permanent Installation 11 Suggested Concrete Pad Specification Permanent Model Standard Layout 12 Suggested Concrete Pad Specification Permanent Model Non Standard Layout 13 Recommended Safety Barrier...

Страница 3: ...Proximity Switch 35 Automation Test 35 Standard Operation 37 Warnings 37 Shut Down and Start Up Procedures 38 Routine Maintenance 39 Long Term Storage 40 Removing from Storage 40 Changing The Brush Wafers 41 Brush Drive 42 Pulley 43 Hoist Drive 44 Brush Idler 45 Carriage Wheel 46 Electric Cable Carrier 47 Trouble Shooting 48 Bluff DuraSweeper Snow Removal System Warranty 49 ...

Страница 4: ...nual and the manual s content No part of this manual may be reproduced or used in any way without the written permission of Bluff Manufacturing except as necessary to operate equipment of DuraSweeper by Bluff Manufacturing Cautions for Receiving this Product Please make sure that you receive the entire number of pieces called for on the bill of lading BOL and that they are in good condition before...

Страница 5: ...ed replacement safety labels are available from Bluff Manufacturing at 1 800 433 2212 see also Safety Label Installation in Maintenance Section Indicates a hazardous situation which if not avoided will result in death or serious injury Indicates a hazardous situation which if not avoided could result in death or serious injury Indicates a hazardous situation which if not avoided could result in mi...

Страница 6: ... the DuraSweeper by Bluff without written consent of Bluff Manufacturing Any modification can affect the safe operation of the unit and may cause personal injury or death Modifications will also nullify the warranty Exposure Hazard Always wear personal protective equipment including appropriate clothing gloves work shoes and eye protection Never operate the DuraSweeper by Bluff while wearing a hea...

Страница 7: ...ye protection while operating the unit or cleaning the DuraSweeper with compressed air or high pressure water Dust flying debris compressed air pressurized water or steam may injure your eyes CAUTION The safety messages that follow have CAUTION level hazards Poor Lighting Hazard Ensure that the work area is adequately illuminated Safety Label Locations Safety Precautions If your unit has been refi...

Страница 8: ...RIESGO DE SER ESTRUJADO Mantengase alejado de las columnas Si no se cumple con esta disposición podria causar muerte o lesions graves 2 RIESGO DE SER ESTRUJADO Mantenerse alejado de esta zona Si no se cumple con esta disposición se causará la muerte o lesiones graves 3 ATTENTION Lire manuel du propriétaire avant utilisation AVERTISSEMENT 1 DANGER DE PINCEMENT Ne pas s approcher des colonnes Le non...

Страница 9: ...cations a transformer is required Rate of Snow Removal Needs to be defined by conditions such as snow density truck width drive HP rating truck speed etc Temperature Rating 13 F for operation by activation bar 40 F for operation by manual control The DuraSweeper is purchased by selecting 4 components The portable package requires concrete Ecoblocks to stabilize the unit Below is a brief descriptio...

Страница 10: ...50 Actual color of drive may vary from that shown herein Power required 460 VAC 3 Phase 60 HZ Height N A Width N A Length N A DS E20 DuraSweeper Electrical Panel 15 20 HP Package 300 Automated control activation bar Manual controls on panel for maintenance Both extension bars provided However as an option only one needs to be installed Height dimension is at the tallest position Height 7 5 Width 2...

Страница 11: ...der to keep the drive lane clear The clear lane is defined as a straight and centered lane that the vehicle may approach engage and leave the equipment on a straight and centered path The material of the clear lane is not critical to the installation and operation of the equipment We recommend 74 clear lane both before and after the placement of the DuraSweeper to allow for a standard tractor trai...

Страница 12: ...nual before proceeding The first step in the pre planning process is to determine the best orientation of the unit for your site The orientation of the unit determines the material ejection direction Unit orientations are defined in the figures below The standard orientation ejects material away from the operator The non standard orientation while not ideal can be used For portable units Bluff rec...

Страница 13: ...rical panel NOTICE On a permanent model orientation cannot be changed without a full reinstall Please contact your Bluff Manufacturing dealer or Bluff directly concerning switching unit orientation Vehicle Travel Vehicle Travel Standard Configuration Non Standard Configuration 185 in 412 in this drawing is for Site Location Requirements Permanent Model 173 in base to base 173 in base to base model...

Страница 14: ...lified personnel under the direction of properly trained and qualified supervision Failure to do so could result in pad failure that could cause serious injury death and catastrophic damage to the equipment The pads for each permanently installed column are expected to be level and on plane to each other Some variations may be overcome with shims under the column bases Concrete should meet all rec...

Страница 15: ...rints are shown in the Standard Concrete Layout and Non Standard Concrete Layout Edge of bollard base plate should be recessed from all pad edges by at least 6 Note Concrete piers can be used in place of concrete pads Contact Bluff for additional information Vehicle Travel PERMANENT MODEL Standard Concrete Layout 25 ft 7 ft 24 ft 3 ft 11 ft 13 ft 12 ft Bluff Bollard SRB42 Bluff Bollard SRB42 Bluff...

Страница 16: ...rints are shown in the Standard Concrete Layout and Non Standard Concrete Layout Edge of bollard base plate should be recessed from all pad edges by at least 6 Note Concrete piers can be used in place of concrete pads Contact Bluff for additional information Vehicle Travel PERMANENT MODEL Non Standard Layout 25 ft 7 ft 3 ft 24 ft 15 ft 14 ft Bluff Bollard SRB42 Bluff Bollard SRB42 Bluff Bollard SR...

Страница 17: ...increase the working life of the equipment Vehicle Travel this drawing is for Recommended Safety Barrier Equipment model for this drawing DS PermanentStandard Bluff Bollard SRB42 Bluff Bollard SRB42 Bluff Bollard SRB42 Electric Panel Bluff Bollard SRB42 Bluff Bollard SRB42 Bluff Bollard SRB42 Power Provisions Power must be supplied to the unit at the rated voltage and phase required by the model p...

Страница 18: ...ipn drawing C Users stevebales Desktop DuraSweeperManual Inventor Model 5 DS MainExplodedView 10HP idw PDF C Users stevebales Desktop DuraSweeperManual Inventor Model 5 DS MainExplodedView 10HP pdf DS180 003 Horizontal Beam Hoist Assembly Ecology Block not included Energy Chain DS180 022 Jack Assy 4 reqd DS180 027 001 Jack Caster Shoe 2 reqd Ecology Block not included DS180 013 Ecology Block Platf...

Страница 19: ...a so that there is plenty of room to maneuver the trucks through the unit and plenty of space for the ejected snow Prevailing wind direction during snow season should be considered to maximize the distance and direction the snow will be ejected Carefully read and understand all sections of this manual before attempting the installation The pages listed below are also in the Pre Installation Guide ...

Страница 20: ... lifting capacity Two lifting slings are recommended when lifting the main structure Slings need to have a minimum capacity of 2000 lbs each when used in a choker configuration Heavy duty saw horses or equivalent to support the structure during the initial structure assembly A spud wrench is strongly recommended to align bolt holes etc Assorted wrenches ratchets etc ...

Страница 21: ...luff recommends the individual assemblies be removed from the shipping bundle in a specific order See photo for details Note the brush assembly can be lifted safely by the lift loops provided 2 Position the Horizontal Beam Hoist Assembly with the hoist motor positioned as shown Securely support the assembly so as not to damage any component It will need to be clamped in this position to keep it fr...

Страница 22: ...19 DuraSweeper 3 Bolt the Horizontal Beam Hoist Assembly to the two columns Note that the columns are identical and can be bolted to either side ...

Страница 23: ...t Lift from above with slings to avoid damage to the hoist motor or hoist spool The unit can be lifted from either side The hoist motor at the top of the horizontal bar sticks out the exit side of the clear lane Be sure to orient the main structure correctly ...

Страница 24: ... end The ends with the two mount pads are to support the Ecology Blocks Make sure the Base Beam Assemblies are arranged so the ends with the two mounting pads for the Ecology Blocks are on the entry side of the unit This should be done for both the portable and the permanent units The other end of the Base Beam Assembly has a single mount pad for the Electric Panel Assembly ...

Страница 25: ...ift Be aware when the full assembly is lifted and set down on the concrete in this manner the legs may come to rest closer to each other than designed If this happens a slight nudging may be necessary to allow the structure to return to a relaxed position If not adjusted this condition could cause difficulty when placing the Brush Carriage Assembly into position Once the unit has been set into pos...

Страница 26: ...rientation of the Hoist motor and the Brush motor They need to be positioned as shown Be aware that the legs may be too close together if the completed unit was moved as described in step 7 If this is the case a slight nudging may be necessary to allow the unit to relax into position The large snow deflector faces the entry side of the unit EXIT ...

Страница 27: ...t position Portable Models a Bolt each of the four Jacks to the Jack Brackets b Bolt a Jack Assembly to each end of both bases Also bolt a Jack Caster Shoe to one end of both Base Assemblies The purpose of the Jack Caster Shoe is to prevent the caster from swiveling when the unit is moved around the lot Decide which end you will be using to pull the unit when moving it around the yard and bolt the...

Страница 28: ...e Ecology Blocks onto the Platforms The Jacks are not designed to hold the weight of the Ecology Blocks The DuraSweeper cannot be moved after placement of the Ecology Blocks Remove Ecology Blocks before attempting to raise and move the DuraSweeper e After retracting the Jacks place on Ecology Block onto the Platforms on each side ...

Страница 29: ...Beam Assembly These shims are provided to fill the gap that may exist when the concrete is not level Install as many shims as will fit up to two thicknesses per side Be sure to add shims on the inside and outside of the base thereby supporting the entire Column Base Plate c Install anchor bolts through the holes in the Column Base Pad and the holes in the shims as shown ...

Страница 30: ...ctrical Panel Assembly onto the Base Beam Assembly 13 Bolt on the Activation Bar as shown and adjust the height with the four bolts and slots shown 14 Bolt the Electric Cable Carrier Bracket onto the Carriage Guide Bracket as shown ...

Страница 31: ... electrical installation should be performed by a licensed electrician 16 Connect electric power to the main Electrical Panel Run wiring form the electrical panel to the hoist and brush motors Motor testing process will come later See Initial Testing section 17 Jog the Hoist motor with the manual controls at the Electric Panel until the hole through the spool is horizontal It doesn t matter which ...

Страница 32: ...w a Attach one end of the main Lift Cable to the welded brackets of the Brush Carriage Assembly Attach it on the side next to the Brush Motor by threading the end of the Cable around the welded Cable Attachment Bracket and secure it with two Cable clamps as shown ...

Страница 33: ...ded bracket on the Brush Carriage Assembly so it goes through the welded bracket barely enough to install a washer and nut This will allow as much take up as possible Tighten this assembly to the welded bracket to hold it in place using the two jam nuts as shown Make sure the eyelet is firmly locked onto the threaded end of the Cable Take up Mechanism with the jam nut as shown ...

Страница 34: ...ly to seize to the adjustment nut when applying tension to the cable Do not depend on any other type of lubricant Anti seize grease is required other types of lubricant will not function properly g Loosen the jam nut of the Cable Take up Mechanism and tighten the adjustment nut to remove all the slack and tighten the cable h Continue tightening the cable until the Brush Carriage Assembly begins to...

Страница 35: ...of Proximity Switches The proximity switches are a necessary component of the automation circuitry of the DuraSweeper The purpose of the proximity switches is to limit the travel of the carriage Note that when the carriage is raised or lowered manually using the buttons on the Electric Panel the lower proximity switch doesn t function The proximity switch function is explained in detail in the ini...

Страница 36: ... Back Plate to the Electric Panel Assembly with tek screws as shown If you have any issues while assembling this unit please call 1 800 433 2212 for assistance Monday Thursday 7 30 a m to 5 30 p m Friday 7 30 a m to 5 00 p m Central Time ...

Страница 37: ...r power 4 Turn the key switch to MANUAL 5 Push the START button and observe the brush direction The brush should sweep the snow towards the back of the truck i e the bottom of the brush should move toward the deflector blade If it doesn t reverse the wiring to the brush motor If the Brush is rotating in the correct direction move on to the Proximity Switch Test Proximity Switch Tests Make sure to ...

Страница 38: ...push the UP or DOWN button to position the Brush Carriage Assembly approximately midway between the Upper and Lower Proximity Switches 3 Lower the Brush Carriage Assembly by pushing the DOWN Button until it approaches the Lower Proximity Switch Release the button when the Carriage gets within 1 1 2 of the switch Check to make sure the indicator light on the back of the Proximity Switch lights up w...

Страница 39: ...pool If this happens see the troubleshooting section Once the Carriage gets to the top limit it will stop The Brush will continue turning for 5 minutes and then turn off Second Test 1 Do the First test again but this time push the activation bar during the last 5 minute time period while the brush is rotating This test makes sure the unit will function in continuous operation The Brush Carriage As...

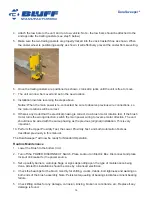
Страница 40: ...the desired horizontal surface 3 Once positioned correctly the driver will push the Activation Bar which will start the brush rotating and initiate the lowering of the Brush Carriage Assembly 4 After the Brush contacts the truck the driver should pull forward very slowly The Brush will automatically maintain proper contact with the truck The brush will rise if the driver moves forward to quickly o...

Страница 41: ... E STOP Button and turn the main POWER DISCONNECT Switch to OFF It s a good idea to disconnect the main power at the facility 3 Grease the hoist and brush bearings to prevent corrosion during the shutdown period Seasonal Start Up 1 Grease the Bearings 2 Check the brush for wear 3 Check the cables for wear Replace if worn 4 Check Brush Carriage Wheel Casters for wear Replace if necessary 5 Check th...

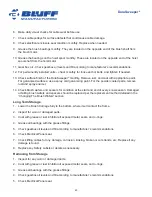
Страница 42: ...irection switch the main power wiring to reverse motor direction The unit should now be wired with the same phasing as the previous original installation This is very important 10 Perform the Upper Proximity Test the Lower Proximity Test and both Automation Tests as described previously in this manual The DuraSweeper will now be ready for Standard Operation Routine Maintenance 1 Lower the Brush to...

Страница 43: ...namel 14 Check Brush wafers and spacers for condition at the start and end of every snow season Damaged or failing brush wafers and spacers should be replaced per the replacement method detailed in the Changing The Brush Wafers section Long Term Storage 1 Lower the Brush Carriage fully to the bottom where it will contact the frame 2 Inspect for worn or damaged parts 3 Coat with grease or rust inhi...

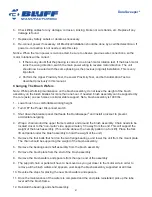
Страница 44: ...assembly is 1480 lbs 1 Lower brush to a comfortable working height 2 Turn OFF the Power Disconnect switch 3 Shut down the breaker panel that feeds the DuraSweeper and install a lockout to prevent accidental energizing 4 Wrap a chain around the upper frame member and around the brush assembly Chain needs to be located closer to the non motor side approximately 1 3 away from the end This will suppor...

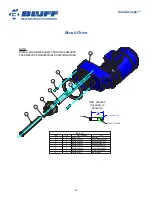
Страница 45: ...rive Package Key DS180 019 003 1 3 Drive Package Key DS180 019 005 1 4 Drive Shaft Spacer DS180 020 002 1 5 Motor Mount Spacer DS180 020 004 1 6 Weld Drive Shaft DS180 020 005 1 7 Bolt Stackup DS180 BS 12 4 8 2 500 21 2 HHCS 1 2 13 UNC 2A HEX NUT NYLOCK NOTE INSTALL AND REMOVE SHAFT FROM DRIVE GEARBOX PER RESPECTIVE MANUFACTURER S SPECIFICATIONS 1 6 8 5 4 7 3 2 ...

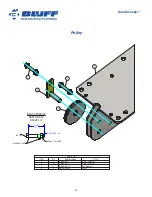
Страница 46: ...0 BS 19 SCALE 1 2 PARTS LIST TITLE PART NUMBER QTY ITEM Weld Column DS180 001 1 1 Weld Pully Pin DS180 035 1 2 Bolt Stackup DS180 BS 19 2 3 Pulley PULLEY38500 1 4 3 000 3 1 2 13 UNC 2A HHCS HEX NUT NYLOCK WASHER FLAT 1 4 2 3 3 Pulley ...

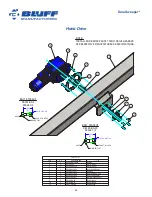
Страница 47: ...9 11 1 4 NOTE INSTALL AND REMOVE SHAFT FROM DRIVE GEARBOX PER RESPECTIVE MANUFACTURER S SPECIFICATIONS BOLT STACKUP DS180 BS 18 SCALE 1 2 BOLT STACKUP DS180 BS 4 SCALE 1 2 PARTS LIST TITLE PART NUMBER QTY ITEM Bearing BRINGMNT4B200 1 1 Weld Beam DS180 002 1 2 Weld Spool DS180 003 001 1 3 Hoist Shaft Spacer DS180 003 002 1 4 Gearbox DS180 003 003 1 5 Hoist Package Key DS180 003 004 1 6 Hoist Shaft ...

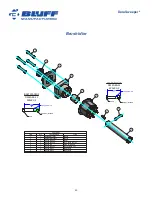
Страница 48: ...ng BRINGTMNT4B200 1 2 Spacer DS180 004 002 1 3 Assy Brush Knuckle DS180 005 142 1 4 Weld Idler Shaft DS180 018 1 5 Drive Package Key DS180 019 003 1 6 Bolt Stackup DS180 BS 11 4 7 Bolt Stackup DS180 BS 22 1 8 Shaft Collar SHAFTCOL200 1 9 3 500 31 2 9 16 12 UNC 1A 1 2 13 UNC 2A 3 000 3 HEX NUT NYLOCK HHCS HEX NUT NYLOCK HHCS 7 9 1 2 3 4 6 8 5 Brush Idler ...

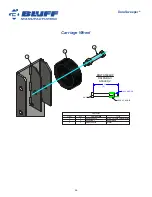
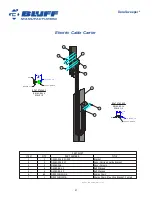
Страница 49: ...ACKUP DS180 BS 3 SCALE 1 2 PARTS LIST TITLE PART NUMBER QTY ITEM Weld Carriage Guide Bracket DS180 004 006 1 1 Bolt Stackup DS180 BS 3 2 2 Wheel WHEEL600200 2 3 5 000 5 3 4 10 UNC 1A HHCS HEX NUT NYLOCK 1 3 2 Carriage Wheel ...

Страница 50: ...H TEXAS 76140 REV SO ESTIMATED WEIGHT QTY 4349 3 lbmass DATE CA 1 16 2015 FINISH PREPARATION FINISH APPLICATION FINISH COLOR DATE CUSTOMER CHECKED SHIP DATE 1 000 1 1 4 20 UNC 2A FHCS HEX NUT NYLOCK 1 500 11 2 1 2 13 UNC 2A HHCS HEX NUT NYLOCK WASHER FLAT BOLT STACKUP DS180 BS 14 SCALE 1 2 BOLT STACKUP BS180 BS 14 SCALE 1 2 PARTS LIST TITLE PART NUMBER QTY ITEM Bracket DS180 004 001 025 1 1 Assy C...

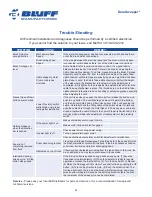
Страница 51: ...e down button release the button and push the up button The unit should go down until it gets to the bottom and then it should start rising After it rises about a foot quit pushing the button Carefully check the lifting cable at the points where it enters and exits the cable hole through the Hoist Spool If it has any wear or broken strands replace the cable Refer to the Lower Proximity Switch test...

Страница 52: ...d warranty does not cover any defects malfunction or failure caused by or resulting from improper or unauthorized service maintenance installation repair or use not in conformance or accordance with Bluff Manufacturing s recommendations product selection guides product manuals or installation instructions and the intended use and capacities or specifications or from abuse neglect accident weather ...

Страница 53: ...9201 South Freeway Fort Worth Texas 76140 800 433 2212 www bluffmanufacturing com Thank You For Purchasing The Durasweeper By Bluff Manufacturing ...

Отзывы: