34
DuraSweeper
®
Initial Testing
Initial Testing after installation of the DuraSweeper
®
by Bluff – (after the unit has been powered up)
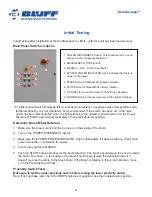
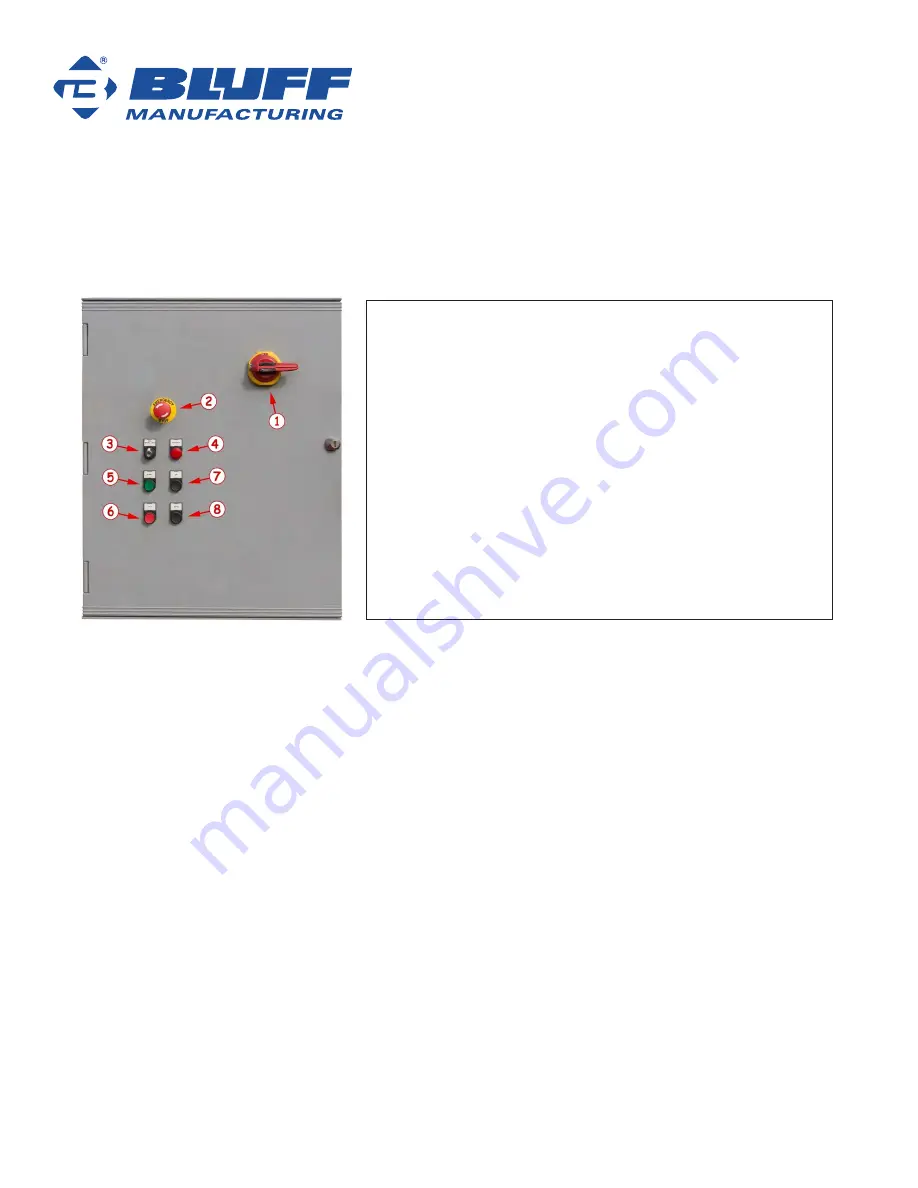
Main Panel Switch Locations
* The Disconnect Switch should be left on to keep drive heaters on anytime outdoor temperatures may
fall below freezing. It is not mandatory, but recommended. If the switch has been off, or the main
power has been disconnected when it is below freezing, the operator should first turn on the Power
Disconnect Switch, and wait approximately 30 minutes before proceeding.
Determine Brush Motor Rotation
1. Make sure the area is clear, and that no one is in the vicinity of the brush.
2. Turn on the POWER DISCONNECT Switch.
3. Make sure the SYSTEM POWER INDICATOR Light is illuminated. If it doesn’t light up, check main
power connection, or breakers for power.
4. Turn the key switch to MANUAL.
5. Push the START button and observe the brush direction. The brush should sweep the snow towards
the back of the truck, i.e. the bottom of the brush should move toward the deflector blade. If it
doesn’t, reverse the wiring to the brush motor. If the Brush is rotating in the correct direction, move
on to the Proximity Switch Test.
Proximity Switch Tests
Make sure to test the upper proximity switch before testing the lower proximity switch.
Note: If during these tests, the UP or DOWN buttons act opposite, see the troubleshooting section.
1. POWER DISCONNECT Switch. This should be left on at all
times except for seasonal shutdown.*
2. EMERGENCY E-STOP Button
3. MANUAL – OFF – AUTO Key Switch
4. SYSTEM POWER INDICATOR Light. Indicates that there is
power to the panel.
5. START Button for Manual Brush Motor Rotation
6. STOP Button for Manual Brush Motor rotation
7. UP Button for manual movement of the Brush Carriage.
8. DOWN Button for manual movement of the Brush Carriage.

