Capture and Playback
103
Capture from Controllable devices
If you have a deck which connects via RS-422, you will need to configure the deck settings before performing
a capture with deck control:
Step 1.
From your project window, click the Settings tab and double-click on Deck Configuration.
Step 2.
In the Deck Configuration dialog box, click Add Channel and then set the Channel Type to Direct
and the Port to RS-422 Deck Control. Click OK and choose "No" when asked, "Do you want to
autoconfigure the channel now?"
Step 3.
Click Add Deck and then select your brand and model of deck from the Device menus and also
set the desired preroll. Click OK and then Apply.
Step 4.
Under the Settings tab, double-click on Deck Preferences.
Step 5.
If you plan to make assemble edits to tape, enable the option to "Allow assemble edit & crash
record for digital cut". If this option is left unchecked, you will only be able to perform insert edits.
Step 6.
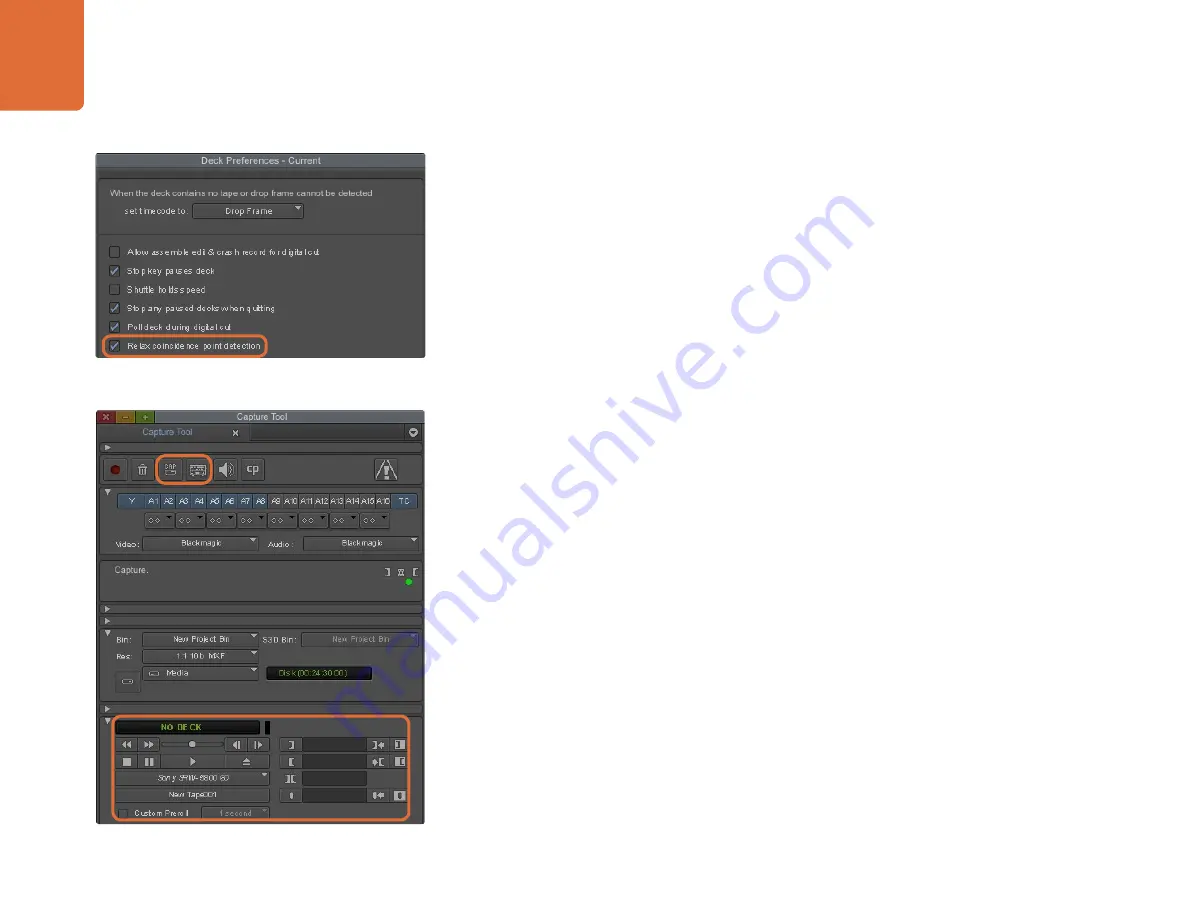
Enable the option to "Relax coincidence point detection" and set other settings as needed. Click
OK. You have completed setting up the RS-422 connection to your deck.
To test the RS-422 connection, ensure an RS-422 serial cable is connected between your Teranex Processor
and the deck. The Remote/Local switch must be set to Remote on the deck so you can use the transport
controls in Media Composer. Open the Capture Tool and use the standard j, k, l shortcut keys to shuttle
backwards, pause and shuttle forwards on the deck. If a deck name appears in italics in the Deck Selection
menu, or "NO DECK" is displayed, click the menu and select Check Decks one or more times, until the deck
is listed without italics, to reestablish deck control.
To capture with deck control on-the-fly:
Step 1.
Choose Tools > Capture to open the Capture Tool.
Step 2.
The Capture/Log Mode button should show the CAP icon. If this button displays a LOG icon, click
the button to switch to capture mode and the CAP icon should appear.
Step 3.
The Toggle Source button should show the icon of a deck. If a red circle-slash symbol is present,
click the button to enable deck control and make the red symbol disappear.
Step 4.
Configure video and audio input, video and audio source tracks, target bin, res, target drive and
tape name the same way as in "Capture from non-controllable devices".
Step 5.
Use the Deck Controller Window in the Capture Tool to cue the tape and start playing.
Step 6.
Click the Capture button or press the F4 key. The Capture button will flash red while recording.
Click the Capture button again or press the Escape button on your keyboard to end the capture.
Step 6. In the Deck Preferences, enable the option to "Relax
coincidence point detection".
Set the CAP and Toggle Source buttons to use deck control. Use
the Deck Controller Window to cue the tape and start playing.


