45
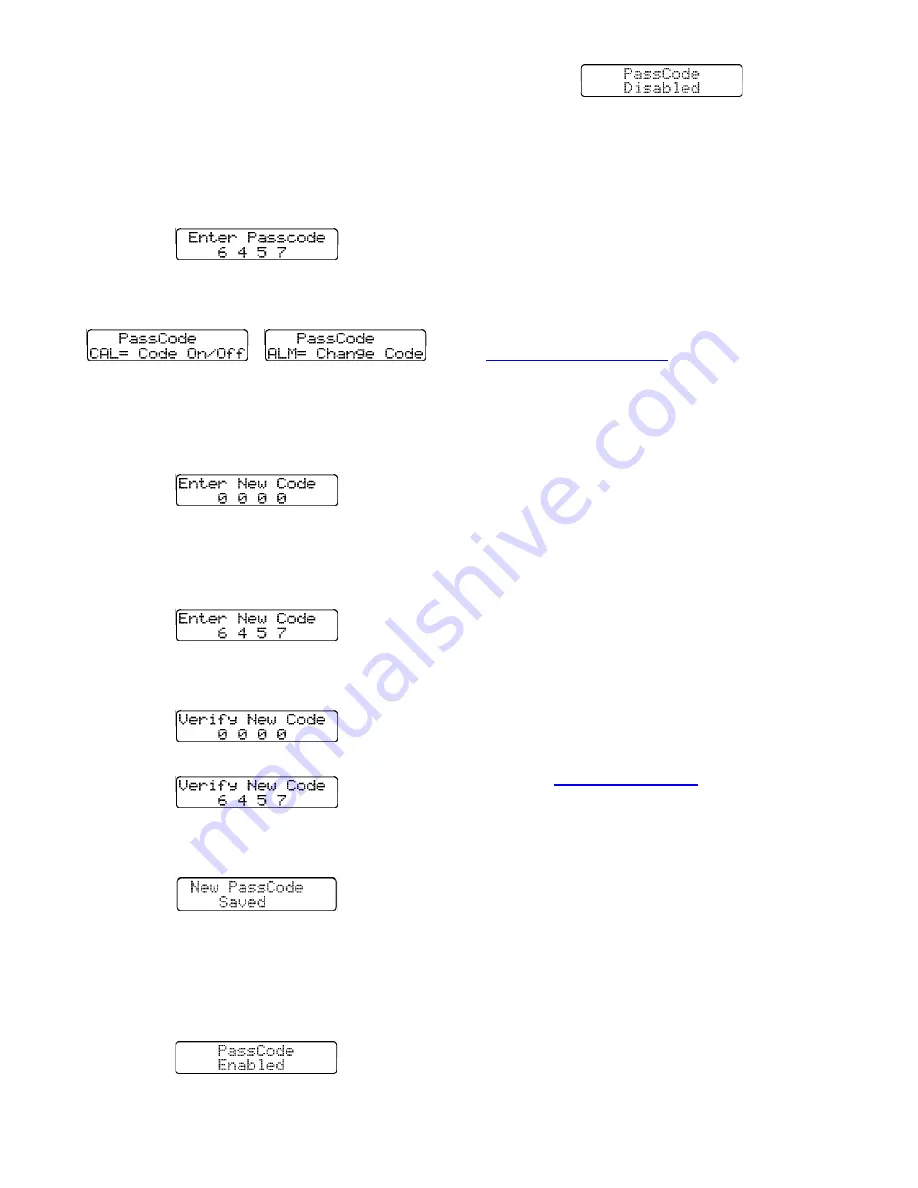
To continue in the passcode setup option, enter the
passcode. If this is the first time entering the
passcode option or the passcode has been saved as
“0 0 0 0”, press CAL to move on to the next screen.
Otherwise, enter the passcode by using the “+” and
“-“ buttons to adjust the digit in each place. The
“ALM” button is used to move from place to place.
The digit which is blinking is the number which can
be modified with the “+” or “-“ button.
Once the passcode has been entered, press the
“CAL” button. The display will toggle back and forth
between the following screens.
4.6.1.1 Changing the passcode
First enter passcode options as described above in
section 4.6. Once the PassCode options are shown,
press ALM. The Enter New Code screen will be
shown.
Enter the new passcode by using the “+” and “-“
buttons to adjust the digit in each place. The “ALM”
button is used to move from place to place. The
digit which is blinking is the number which can be
modified with the “+” or “-“ button.
Once the passcode has been entered, press CAL.
The instrument will prompt you to verify the new
passcode by entering it a second time.
Enter the new passcode.
Press the “CAL” button to accept. A screen will
quickly appear stating that the new passcode has
been saved.
4.6.1.2 Enable/disable the passcode
To enable or disable the passcode option, first enter
passcode options as described above in section 4.6.
Once the PassCode options are shown, press
“CAL”. The following screen will appear displaying
the current status of the passcode option.
To disable the passcode option press the “-“
button.
To enable the passcode option press the “+”
button.
Press the “CAL” button to save the new setting.
Press the mode button to cancel. If the mode
button is pressed then a screen will be displayed
which states “Code Setting Unchanged” the
instrument will then shutdown.
4.7
Software / Flash Upload
For instruments with software versions greater than
3.40, the instrument software in the PhD Ultra may
be updated at any time. New software will be
available through the biosystems website at
http://www.biosystems.com
.
Once the new software is downloaded from the
Internet, it must then be uploaded into the
instrument through the PhD Ultra Datadock.
Note: Instruments with software prior to version
3.40 must be returned to Biosystems for the
software upgrade. Once the instrument is
updated with a version greater than version
3.39, it may then be updated as discussed
below.
CAUTION
The PhD Ultra’s datalogger memory
will be wiped clean when the new software is
uploaded. Be sure to download any instrument
data that you may need in the future prior to
uploading the new flash.
The Flash download is a two-step download process
that will prepare your PC to update the flash
program of your PhD Ultra. To install the files:
1. Close all applications (except the internet
connection) that are currently running on your
computer.
2. Go
to
www.biosystems.com
and select the
Technical Information icon from the entry
screen.
3. Click on Software Downloads.
4. Select PhD Ultra.
5. Follow the directions given on the screen to
download the flash utility program and then the
flash file itself.


