background image

90

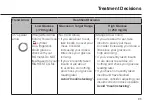
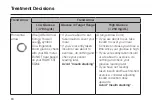
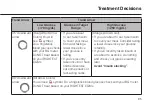
Treatment Decisions

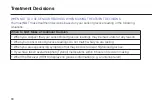
When to NOT Make a Treatment Decision

• 

When you suspect that your sensor blood glucose readings may be inaccurate for any reason.

• 

When your sensor blood glucose readings do not match what you are feeling.

• 

When you are experiencing symptoms that may be due to low or high blood glucose.

• 

If you have taken acetaminophen (Tylenol) medications within 6 hours of decision making.

• 

When the Receiver (HR310) displays no glucose information (e.g. an interrupt alert).

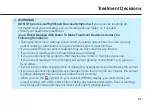
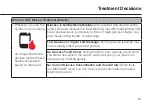
WHEN NOT TO USE SENSOR READINGS WHEN MAKING TREATMENT DECISIONS

You must NOT make treatment decisions based on your sensor glucose reading in the following 
situations:

Содержание RIGHTEST HR310

Страница 1: ...g System BIONIME CORPORATION No 100 Sec 2 Daqing St South Dist Taichung City 40242 Taiwan Tel 886 4 2369 2388 Fax 886 4 2261 7586 http www bionime com E mail info bionime com Use with a receiver BIONI...

Страница 2: ...1...

Страница 3: ...GHTEST Continuous Glucose Monitoring System The instructions warnings precautions safety information as well as tips contained within this manual are intended to help ensure proper use and optimal res...

Страница 4: ...L DEFINITIONS IV GETTING TO KNOW YOUR RIGHTEST CGMS WHAT IS INCLUDED PERFORMANCE FEATURES SAFETY FEATURES THE RIGHTEST CGMS COMPONENTS ACCESSORIES V BEFORE GETTING STARTED CHARGING BASICS CHARGING THE...

Страница 5: ...NG A MONITORING SESSION END THE MONITORING SESSION SENSOR AND TRANSMITTER REMOVAL VIII UNDERSTAND YOUR GLUCOSE READINGS HOME SCREEN INDICATOR AND DISPLAYS OVERVIEW GLUCOSE INFORMATION GLUCOSE TREND AR...

Страница 6: ...NS TRANSMITTER SPECIFICATIONS Receiver HR310 SPECIFICATIONS TRANSMITTER CHARGER SPECIFICATIONS XIII CERTIFICATE STATEMENT RF STATEMENT FCC STATEMENT NCC STATEMENT XIV APPENDIX ALARM ALERTS RECEIVER HR...

Страница 7: ...decisions Interpretation of the RIGHTEST CGMs results shall be based on the glucose trends and several sequential readings over time It also aids detecting episodes of hyperglycemia and hypoglycemia f...

Страница 8: ...ystem resulting in failure or user injury It is important to understand that the safety information is not exhaustive It is meant to keep the user safe while using the system If you are in the serious...

Страница 9: ...m begins to transmit data If you suspect that your sensor readings may be inaccurate for any reason If your sensor readings do not match what you are feeling If you are experiencing symptoms that may...

Страница 10: ...period If your sensor readings do not match what you are feeling When the receiver HR310 is out of range 6 meter 20 feet from your transmitter or obstacles metal wall or water etc are between them the...

Страница 11: ...ponents Appear to be Damaged or Past its Expiration Date A damaged or cracked sensor inserter transmitter or receiver HR310 could compromise the integrity of the system or contribute to infection risk...

Страница 12: ...NOT Place the Sensor on Any Area of the Body other than the Upper Arm or Abdomen Placing the sensor on other areas of the body has not been tested and the risks are unknown Select an Appropriate Sens...

Страница 13: ...accurate system performance Store the Sensor in a Dry Room Store your sensor at a temperature of 5 C to 30 C 41 F to 86 F and 10 90 non condensing humidity You can also store the sensor in the refrige...

Страница 14: ...nly as directed and store safely Misuse of the USB cable can be a strangulation risk Do NOT Use If the Receiver HR310 is Damaged or If It Could Fall into Water The receiver HR310 and accessories are e...

Страница 15: ...a standard household electrical outlet 100 to 240 VAC 50 60Hz the transmitter battery requires approximately 2 hours to fully charge When connected to your personal computer s USB port or USB car char...

Страница 16: ...15...

Страница 17: ...turer Biological risks Authorized representative in the European Community For single use only Batch Lot Number Type BF applied part device Expiry date Direct current Temperature limitation Alternatin...

Страница 18: ...Protected from condensation MR Unsafe Serial Number Prescription Required CE Mark with Notified Body Number Refer to Instruction Manual Booklet Bluetooth Electrical Equipment Designed Primarily for In...

Страница 19: ...smitter 1 SENSOR INSERTER Designed with a pre loaded sensor 2 TRANSMITTER HM312 Rechargeable for multiple use 3 Receiver HR310 Blood glucose information display 4 POWER SUPPLY AC power adapter USB cab...

Страница 20: ...ucose Monitoring System with single use Transmitter 1 SENSOR INSERTER Designed with a pre loaded sensor 2 TRANSMITTER HM310 Non rechargeable transmitter for single use 3 Receiver HR310 Blood glucose i...

Страница 21: ...nsmitter will be either rechargeable or non rechargeable as chosen by the user users choices The transmitter wirelessly sends data to the receiver HR310 every 5 minutes The receiver HR310 displays glu...

Страница 22: ...our target glucose range the receiver HR310 alerts you Receiver HR310 warns you if your glucose level falls below 54 mg dL or when your sensor reading is below 70 mg dL and continuously falling for th...

Страница 23: ...r assembly The inserter helps you place the sensor wire under your skin with ease The sensor measures your glucose information TRANSMITTER HM312 HM310 The transmitter sends your glucose data from the...

Страница 24: ...included with your HM312 transmitter STORAGE VIAL The vial is used for storage of a spare transmitter and its USB charger to keep them dry POWER SUPPLY USB CABLE AND AC POWER ADAPTER AC power supply...

Страница 25: ...a new monitoring session Otherwise your sensor will likely not remain operational until the end date of sensor wear period 14 days A complete charging cycle of the receiver HR310 takes about 4 hours...

Страница 26: ...T CGMs when charging your receiver HR310 and transmitter Using different chargers or AC power adapters could damage the system or cause fire Plug in to Charge To best protect yourself from not getting...

Страница 27: ...26 Before Getting Started 1 Connect the micro USB plug of the charging cable to the mircro USB input of the receiver HR310 1...

Страница 28: ...the USB plug to the USB port of the AC power adapter supplied with your system and connect the adapter to the power source Alternatively connect plug to the USB port of your computer or USB car charge...

Страница 29: ...ercentage of full charge and the battery status icon charging or discharging is displayed in the top right corner of the screen When the receiver HR310 is charging you will see lightning bolt in the m...

Страница 30: ...all components that may be dangerous if swallowed PRECAUTIONS Use only the AC power adapter USB cable and USB charger provided with the RIGHTEST CGMs when charging your receiver HR310 and transmitter...

Страница 31: ...g entire wear period 14 days 1 Take out your transmitter charger from its storage vial Hold the charger face up 2 Make sure the alignment notch of the transmitter is facing the charger s transmitter c...

Страница 32: ...4 Plug the charger s USB plug into the USB port on the AC power adapter supplied with the RIGHTEST CGMs then plug the AC power adapter inot the AC mains outlet 100 to 240 VAC 50 60 Hz You can also cha...

Страница 33: ...ully charged unplug the transmitter charger from the power source 7 If you wish to take out the transmitter from its charger or to store the transmitter charger turn over the charger to the back side...

Страница 34: ...33...

Страница 35: ...ransmitter The system will not start if you fail to scan the codes Sensor Inserter Package Alcohol Wipes Transmitter Receiver HR310 Your Blood Glucose BG Meter PAIRING THE SENSOR AND TRANSMITTER USING...

Страница 36: ...er button for 2 seconds to turn ON If your receiver HR310 is ON press the Power button briefly to wake up its display 35 Set Up Your RIGHTEST CGMs NOTE If using the receiver HR310 for the first time f...

Страница 37: ...36 Set Up Your RIGHTEST CGMs 3 Tap Home at the bottom of your receiver HR310 screen Then tap New Monitor to start a new monitoring session 3...

Страница 38: ...37 Set Up Your RIGHTEST CGMs 4 When the receiver HR310 prompts you to pair the sensor transmitter choose Pair 4...

Страница 39: ...38 Set Up Your RIGHTEST CGMs 5 Locate the NFC panel at the top of your receiver HR310 s back cover The center of NFC panel is engraved with a mark 5 NFC panel...

Страница 40: ...anel against the tag on top of the sensor inserter package until you hear a beep sound NOTE Be sure your receiver HR310 s NFC panel is within 1cm 3 8 of the NFC tag mark when you scan the codes 39 Set...

Страница 41: ...40 Set Up Your RIGHTEST CGMs 7 Once connected pairing confirmation is displayed as by checkmark on the receiver HR310 screen 7...

Страница 42: ...r HR310 s NFC panel against the laser engraved NFC mark on the top of transmitter until you hear a beep sound NOTE Be sure your receiver HR310 s NFC panel is within 1cm 3 8 of the NFC tag mark when yo...

Страница 43: ...42 Set Up Your RIGHTEST CGMs 9 Once connected pairing confirmation is displayed as by checkmark the screen 9...

Страница 44: ...ys Pairing Complete press Next 11 Make sure you follow the step by step instructions in the installation guide described in the next 2 sections Apply Your Sensor and Attach Your Transmitter After the...

Страница 45: ...her areas of the body has not been tested and the risks are unknown Select an Appropriate Sensor Insertion Site Do NOT place the sensor on skin that is painful to touch raised higher than surrounding...

Страница 46: ...rter Before applying the sensor to your skin get familiar with the information in this section Overview of Sensor Inserter Sensor Inserter Sensor Inserts into your skin Adhesive Patch Keeps sensor and...

Страница 47: ...ximately for 2 minutes until the site dried out thoroughly before getting started 3 Take out the sensor inserter from its package Open the sensor inserter cap 4 Place the inserter over the site and pu...

Страница 48: ...om your insertion site 6 Make sure the sensor is securely attached to your skin approximately for 2 minutes until the site dried out 7 Discard the inserter and its package according to local regulatio...

Страница 49: ...er HM312 The RIGHTEST CGMs HM312 transmitter is rechargeable and reusable Never share your transmitter with others The system is a prescription only medical device and is meant for your use only If us...

Страница 50: ...imately 2 hours to fully charge using the transmitter charger supplied with the RIGHTEST CGMs When connected to your personal computer s USB port or USB car charger adapter it may take much longer 49...

Страница 51: ...tter HM310 has sufficient battery life to function as intended Discard the transmitter HM310 according to local regulations after each use Follow these steps to install your Transmitter 1 Get your tra...

Страница 52: ...51 Set Up Your RIGHTEST CGMs 3 Let the transmitter dry 4 Align both notches on the sensor base and transmitter 5 Press down the transmitter until it snaps into place 4...

Страница 53: ...C power adapter USB cable and USB charger provided with the RIGHTEST CGMs when charging your receiver HR310 and transmitter Using different chargers or AC power adapters could damage the system or cau...

Страница 54: ...rs 20 feet with no obstructions e g wall metal glass or water in between Obstructions or longer distance may cause Bluetooth signal loss and you will not receive important alerts alarms Plug in to Cha...

Страница 55: ...ch Your Transmitter sections Then when the receiver HR310 displays Your system is about to start press Start Sensor 1 NOTE Make sure you go through all steps in the Pairing the Sensor and Transmitter...

Страница 56: ...ssage go through the steps in the Pairing the Sensor and Transmitter using NFC section again If the problem persists refer to the troubleshooting section 55 Set Up Your RIGHTEST CGMs 2 The receiver HR...

Страница 57: ...56 Set Up Your RIGHTEST CGMs 3 Wait for successful connection confirmation with a graphic 3...

Страница 58: ...57 Set Up Your RIGHTEST CGMs 4 4 If you want to add a data security number press Learn more If you do not want to add a security number then proceed to step 7...

Страница 59: ...58 Set Up Your RIGHTEST CGMs 5 5 Press Add Now to configure your 4 digit security code...

Страница 60: ...59 Set Up Your RIGHTEST CGMs 6 You will be prompted to enter your personal security code Then press Done 6...

Страница 61: ...Press Done then wait 2 hours for the sensor warmup NOTE You won t get any sensor readings alarms or alerts until your system begins to transmit data Use a blood glucose meter to make treatment decisi...

Страница 62: ...61 8 The receiver HR310 displays the sensor warmup progress and remaining warmup time When the sensor warmup is complete Warmup disappears from your display 8 Set Up Your RIGHTEST CGMs...

Страница 63: ...ing a Monitoring Session VII ENDING A MONITORING SESSION You will receive a Sensor Expiring Soon alert on your receiver HR310 24 hours prior to monitoring ending Press OK to confirm you have read this...

Страница 64: ...63 Ending a Monitoring Session...

Страница 65: ...Session END THE MONITORING SESSION Before you remove the sensor Either Wait for the sensor to fully expire You will receive a Sensor Expired alert and the session will end automatically Press OK confi...

Страница 66: ...a Monitoring Session End the monitoring session early by selecting the Stop Sensor option in My menu You will see a message warning you that the sensor has not expired yet Press Stop Anyway to end th...

Страница 67: ...he base and across from the notch Then pinch firmly at this point with your thumb and index fingers While you do so grip a corner of the notched edge of the sensor base with your other hand 4 Press do...

Страница 68: ...67 Ending a Monitoring Session 1 3 4...

Страница 69: ...t is important to understand your readings HOME SCREEN INDICATOR AND DISPLAYS OVERVIEW Your glucose information e g reading glucose graph trend arrow indicating rates and direction of glucose change e...

Страница 70: ...tatus Receiver HR310 battery level Transmitter level Most recent data point Add Notes Days until sensor expiration Trend Arrow Glucose High Low Alerts Check Blood Glucose When you see this symbol you...

Страница 71: ...Your glucose is less than 70 mg dL regardless of your projected trend direction Your glucose is rising or falling rapidly at or more than 2 mg dL per minute There is no glucose value or trend arrow H...

Страница 72: ...se Readings Fingerstick Check and Alerts Message Glucose message Glucose High Low Alerts Check Blood Glucose When you see this symbol you must check your blood glucose value with a meter before making...

Страница 73: ...TREND ARROW AND ARROW COLOR There are 5 different trend arrows reflecting your glucose readings and how fast they are changing The color orange amber green rouge and red of the arrow helps identify t...

Страница 74: ...of change is in 1 2 mg dL per minute glucose falling rising rapidly means the glucose rate of change is at or more than 2 mg dL per minute Direction Arrow Color What it means Glucose is steady Glucos...

Страница 75: ...es The most recent data point is marked by an open target double circle at the right end of the plot The sensor glucose reading range is 40 500 mg dL The trend graph uses a dynamic range of 0 500 mg d...

Страница 76: ...75 Understand Your Glucose Readings Reproduced Graph Range 0 500 mg dL Most Recent Reading High Target Low Target Note logs Add Notes...

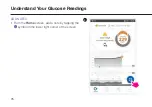
Страница 77: ...76 Understand Your Glucose Readings ADD NOTES 1 From the Home screen add a note by tapping the symbol in the lower right corner of the screen 1...

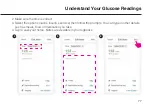
Страница 78: ...2 Make sure the time is correct 3 Select the options carbs insulin exercise then follow the prompts You can type in other details such as meals food or medication you take 4 Tap to save your notes No...

Страница 79: ...e target symbol and is viewable in the note To access your sensor glucose information or to view your personal notes from anytime between the first and most recent reading hold and drag the trend grap...

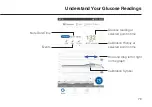
Страница 80: ...Understand Your Glucose Readings Glucose reading at selected point in time Note Date Time Events Calibration History at selected point in time Hold and drag left or right on the graph Calibration Symb...

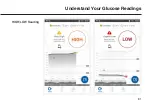
Страница 81: ...t with a BG meter If you also get a HIGH result 500 mg dL from the meter test contact your healthcare practitioner immediately If LOW appears on your receiver HR310 screen your glucose reading is less...

Страница 82: ...81 Understand Your Glucose Readings HIGH LOW Reading...

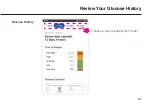
Страница 83: ...at least 7 10 days ideally more than 14 days to identify your glucose patterns The 7 days 14 days 30 days and 90 days result of AGP analysis can be reviewed on the Report page From the Report screen c...

Страница 84: ...83 Review Your Glucose History Glucose History Choose a report duration from here...

Страница 85: ...feeling use your blood glucose meter or if needed consult your healthcare practitioner Use a Blood Glucose BG Meter To Make Treatment Decisions Under The Following Conditions During the first 2 hour w...

Страница 86: ...ymbol on your receiver HR310 display you must check your BG value with a BG meter before making any treatment decisions Sensor readings may be less accurate and may not reflect your current glucose le...

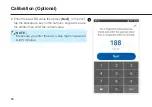
Страница 87: ...2 Enter the exact BG value then press Next If incorrect tap the backspace key on the numeric keypad to erase the entries then enter the correct value NOTE Make sure you enter the exact value that is m...

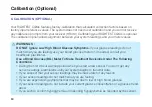
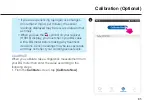
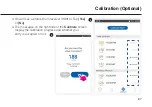
Страница 88: ...ation Optional 3 You will see a prompt from receiver HR310 Tap Yes or No 4 The messages on the right side of the Calibrate screen display the calibration progress and whether your entry is accepted or...

Страница 89: ...nue to use your blood glucose meter for treatment decisions until you are comfortable with the information you receive Getting familiar with the system could take days weeks or even months Work with y...

Страница 90: ...our sensor readings do not match what you are feeling If you are experiencing symptoms that may be due to low or high blood glucose If your sensor readings do not include your current glucose concentr...

Страница 91: ...eeling When you are experiencing symptoms that may be due to low or high blood glucose If you have taken acetaminophen Tylenol medications within 6 hours of decision making When the Receiver HR310 dis...

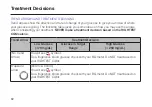
Страница 92: ...articularly at times of rapid glucose change e g after meals taking insulin or exercising Low Glucose or Urgent Low Message Sensor glucose readings may not accurately reflect your blood glucose No Glu...

Страница 93: ...ng your treatment NEVER make a treatment decision based on the RIGHTEST CGMs alone Trend Arrow Treatment Decision Low Glucose 70 mg dL Glucose in Target Range High Glucose 250 mg dL No Trend Arrow You...

Страница 94: ...dose a little since your glucose is rising If you ve recently taken insulin or are about to exercise do nothing and check your glucose reading later Avoid Insulin stacking Orange Arrow Color If you ar...

Страница 95: ...ur meal If you ve recently taken insulin or are about to exercise do nothing and check your sensor reading later Avoid Insulin stacking Orange Arrow Color If you are about to eat take insulin to cover...

Страница 96: ...wer dose since your glucose is falling If you ve recently taken insulin or have finished exercise eat some snacks or fast acting carbs Orange Arrow Color If you are about to eat take insulin to cover...

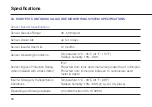
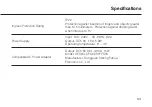
Страница 97: ...Sensor Inserter Shelf Life 12 months Sensor Operating Conditions Temperature 5 C 45 C 41 F 113 F Relative humidity 10 90 Sensor Ingress Protection Rating when installed with a transmitter Inserter St...

Страница 98: ...Inserter Size 51 8 mm 57 0 mm 61 3 mm 0 5 mm Sterilization Usage Sterilized by radiation Single use disposable 97 Specifications...

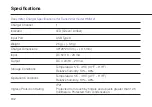
Страница 99: ...e Rechargeable lithium battery 3 5 4 2V 25mA CR 1225 Lithium Battery Storage Transportation Operating Conditions Temperature 5 C 45 C 41 F 113 F Relative humidity 10 90 Operating and Storage Altitude...

Страница 100: ...ngs stored every 5 minutes Ingress Protection Rating when attached to Sensor IP 47 Protected from tools and small wires greater than 1 millimeter Protected from immersion between 15 centimeters and 1...

Страница 101: ...ing NFC pairing USB type C Storage Transportation Operating Conditions Temperature 5 C 45 C 41 F 113 F Relative humidity 10 90 Alarm Output Sound Speaker Vibration Receiver HR310 Specifications Dimens...

Страница 102: ...ters Protection against dripping water when tilted up to 15 Power Supply Compatible AC Power Adapter Input 100 240V 50 60Hz 0 2A Output DC5 0V 1 0A 5 0W Operating temperature 0 45 Output DC5 0V 0 01 3...

Страница 103: ...harger Dimensions Input Output Storage Conditions Operation Conditions Ingress Protection Rating 40 26 23 mm 0 5 mm DC 5V 18 20 mA DC 4 2V 18 20 mA Temperature 5 C 45 C 41 F 113 F Relative humidity 10...

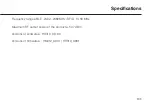
Страница 104: ...Specifications 103 Frequency range BLE 2402 2480MHz RFID 13 56 MHz Maximum RF output power of the product 5 37 dBm Versions of software HR310_0 9 0 0 Versions of firmware HM312_A001 HR310_A001...

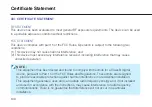
Страница 105: ...erence received including interference that may cause undesired operation NOTE This equipment has been tested and found to comply with the limits for a Class B digital device pursuant to Part 15 of th...

Страница 106: ...one or more of the following methods Reorient or reposition the receiving antenna Increase the separation between the equipment and the receiving device Connect the equipment to a different power out...

Страница 107: ...strative Regulations on Low Power Radio Waves Radiated Devices Article 12 Without permission granted by the NCC any company enterprise or user is not allowed to change frequency enhance transmitting p...

Страница 108: ...ns If found the user shall cease operating immediately until no interference is achieved The said legal communications means radio communications is operated in compliance with the Telecommunications...

Страница 109: ...ALERTS Screen Event Visual Sound Settings Very High Glucose 250 mg dL and when the glucose is projected to rise or remain steady Default Setting Visual Safety Symbol on Home Screen Yes Sound Vibratio...

Страница 110: ...Settings Low Glucose 55 70 mg dL and when the glucose is projected to fall or remain steady Default Setting Visual Safety Symbol on Home Screen Yes Sound Vibration Alert ON Editable Setting Sound Vibr...

Страница 111: ...110 Appendix Screen Event Visual Sound Settings Urgent Low Glucose 54 mg dL Default Setting Visual Safety Symbol on Home Screen Yes Sound Vibration Alert ON Editable Setting NO...

Страница 112: ...trend direction 2 Glucose rising or falling at or more than 2 mg dL per minute 3 When there is no glucose value or trend arrow High Low 4 During the first 2 hour sensor warmup period Visual glucose ch...

Страница 113: ...the receiver HR310 or when there is an obstacle e g water wall in between transmitter and receiver HR310 Default Setting Visual message on the screen Yes Sound Vibration Alert ON System attempts to r...

Страница 114: ...113 Appendix Screen Event Visual Sound Settings Receiver HR310 battery less than 20 Default Setting Visual message on the screen Yes Sound Vibration Alert No...

Страница 115: ...114 Appendix Screen Event Visual Sound Settings Receiver HR310 battery less than 10 Default Setting Visual message on the screen Yes Sound Vibration Alert Yes...

Страница 116: ...115 Appendix Screen Event Visual Sound Settings Transmitter battery voltage less than 3 5V 10 Default Setting Visual message on the screen Yes Sound Vibration Alert Yes...

Страница 117: ...creen Event Visual Sound Settings 1 Receiver HR310 scan distance is toofar 1cm away from the NFCtag mark 2 When the NFC tag mark is damaged Default Setting Visual message on the screen Yes Sound Vibra...

Страница 118: ...s too far from the receiver HR310 or there is an obstacle e g water wall in between transmitter and receiver HR310 2 Transmitter battery empty Default Setting Visual message on the screen Yes Sound Vi...

Страница 119: ...endix Screen Event Visual Sound Settings When receiver HR310 make 10 attempts to reconnect to sensor transmitter pair but still fails Default Setting Visual message on the screen Yes Sound Vibration A...

Страница 120: ...119 Appendix Screen Event Visual Sound Settings Transmitter is not working Default Setting Visual message on the screen Yes Sound Vibration Alert Yes...

Страница 121: ...120 Appendix Screen Event Visual Sound Settings Transmitter detects a current error measured by the sensor Default Setting Visual message on the screen Yes Sound Vibration Alert Yes...

Страница 122: ...Event Visual Sound Settings Transmitter temperature is too high Temporary Issue Move to a cooler environment below 45 C and wait up to 3 hours Default Setting Visual message on the screen Yes Sound V...

Страница 123: ...122 Appendix Screen Event Visual Sound Settings When sensor is to be expired in less than 24 hours Default Setting Visual message on the screen Yes Sound Vibration Alert No...

Страница 124: ...123 Appendix Screen Event Visual Sound Settings Your sensor session is expired Default Setting Visual message on the screen Yes Sound Vibration Alert Yes...

Страница 125: ...124 Appendix Screen Event Visual Sound Settings When transmitter detects a sensor that has been used Default Setting Visual message on the screen Yes Sound Vibration Alert Yes...

Страница 126: ...125...

Страница 127: ...report your incident to us and the local competent authority WARRANTY The manufacturer warrants that your RIGHTEST Receiver HR310 rechargeable Transmitter will be free from defects in materials and wo...

Страница 128: ......
Отзывы: