


- 4 -
GENERAL ACCESS AND EMPTYING HYDRAULIC CIRCUITS
2 GENERAL ACCESS AND EMPTYING
HYDRAULIC CIRCUITS
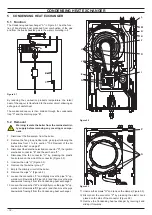
2 .1 Nomenclature
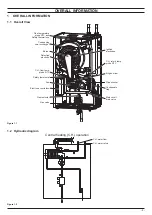
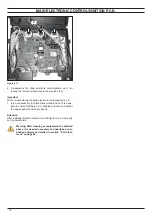
Figure 2 .1
1
2
3
4
5
1
Right side panel
2
Front panel
3
Control panel
4
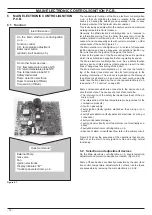
Main electronic p.c.b. box
5
Left side panel
Warning: open vent boilers can utilize extensive ex-
ternal controls and equipment that can have an ef-
fect on the correct operation of the boiler, under
dysfunctional operation conditions it is advised
that you safely disconnect any and all external
equipment to identify if the boiler or external equip-
ment is causing the issue . the boiler can be operat-
ed with any external zone valves in the manually
locked open condition and with the room thermo-
stat link replaced to prove correct operation of the
boiler . Please take care to safely terminate any re-
moved wiring during this test .
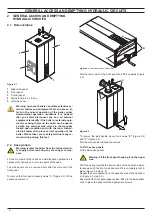
2 .2 Case panels
Warning: isolate the boiler from the mains electrici-
ty supply before removing any covering or compo-
nent .
For the most part of the check and maintenance operations it is
necessary to remove one or more panels of the case.
The side panels can be removed only after the removal of the
front panel.
To remove the front panel loosen screws "A" (Figure 2.2), lift the
panel and remove it.
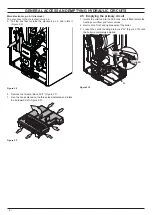
Figure 2 .2
- Bottom view of the boiler
A
B
B
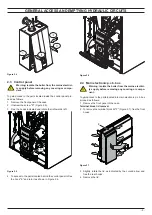
Pull the lower part of the front panel and lift it upwards (Figure
2.3).
Figure 2 .3
C
C
To remove the side panels loosen the screws "B" (Figure 2.2)
and "C" (Figure 2.3).
Pull the side panels towards the outside.
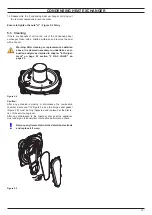
To Fit the case panels
Fit the side case panels.
Warning: Fit the front panel hooking it on the upper
side .
Push the spring towards the internal side of the boiler and simul-
taneously push the front case panel until it is completely hold in
place (Figure 2.4 step 1, 2).
Repeat the same operation on the opposite side of the front pan-
el (Figure 2.4 step 3, 4).
Ensure that the front panel edge is close-fitting to the side panels.
Lock in place the panel with the appropriate screws.
Содержание ADVANCE 15OV
Страница 26: ...26 TEMPERATURE PROBE Figure 9 4 E F...