background image

Using the Web-Based Advanced User Interface

55

se

ct

io

n

1

2

3

4

5

6

7

8

9

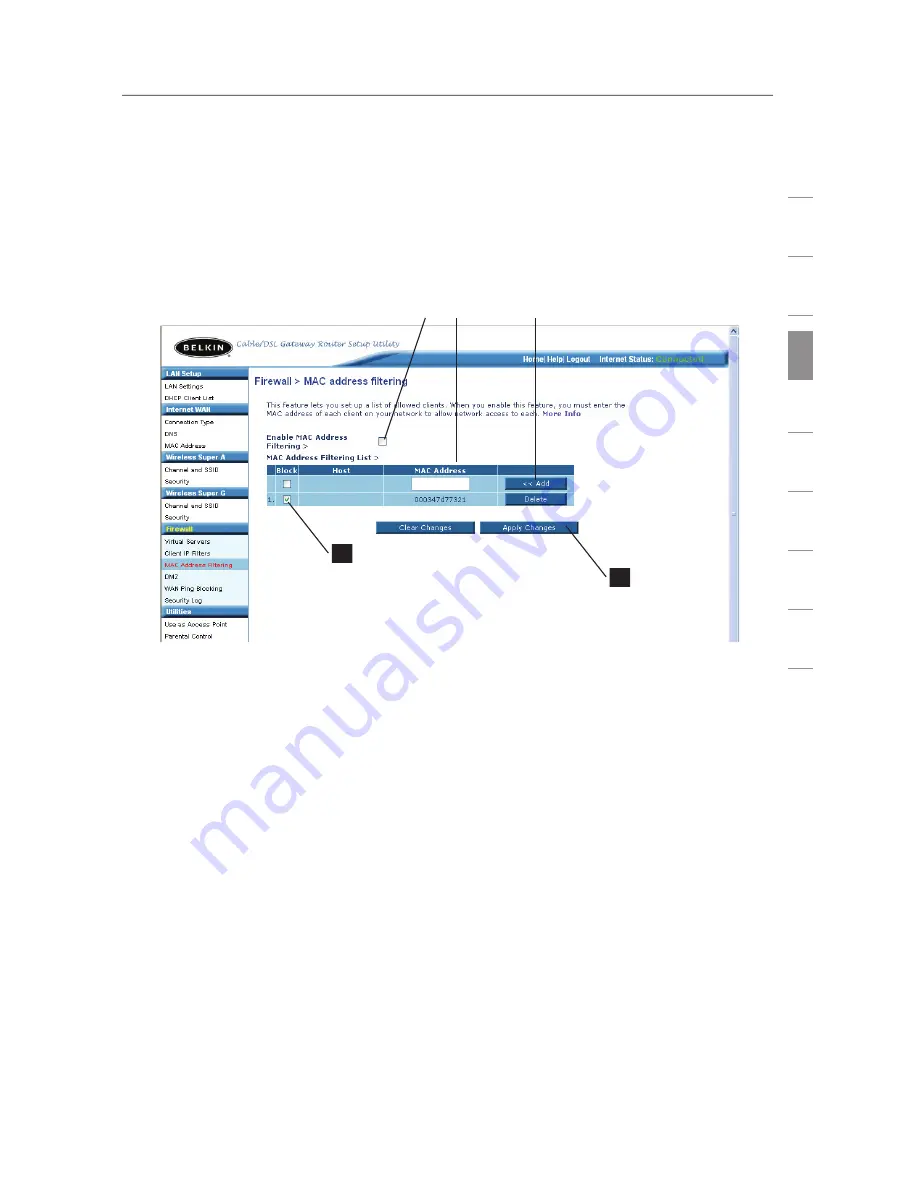
Setting up a Block Access List

The “Block” list lets you specify computers that you DO NOT want 
to access the network. Any computer in the list will not be allowed 
access to the wireless network. All others will.

1. 

Check the “Enable MAC Address Filtering” box

(1)

 to begin 

setting up a list of computers to be denied access to the 
wireless network. 

2. 

Next, in the “MAC Address” field that is blank

 (2)

, type in the 

MAC address of the wireless computer you want to block access 
to the wireless network, then click “<<Add” 

(3)

3. 

Continue to do this until all of the computers you want to deny 
access to have been entered. 

4.

  Check the “Block” box 

(4)

next to the MAC address you would 

like blocked from the network.

5. 

Click “Apply Changes” 

(5)

 to finish.

(1) (2)

(3)

Содержание F6D3230-4

Страница 1: ...F6D3230 4 Dual Band Wireless A G Router Share your broadband Internet connection User Manual User Manual...

Страница 2: ...DHCP Client List Page Viewing the DHCP Client List Page Viewing the DHCP Client List Page 41 Configuring the Wireless Network Settings 42 Setting WPA with server Security Setting WPA with server Secu...

Страница 3: ...ingle printer with the entire family Share documents music video and digital pictures Store retrieve and copy files from one computer to another Simultaneously play games online check Internet email a...

Страница 4: ...ifficulties persist even at close range please contact Belkin Technical Support Note While some of the items listed below can affect network performance they will not prohibit your wireless network fr...

Страница 5: ...uters Unplug and remove the battery from any cordless phone that operates on the 2 4 or 5GHz band check the manufacturer s information If this fixes the problem the phone may be interfering If your ph...

Страница 6: ...on These guidelines should allow you to cover the maximum possible area with your Router Should you need to cover an even wider area we suggest the Belkin Wireless Range Extender Access Point 5 Secure...

Страница 7: ...o sleep however this may not be appropriate for portable computers To change your power management setting in Windows see the Power Options item in the Control Panel If you continue to have difficulty...

Страница 8: ...and best of all you can make changes and perform setup functions from any computer on the network quickly and easily NAT IP Address Sharing Your Router employs Network Address Translation NAT to shar...

Страница 9: ...stall Wizard software is compatible with Windows 98SE Me 2000 XP and Mac OS 9 X and Mac OS X If you are using another operating system the Router can be set up using the Alternate Setup Method describ...

Страница 10: ...addresses into a list using the Web Based Advanced User Interface and you can control access to your network Product Specifications The Router has been designed to be placed on a desktop All of the ca...

Страница 11: ...the LAN ports on the rear of the Router the icon will light when a device is connected When information is being sent over the port the icon blinks rapidly 4 WAN Light This LED lights in GREEN to indi...

Страница 12: ...ernet WAN Port GREEN This port is for connection to your cable or DSL modem Use the cable that was provided with the modem to connect the modem to this port Use of a cable other than the cable supplie...

Страница 13: ...Press and hold the Reset button for at least 10 seconds then release it The lights on the Router will momentarily flash When the lights stop blinking the reset is complete 10 Rotating Antennas Both an...

Страница 14: ...on each computer RJ45 Ethernet networking cable Internet browser Easy Install Wizard Software System Requirements A PC with Windows 98SE Me 2000 or XP or a Mac computer running Mac OS 9 x or OS X Mini...

Страница 15: ...you do not have a CD ROM drive or one of the required operating systems please continue to the Alternate Setup Method section of this manual to install the Router Modem Requirements Your cable or DSL...

Страница 16: ...ll Wizard screen will automatically appear on your screen within 15 seconds Click Next to start the setup Mac OS Users Insert the CD into your CD ROM drive A drive will appear on your desktop called B...

Страница 17: ...s examining your network settings When the Wizard is finished examining your settings click Next 1 5 You may see the Multi NICs screen This screen will appear ONLY if you have more than one network ad...

Страница 18: ...that is included with your Router Plug one end of this cable into ANY one of the BLUE ports on your Router Plug the other end of the cable into the networking port on your computer Click Next to conti...

Страница 19: ...rrier that may require you to log on to access the Internet you may see this screen The Wizard will ask you to type in your user name and password After entering this information click Next Note Your...

Страница 20: ...the Router will flash during this time Please be patient through this process Note If the Easy Install Wizard repeatedly displays an error message that says it cannot make an Internet connection you m...

Страница 21: ...ongratulations You have finished installing your new Belkin Router To test your Internet connection open your browser and visit any website such as www belkin com Upon connecting to the Internet throu...

Страница 22: ...installation Modem Requirements Your cable or DSL modem must be equipped with an RJ45 Ethernet port Many modems have both an RJ45 Ethernet port and a USB connection If you have a modem with both Ethe...

Страница 23: ...ort on the back of the Router labeled Internet WAN 1 4 Connect the included network cable from the back of the computer to one of the ports labeled 1 4 Note It does not matter which numbered port you...

Страница 24: ...outer 1 8 by checking the lights labeled LAN 1 2 3 4 The light that corresponds to the numbered port connected to your computer should be ON if your computer is connected properly If it is not recheck...

Страница 25: ...en leave the password blank and click the Submit button to log in Logging out of the Router One computer at a time can log into the Router for the purposes of making changes to the settings of the Rou...

Страница 26: ...s and grouped by tabs to make finding a particular setting easier to find Clicking on the purple header of each tab will show you a short description of the tab s function 2 Home Button The home butto...

Страница 27: ...he settings of the Local Area Network LAN side of the Router Changes can be made to the settings by clicking on any one of the links IP Address Subnet Mask DHCP Server or by clicking the LAN quick nav...

Страница 28: ...e Router s settings for your ISP s connection type Your ISP connection settings are provided to you by your ISP To configure the Router with the settings that your ISP gave you click Connection Type 1...

Страница 29: ...on 1 2 3 4 5 6 7 8 9 Setting your Connection Type From the connection type page you can select the type of connection you use Select the type of connection you use by clicking the button 1 next to you...

Страница 30: ...e space provided if you were assigned one Your host name is assigned by your ISP Some dynamic connections may require that you clone the MAC address of the PC that was originally connected to the mode...

Страница 31: ...k and ISP gateway address This information is available from your ISP or on the paperwork that your ISP left with you Type in your information then click Apply Changes 4 After you apply the changes th...

Страница 32: ...ou into the service If you have an Internet connection in your home or small office that doesn t require a modem you may also use PPPoE Your connection type is PPPoE if a Your ISP gave you a user name...

Страница 33: ...m it 3 Service Name A Service name is rarely required by an ISP If you are not sure if your ISP requires a service name leave this blank 4 MTU The MTU setting should never be changed unless your ISP g...

Страница 34: ...system Type in the information provided by your ISP in the space provided When you have finished click Apply Changes 9 After you apply the changes the Internet Status indicator will read connection O...

Страница 35: ...you a connection ID leave this blank 8 Disconnect after X The Disconnect feature is used to automatically disconnect the Router from your ISP when there is no activity for a specified period of time F...

Страница 36: ...ply the changes the Internet Status indicator will read connection OK if your Router is set up properly 1 Select your State Select your state from the drop down menu 6 The Login Server box will automa...

Страница 37: ...tomatic from ISP box 1 should be checked if your ISP did not give you a specific DNS address If you are using a static IP connection type then you may need to enter a specific DNS address and secondar...

Страница 38: ...he Internet service When you install the Router its own MAC address will be seen by the ISP and may cause the connection not to work Belkin has provided the ability to clone copy the MAC address of th...

Страница 39: ...utton the Router was installed Click the Clone button 1 Click Apply Changes 3 Your MAC address is now cloned to the Router Entering a Specific MAC Address In certain circumstances you may need a speci...

Страница 40: ...www then press the Enter key You will see the Router s home page in your browser window Viewing the LAN Settings Clicking on the header of the LAN tab 1 will take you to the LAN tab s header page A qu...

Страница 41: ...IP address you choose should be a non routable IP Examples of a non routable IP are 192 168 x x where x is anything between 0 and 255 10 x x x where x is anything between 0 and 255 172 y x x where y...

Страница 42: ...ust be lower in number than the ending IP address 5 Lease Time The length of time the DHCP server will reserve the IP address for each computer We recommend that you leave the lease time set to Foreve...

Страница 43: ...known as clients which are connected to your network You are able to view the IP address 1 of the computer the host name 2 if the computer has been assigned one and the MAC address 3 of the computer...

Страница 44: ...ng changes to these settings and more Disabling Wireless In some cases you may not want your wireless network ON To disable the radio place a check mark next to Disable Super A Radio or Disable Super...

Страница 45: ...at least five channels away from the other wireless networks in the area For instance if another network is operating on channel 11 then set your network to channel 6 or below To change the channel s...

Страница 46: ...u can leave them unchanged Keep in mind if you decide to change your wireless network name and there are other wireless networks operating in your area your network name needs to be different from oth...

Страница 47: ...is mode the Router constantly monitors the radio waves looking for interference or other networks If neither of these is detected the Router will jump into 108Mbps mode and remain there unless interfe...

Страница 48: ...wer than 1Mbps rates when the signal is weak when the device is far from the Router the connection can be maintained at much greater distances than normal The Router ships from the factory with the XR...

Страница 49: ...s Changing the Wireless Security Settings Your Router is equipped with the latest security standard called WPA Wi Fi Protected Access It also supports the legacy security standard called WEP Wired Equ...

Страница 50: ...ill be used in a home environment It is recommended by the Wi Fi Alliance that your key be at least 20 characters long and use a mixture of letters numbers and special characters such as Try to make i...

Страница 51: ...select WPA with server 2 For Encryption Technique select TKIP or AES This setting will have to be identical on the clients that you set up 3 Enter the IP address of the radius server into the Radius S...

Страница 52: ...n the Passphrase field and click Generate to create a WEP key from the passphrase Click Apply Changes to finish You must now set all of your clients to match these settings Note on passphrases The pas...

Страница 53: ...B2 C3 D4 4B C3 D4 E7 128 bit key In the boxes below make up your key by writing in two characters between A F and 0 9 You will use this key to program the encryption settings on your Router and your w...

Страница 54: ...802 1x 2 Enter the IP address of the radius server into the Radius Server fields 3 Enter the port that the radius server is listening on 4 Enter the radius key into the Radius Key field 5 Enter the r...

Страница 55: ...o The default IP address is 192 168 2 254 and subnet mask is 255 255 255 0 These can be customized for your needs 1 Enable the AP mode my selecting Enable in the Use as Access Point only page When you...

Страница 56: ...the MAC address of each client computer to which you want to allow network access The Block feature lets you turn on and off access to the network easily for any computer without having to add and rem...

Страница 57: ...MAC Address Filtering box 1 to begin setting up a list of computers to be denied access to the wireless network 2 Next in the MAC Address field that is blank 2 type in the MAC address of the wireless...

Страница 58: ...defect IP with zero length RIP defect Smurf Attack Fragment flooding TCP Null Scan The firewall also masks common ports that are frequently used to attack networks These ports appear to be stealth mea...

Страница 59: ...r to find out which port settings you need Choosing an Application Select your application from the drop down list Click Add The settings will be transferred to the next available space in the screen...

Страница 60: ...e IP address of the computer you wish to restrict access to in the IP fields 1 Next enter 80 in both the port fields 2 Select Both 3 Select Block 4 You can also select Always to block access all of th...

Страница 61: ...ou are using multiple static WAN IP addresses it is possible to select which WAN IP address the DMZ host will be directed to Type in the WAN IP address you wish the DMZ host to direct to enter the las...

Страница 62: ...mproperly Restarting or rebooting the Router will NOT delete any of your configuration settings Restarting the Router to Restore Normal Operation 1 Click the Restart Router button 2 The following mess...

Страница 63: ...button 2 The following message will appear Click OK 3 The following message will appear Restoring the defaults includes restarting the Router It can take up to 60 seconds It is important not to turn...

Страница 64: ...is recommended that you back up your current configuration before performing a firmware update 1 Click Save A window called File Download will open Click Save 2 A window will open that allows you to...

Страница 65: ...The configuration is now saved Restoring a Previous Configuration This option will allow you to restore a previously saved configuration 1 Click Browse A window will open that allows you to select the...

Страница 66: ...ll appear It will take up to 60 seconds for the configuration restoration to complete Click OK 4 A 60 second countdown will appear on the screen When the countdown reaches zero the Router s configurat...

Страница 67: ...irmware you can download the firmware from the Belkin update website and update your Router s firmware to the latest version Checking for a New Version of Firmware The Check Firmware 1 button allows y...

Страница 68: ...he one below 1 To download the new version of firmware click Download 2 A window will open that allows you to select the location where you want to save the firmware file Select a location You can nam...

Страница 69: ...open that allows you to select the location of the firmware update file 2 Browse to the firmware file you downloaded Select the file by double clicking on the file name 3 When the save is complete you...

Страница 70: ...ck OK 5 You will see one more message This message tells you that the Router may not respond for as long as one minute as the firmware is loaded into the Router and the Router is rebooted Click OK 6 A...

Страница 71: ...ed that you set a password if you plan to use the remote management feature of your Router Changing the Login Timeout Setting The login timeout option allows you to set the period of time that you can...

Страница 72: ...f your Belkin Router MAKE SURE YOU HAVE SET THE ADMINISTRATOR PASSWORD Remote management allows you to make changes to your Router s settings from anywhere on the Internet There are two methods of rem...

Страница 73: ...ng Disabling UPnP UPnP Universal Plug and Play is yet another advanced feature offered by your Belkin Router It is a technology that offers seamless operation of voice messaging video messaging games...

Страница 74: ...eck for a new version of firmware and alert you that the new firmware is available When you log into the Router s advanced interface the Router will perform a check to see if new firmware is available...

Страница 75: ...ontrol panel Select Ethernet Built In or Ethernet in the Connect via drop down menu 1 3 Next to Configure 2 if Manually is selected your Router will need to be set up for a static IP connection type W...

Страница 76: ...lly Configuring Network Settings Manually Configuring Network Settings in Mac OS X 1 Click on the System Preferences icon 2 Select Network 1 from the System Preferences menu 3 Select Built in Ethernet...

Страница 77: ...you will need to configure your Router for a PPPoE connection type using your user name and password 5 If Manually is selected your Router will need to be set up for a static IP connection type Write...

Страница 78: ...ies from the drop down menu 4 In the Local Area Connection Properties window click Internet Protocol TCP IP and click the Properties button The following screen will appear 5 If Use the following IP a...

Страница 79: ...be set up for a static IP connection type Write the address information in the table below You will need to enter this information into the Router 4 Write the IP address and subnet mask from the IP A...

Страница 80: ...his section Microsoft Internet Explorer 4 0 or Higher 1 Start your web browser Select Tools then Internet Options 2 In the Internet Options screen there are three selections Never dial a connection Di...

Страница 81: ...lly detect settings Use automatic configuration script and Use a proxy server Click OK Then click OK again in the Internet Options page Netscape Navigator 4 0 or Higher 1 Start Netscape Click on Edit...

Страница 82: ...guide on page 87 Directions for AOL DSL Users STEP 1 Create AOL screen names for the Router and for each computer that will be using your AOL service STEP 2 Configure the Router for AOL for Broadband...

Страница 83: ...window type in names then click Go 5 You will see the AOL Screen Names window Click CREATE a Screen Name 6 A window will appear that asks whether the screen name is for a child If you are creating the...

Страница 84: ...name is for the Router the name you choose should be something like your master screen name followed by the word Router For instance JohnSmithRouter If the screen name is for a computer type in the s...

Страница 85: ...me is for a computer choose the desired setting and click Continue 10 The Confirm your Settings window will appear Select Accept Controls 11 The AOL Screen Names window appears This window will includ...

Страница 86: ...p 2 Configuring the Router Connect your Router to your network per the instructions in your User Manual 1 Open your web browser 2 In the address bar of your browser type http 192 168 2 1 and click Go...

Страница 87: ...the User Name field 1 type in the screen name that you created for your Router 6 In the Password fields 2 type in the password you created for the Router s screen name 7 Leave the Service Name field 3...

Страница 88: ...computers with the AOL screen names you just created This step consists of installing the AOL software on each computer and configuring it to use one of the screen names you created in Step 1 Remembe...

Страница 89: ...that will be using your AOL service STEP 2 Configure your computers with the new AOL screen names you just created Step 1 Creating new AOL screen names Note Your AOL connections must be set to operate...

Страница 90: ...ndow will appear that asks whether the screen name is for a child Click Yes or No to answer 7 The Choose a Screen Name window will appear Type in the screen name of the computer for which you are crea...

Страница 91: ...for this screen name twice and click Continue 9 The Select a Parental Controls setting window will appear Choose the appropriate setting for this screen name Click Continue 10 The Confirm your Settin...

Страница 92: ...2 Configure your computers with the new AOL screen names Step 2 Configure your computers with the new AOL screen names you just created This step consists of installing the AOL software on each comput...

Страница 93: ...en up your CD ROM drive by double clicking on the My Computer icon that is located on your desktop 2 Next double click on the CD ROM drive that the Easy Installation CD has been placed in to start the...

Страница 94: ...hange the firewall settings to function properly when it is turned on Please refer to the instructions provided by the publisher of your firewall software for instructions on configuring the firewall...

Страница 95: ...lug the power from the modem supplied by your ISP 2 Unplug the power from your Belkin Router 3 Wait for five minutes 4 Reconnect power to the modem 5 Wait for the modem to power up about one minute pl...

Страница 96: ...r three minutes plug the modem back into its power source This may force the modem to properly recognize the Router 3 Unplug the power to your Router wait 10 seconds and then reconnect the power This...

Страница 97: ...Connected light is solid Solution If the WAN light is blinking and the Connected light is solid but you are unable to access the Internet there may be third party firewall software installed on the co...

Страница 98: ...es should have a list of Available Networks those wireless networks it can connect to Does the name of your wireless network appear in the results Yes my network name is listed go to the troubleshooti...

Страница 99: ...s User Manual 2 Using a computer that is connected to the Router via a network cable as opposed to wirelessly ensure that Broadcast SSID is enabled This setting is found on the Router s wireless Chann...

Страница 100: ...ess card in the list box and then click Properties then choose the Advanced tab and select the rate property Wireless client cards are usually set to automatically adjust the wireless transmit rate fo...

Страница 101: ...is turned on for this wireless client If this is not done you will lose your wireless connection Note to Mac users Original Apple AirPort products support 64 bit encryption only Apple AirPort 2 produ...

Страница 102: ...Wireless Card please consult the manufacturer s user manual for that wireless client card Problem Do Belkin products support WPA Solution Note To use WPA security all your clients must be upgraded to...

Страница 103: ...ttings Problem I am having difficulty setting up Wi Fi Protected Access WPA security on a Belkin Wireless Card for a home network Solution Clients must use the same key that the Wireless Router or Acc...

Страница 104: ...the knowledge base for Windows XP WPA Note The file that Microsoft has made available works only with Windows XP Other operating systems are not supported at this time You also need to ensure that the...

Страница 105: ...Date Encryption This setting will have to be identical to the Wireless Router or Access Point that you set up 6 Type in your encryption key in the Network Key box Important Enter your pre shared key T...

Страница 106: ...d on the designation 802 11 x so named by the IEEE the board that is responsible for certifying networking standards The most common wireless networking standard 802 11b transmits information at 11Mbp...

Страница 107: ...nd cordless phones that use the 2 4GHz band Common household devices such as cordless phones and microwave ovens may interfere with the unlicensed band 2 4GHz Compatibility Compatible with 802 11g Com...

Страница 108: ...at http www belkin com networking or www belkin com through the tech support area If you want to contact technical support by phone please call US 877 736 5771 or 310 898 1100 ext 2263 Europe 00 800 2...

Страница 109: ...Information 107 section 1 2 3 4 5 6 7 8 9 Wi Fi Interoperability Certificate...

Страница 110: ...ng normal operation Federal Communications Commission Notice This equipment has been tested and found to comply with the limits for a Class B digital device pursuant to Part 15 of the FCC Rules These...

Страница 111: ...s to this device that are not expressly approved by Belkin Corporation may void the user s authority to operate the equipment Canada Industry Canada IC The wireless radio of this device complies with...

Страница 112: ...t Proof of purchase may be required This warranty does not apply if the product has been damaged by accident abuse misuse or misapplication if the product has been modified without the written permiss...

Страница 113: ...7 Bowen Crescent West Gosford NSW 2250 Australia 61 0 2 4372 8600 61 0 2 4372 8603 fax Belkin B V Boeing Avenue 333 1119 PH Schiphol Rijk The Netherlands 31 0 20 654 7300 31 0 20 654 7349 fax Belkin T...

Отзывы: