background image

Service Instructions Automatic Single-Head Serging Machine 1265-4

Beisler GmbH

C-23

C.5

Maintenance

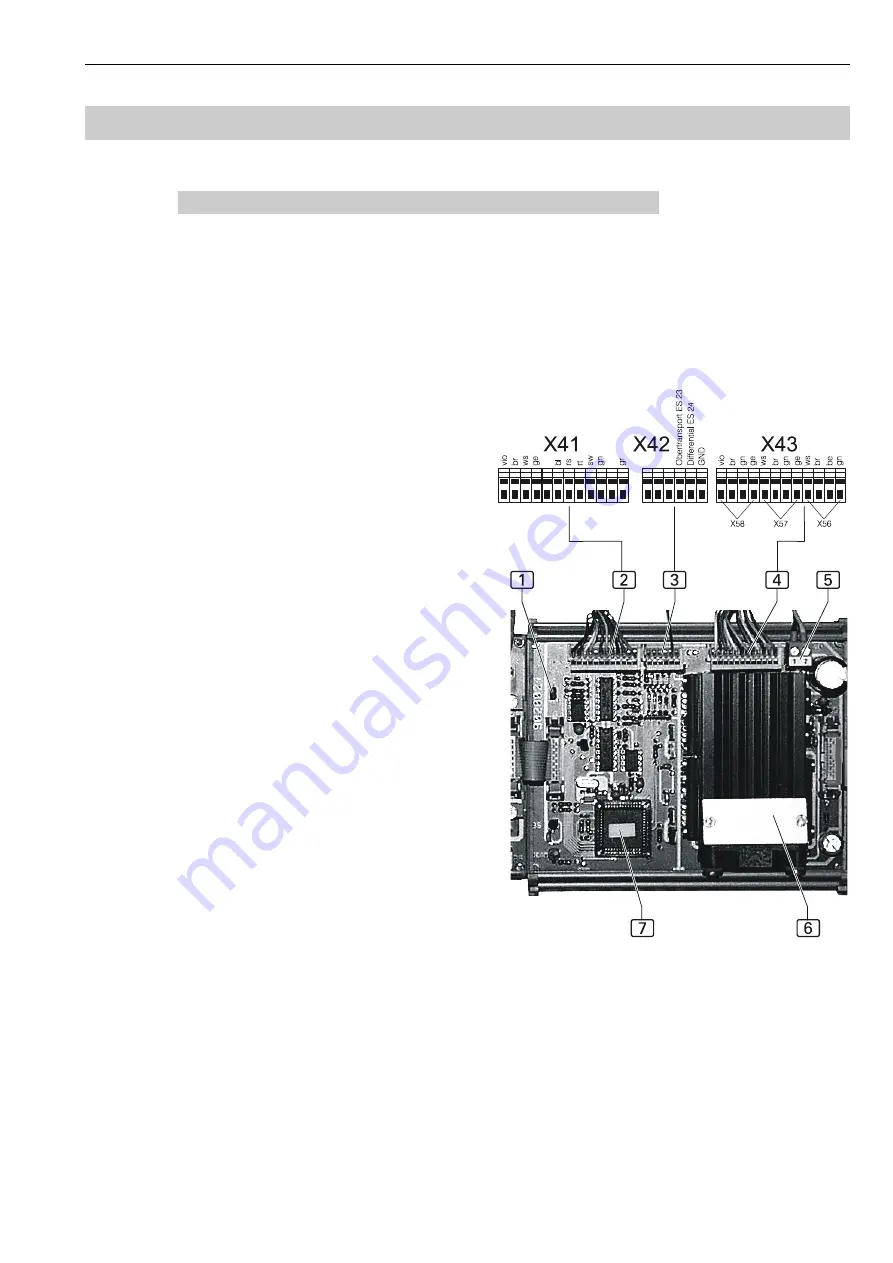
C.5.16 Stepper motor PCB with transmission

Fig. 14:

 Efka control, initiators, and transport unit are connected to the

terminal strips X11-X13.

1

Sewing machine: Jumper (set)

2

Sewing machine: Efka controller

3

Sewing machine: Initiators

4

Sewing machine: Connection for top transport (X58),

differential transport (X57), puller (X56)

5

Sewing machine: 24 V power supply

6

Sewing machine: Fan

7

Sewing machine: EPROM CRC 0105

Fig. 14

Содержание 1265-4

Страница 1: ...Working Instructions Automatic Single Head Serging Machine Beisler GmbH A 1 Working Instructions Working Instructions Automatic Single Head Serging Machine 1265 4 Valid 01 2003 A ...

Страница 2: ...tart up setting up and service of the machine D Programming instructions Instructions for the service personnel in charge of preparing and setting up the machine Scope of the working instructions These working instructions describe the AUTOMATIC SINGLE HEAD SERGING MACHINE 1265 4 of Beisler GmbH and apply only to those machine parts and components that are standard equipment of the AU TOMATIC SING...

Страница 3: ...Working Instructions Automatic Single Head Serging Machine Beisler GmbH A 3 Section A General notes ...

Страница 4: ...he operator A 6 A 1 4 Warranty A 6 A 1 5 Important information for the operating personnel A 7 A 1 6 Important information for the service personnel A 7 A 2 Explanation of symbols A 8 A 2 1 Symbols used in the working instructions A 8 A 2 2 Symbols used on the machine A 8 A 3Use of the device A 9 A 3 1 Correct use A 9 A 3 2 Incorrect use A 9 A 4 Safety requirements A 10 A 4 1 Standards and directi...

Страница 5: ...ot responsible for damage that arises from the use of non defined and non approved spare parts or accessories A 1 2 Copyright 2002 Beisler GmbH Hösbach Automatic single head serging machine The automatic single head serging machine 1265 4 and all related parts are protected by copyright Any reproduction of the machine will be prosecuted Working instructions These working instructions are protected...

Страница 6: ...ing instructions are subject to change wit hout further notice Concerning translations into foreign languages the German versi on of these working instructions is binding Should you encounter problems that are not mentioned in these working instructions please contact your supplier immediately for your own safety Please do not hesitate to contact Beisler if you have any suggestions that help to im...

Страница 7: ...tial operation of the automatic single head serging ma chine 1265 4 read the operating instructions carefully so that you can make full use of the advantages of the machine and to prevent damage A 1 6 Important information for the service personnel Please note that service work to the automatic single head serging ma chine 1265 4 must be carried out only by authorized and adequately trained expert...

Страница 8: ...ns WARNING is used if non observance may cause serious or even lethal injuries CAUTION is used if non observance may cause medium to minor injuries or da mage NOTE is used for hints and useful information A 2 2 Symbols used on the machine WARNING DANGER Caution Observe working instructions WARNING HIGH VOLTAGE Caution Prior to opening pull out power plug ...

Страница 9: ... been designed for permanent operation in indu stry The AUTOMATIC SINGLE HEAD SERGING MACHINE 1265 4 has been tested for electromagnetic compatibility and is suited for instal lation in industrial operating rooms A 3 2 Incorrect use The AUTOMATIC SINGLE HEAD SERGING MACHINE 1265 4 must not be operated in rooms that do not comply with the location requirements The AUTOMATIC SINGLE HEAD SERGING MACH...

Страница 10: ...lations for electrically operated measuring and control in stallations general requirements DIN EN 50178 VDE 0160 1998 04 Equipment of power systems with electronic devices DIN EN 50082 VDE 0839 Part 2 1997 11 Electromagnetic compatibility basic specification immunity to inter ference Part 1 Domestic business and commerce small enterprises Part 2 Industry DIN EN 60204 DIN VDE 0113 1993 06 Electric...

Страница 11: ...Operating Instructions Automatic Single Head Serging Machine 1265 4 Beisler GmbH B 1 Section B Operating Instructions ...

Страница 12: ...Transport 10 B 2 7 Stacking 10 B 2 8 Switches 11 B 2 9 Operating panel 13 B 2 10 Sewing programs 14 B 3Operation 3 B 3 1 Preparing the machine 16 B 3 2 Access levels 17 B 3 3 Selecting a sewing program 18 B 3 4 Passing thread through needles 19 B 3 5 Modifying sewing program functions 19 B 3 6 Resetting the day counter to zero 22 B 3 7 Activating manual sewing 22 B 3 8 Securing the sewing pieces 2...

Страница 13: ...tic single head serging machine 1265 4 are in stalled to a height adjustable rack and freely accessible 1 Thread holder 2 Operating panel 3 Tray for trousers components 4 Tray for lining 5 Working plate 6 Main switch 7 Waste container 8 Footswitch for machine operation 9 Footswitch for stacker a Protective strap for stacker b Stacker c Sewing head with transport unit Fig 1 ...

Страница 14: ...e short seams can be serged manually at the sewing head 2 prior to the sewing of the inseam or side seam The trousers panels are stocked on the upper tray 5 the knee linings are stocked on the lower tray 4 The trousers panel is placed onto the working plate the corresponding knee lining is aligned to the trousers panel with the hems being flush At the optional bonding station 6 the front and rear ...

Страница 15: ...the knee lining from being shifted du ring the sewing process they are secured to each other by hot pres sing at a lateral location At the bonding station 1 a bonding mesh strip 3 is pla ced between knee lining and trousers panel and heated by the lower stamp 4 of the press unit Then the upper stamp 3 and the lower stamp 4 press the sewing pieces to gether so that they are secu red to each other F...

Страница 16: ...of the contour guide The rough adjustment made with the height quick adjustment can be fine adjusted The following should be observed as a rule A single fabric layer should pass easily below the sliding plate 4 while a double layer must not be allowed to pass through the gap The pressure that the contour roller 7 applies to the sewing pie ces is set with the adjustment screw 3 The setting of the c...

Страница 17: ...eces are shif ted sideways away from the stop the puller speed is too high if the sewing pieces warp at the stop the puller speed is too low The frequency for adapting the puller speed is set with the program con trol In addition the contour roller 3 due to its orientation pushes the sewing material toward the stop The lateral thrust depends on the pressure that the contour roller applies to the s...

Страница 18: ... sewing process starts the trousers panel is sewn the knife 5 serges the seam the thread and fabric residues are aspired into the waste container NOTE Reflective surfaces The reflective surface 3 of the photocell must not be damaged or dirty as otherwise the sewing unit control may be impaired NOTE Cancelling the sewing process When the program stop switch at the operating panel is depressed all m...

Страница 19: ...am A and inseam B the trousers panel splits into five sections with the knee lining C extending over four of the se sections For each section the length can be varied and the pertai ning fullness quantity can be preset with the program control see Sec tion D Programming Instructions Quick adjustment Fig 8 The operating panel allows direct access for the quick adjustment of the fullness by modifyin...

Страница 20: ...nsport function can be enabled for heavy fabrics To improve the gliding characteristics of the trousers panels the working plate has six com pressed air nozzles 1 in the sewing head area The air blows from below against the trousers panels the resulting air cushion re duces friction during the transport In the sewing range of the side seam hip curve the position of the strut 3 is altered to rotate...

Страница 21: ...witch for the bonding station heating module The heating module 1 of the optional bonding sta tion has a thermostat with a separate on off switch that is installed below the bonding station Program stop switch When the program stop switch 3 is pressed all machine movements and the sewing process are in terrupted immediately The switch is locked after it has been pressed When rotated clockwise the ...

Страница 22: ... is pressed the upper and lower stamps of the bonding unit are pressed against each other and the bonding mesh between the stamps bonds the sewing pieces to each other Footswitch for stacker 3 When this footswitch is pressed the stacker bund le clamp opens so that the sewing pieces can be removed When the footswitch is released the bundle clamp closes again Footswitch for manual sewing 4 This foot...

Страница 23: ...sed for cancelling the machine cycle Numeric keypad 4 Use the numeric keypad to enter all modifia ble numeric values The sewing programs M01 M09 are selected by entering the corresponding numbers To select the sewing programs M10 M20 press the M key then enter the corresponding numbers Use the P key to select submenus to con firm data input or to exit the programming mode Arrow keys 5 Each pressin...

Страница 24: ...ram a sewing program may consist of several seams 3 Seam number of the sewing program 4 Symbols of the activated sewing functions 5 Day counter for completed seams 6 Symbols of the deactivated sewing functions Preseams Hem seams fly seams and hem seams can be serged sepa rately The characteristics of the preseams are set in a separate pa rameters list These settings are used only if the sewing pro...

Страница 25: ...ing bottom sewing starts at waistband M 05 Seam No 4 5 Front trousers inseam 4 and side seam 5 al ternatingly lining bottom sewing starts at waistband for machines with optional bonding station M 06 Seam No 5 4 Front trousers inseam 4 and side seam 5 al ternatingly lining bottom sewing starts at hem for machines with optional bonding station M 07 Seam No 7 5 Front trousers side seam with pocket po...

Страница 26: ...machine must not be connected Insert the grounding plug into a properly grounded and fused power socket Make sure that the power supply cable is not subjected to tensile or pressure forces 2 Switch the machine on by moving the main switch to position I After the machine has been switched on its control program is powered up The display shows the most recently selected sewing program 3 Switch the h...

Страница 27: ... Select operating menu access level 2 F2 Enable manual sewing F3 Change sewing parameters Enable disable machine functions F4 Select machine parameters F5 Not used F6 Not used F7 Activate stacking F8 Pass thread through needle Access level 2 BD z FH abcdefgh F1 Liste of basic parameters F2 Activate deactivate sewing program seams F3 Set preseams F4 Set start mode F5 Activate machine manually F6 Ac...

Страница 28: ...n D Programming Instructions of these working instructions 1 Select the sewing program at the operating panel The sewing programs M01 M09 can be selected in direct access Enter the number of the sewing program at the numeric keypad e g 4 only the single digit needs to be entered The sewing programs M10 M20 are selected from the memory Select the memory function Press the key Select the number of t...

Страница 29: ...owing functions of a sewing program can either be modified or com pletely enabled or disabled as executable machine function within a va lue range v Top transport Increase reduce value w Differential transport Increase reduce value Puller Parameter 14 speed x Roller Parameter 30 roller distance Sewing speed Speed waist curve slow Fig 17 Enabled functions 1 are displayed as inverted sym bols A disa...

Страница 30: ...which fullness has been enabled w Differential transport The position of the differential transport unit to the main transport unit of the sewing unit can also be changed by quick adjustment within a value range of 19 to 19 This setting affects only that section of the seam for which fullness has been enabled Puller speed The photocell determines the deviation of the fabric contour from the ideal ...

Страница 31: ...mbi nations 1 Select the function Press the c key s until the symbol assigned to the input field appears on a black back ground 2 Move to the basic parameter menu of the selected function Press the key 3 Enable or disable the function Press the h key 4 Confirm input Press the key Fig 18 When the program function Sewing speed at waist curve 2 is selected for the side seam 1 with seam number 7 the c...

Страница 32: ...nds The day counter is reset to zero 3 Confirm reset and return to access level 1 Press the key Display S 0000 B 3 7 Activating manual sewing If the function Manual sewing is enabled the photocell is deactivated and the footswitch is activated 1 Enable the function Press the b key T 2 Control sewing speed by depressing footswitch pedal 3 Disable the function Press the b key T The photocell is acti...

Страница 33: ...ers and secures the knee lining Simultaneously a fi xed section of the bonding mesh 5 is advanced and removed from the backing tape at the se parator 3 Place trousers panel onto lining and align properly To change the position of the knee lining press the clamp switch to open the bonding clamp 4 If the sewing pieces are aligned properly on top of each other press the bonding switch 4 The upper sta...

Страница 34: ...ess To ensure the correct routing of the seam the trousers pa nels must be released as soon as the transport unit of the se wing head has seized the sewing pieces NOTE Resetting the insertion process Before the response delay period of the photocell has elapsed the insertion process can be cancelled by moving the trou sers panels out of the sensor range of the photocell After the sewing process ha...

Страница 35: ...e seam start point at the waistband of the trousers panel to just before the reflection point 3 of the photocell 2 5 Slide trousers panels into the sensor range of the photocell When the fabric interrupts the light beam at the reflective surface the automatic machine cycle is started automatically The seam is sewn and serged NOTE Restart After the manual sewing process the sewing program must be r...

Страница 36: ...ed 1 Press the program stop switch 2 Unlock the program stop switch B 3 12 Shutting the machine down For extended work intermissions the machine must be shut down com pletely 1 Switch off power supply by moving the main switch to the 0 position 2 Disconnect the machine from the compressed air supply B 3 13 Cleaning the machine The machine must be cleaned after large production series or at least o...

Страница 37: ...Service Instructions Automatic Single Head Serging Machine 1265 4 Beisler GmbH C 1 Section C Service Instructions ...

Страница 38: ...n 10 C 5 2 Cleaning 10 C 5 3 Service 11 C 5 4 Removing installing the operating panel 12 C 5 5 Transport unit toothed belts 13 C 5 6 Replacing the roller toothed belt 14 C 5 7 Adjusting the transport rollers 14 C 5 8 Adjusting the contour guide 15 C 5 9 Positioning the contour guide photocells 16 C 5 10 Adjusting the photocell light sensitivity 16 C 5 11 Adjusting the chain cutter knife and stop 1...

Страница 39: ...d aligned the shipping braces must be removed NOTE Damages in transit If any damage presumably caused by incorrect transport is found when the machine is unpacked please contact your supplier immediately C 1 2 Standard equipment The machine is delivered in an operative condition The standard equip ment includes Automatic single head serging machine The machine is equipped with several customer spe...

Страница 40: ...imate Climatic requirements for the operating room The machine must only be stored or operated in closed operating rooms Room temperature 10 C to 45 C Relative humidity max 80 C 2 3 Floor space requirements For operation during production and for service works the machine must be freely accessible from all sides On all sides there must be a minimum clearance of 1 m Dimensions L x W x H 2300 x 1500...

Страница 41: ...ly of the machine requires a properly grounded power supply connection with Grounding plug 230 V 10 50 60 Hz Fusing 16 A NOTE Peak voltages The correct function of the machine requires that the po wer supply system supplies a constant current Peak voltages may particularly impair the stability of the pro gram control Compressed air supply The on site compressed air supply system must meet the foll...

Страница 42: ...ctions 7 Tighten height adjustment locating screws 2 NOTE Shipping braces Before the machine is connected to the power supply sy stem and operated all shipping braces must be removed Cut off cable ties Remove labels Remove protective film from operating panel C 3 2 Compressed air connections Fig 2 The compressed air connection is preinstal led on the machine It comprises the following com ponents ...

Страница 43: ... ratings of the power supply system in the operating room correspond with the ra tings on the nameplate at the rear of the machine If the ratings for voltage V and maximum current A do not match the machine must not be connected Insert the grounding plug into a properly grounded and fused power socket Make sure that the power supply cable is not subjected to tensile or pressure forces Route the po...

Страница 44: ...k ker has been shifted down to the secured position 3 The main switch also serves as an emergency off switch To check the function of this switch turn the machine on start a machine cy cle and turn the machine off during the sewing process using the main switch All operational movements of the cross transport and of the assist transport as well as the sewing process must stop and the program contr...

Страница 45: ...ting personnel and can be used as a template for programming customer specific se wing programs For details about the programming of sewing programs please refer to Section D Programming Instructions C 4 2 Shutting the machine down If the machine is to be shut down it must be disconnected from all en ergy supply sources Disconnecting the machine from the power supply system 1 Turn the machine off ...

Страница 46: ...spection The machine must be inspected annually The inspection comprises particularly the following items safety devices of the machine operativeness of the program control correct function of inputs and outputs C 5 2 Cleaning The machine must be cleaned after large production series or at least once a day whichever occurs first Cleaning the machine surfaces 1 Disconnect machine from power supply ...

Страница 47: ... marks for the upper and lower limits If the level drops below the mark for the mi nimal level refill oil 2 For details on the recommended oil type and refilling procedure please refer to the operating instructions of the sewing heads that are attached to this machine Fig 3 Emptying the water separator weekly 1 Have a suitable container available 2 Drain water at the water seperator of the pressur...

Страница 48: ...ine NOTE Liability Use only original spare parts for installing or replacing machine components The manufacturer and supplier will not assume liability for spare parts from third party suppliers C 5 4 Removing installing the operating panel 1 Disconnect machine from power supply 2 Remove two locating screws and disconnect interface connector 3 Remove retaining screws from operating panel bracket 4...

Страница 49: ...he stepper motor drive roller 6 To pretension the toothed belt push the plate with the stepper motor down and tighten the locating screw 3 If the pretensioning is cor rect it must be possible to depress the center of the belt approx 5 mm while counterpressure is felt 7 Install the pressure cylinder rod to the mounting block and secure it using the screws Replacing the puller toothed belt 1 Lower t...

Страница 50: ... counterpressure is felt NOTE Transport roller orientation After the toothed belt has been replaced the distance bet ween the transport rollers and the working plate must be checked C 5 7 Adjusting the transport rollers Fig 5 The transport rollers of the puller 9 and of the roller 2 should contact the working plate with slight pressure in the lowered position i e distance must be zero in the lower...

Страница 51: ...should lower as far as possible the fabric should pass easily below the sliding plate 1 Slide the sewing material below the sliding plate 2 Push the sliding plate manually down all the way to the stop 3 To lower the sliding plate further rotate the handwheel 1 counterclockwise 4 Pull fabric below sliding plate to check whether the sewing material can pass ea sily Contour roller clamping pressure T...

Страница 52: ...t the fabric passage 5 Adjust the position of the photocells and tighten the locating screws Photocell 13 se wing start at waist band Control of contour guide assist roller control of width dis tribution Photocell 15 se wing start at hem Control of contour guide assist roller control of waist cur ve control of width distribution C 5 10 Adjusting the photocell light sensitivity The sensitivity of t...

Страница 53: ...einstall cover plate and shift contour guide so that the distance A between chain cutter knife 2 and stop 3 is approx 0 2 0 3 mm Check dis tance using a feeler gauge 4 Tighten the two retaining screws 5 at the front of the cover plate 5 Remove cover plate and tighten the contour guide retaining nut 4 6 Align pressure foot 1 to stop 3 Loosen pres sure foot locating screw push pressure foot close to...

Страница 54: ... pres sure foot The distance A between kettup knife 2 and stop plate 3 should be approx 0 2 0 3 mm Set the distance by rotating the knurled screw 4 3 Aligne the pressure foot 1 at the stop 3 Loosen the pressure foot locating screw push the pressu re foot close to the stop and retighten the locating screw The sewing foot should be positioned at distance B of approx 0 5 mm from the kettup kni fe 4 T...

Страница 55: ...ieces while sewing the knee lining is reduced Use the rotary knob 1 to set the pressure to 0 1 mPa and check the pressure at the manome ter 2 2 If the lining is at the bottom the pressure applied to the sewing pie ces while sewing the knee lining is increased Use the rotary knob 1 to set the pressure to 0 25 mPa and check the pressure at the manometer 2 Compressed air nozzles To improve the glidin...

Страница 56: ...ip roll 9 to the drum and push the disk back onto the drum 3 Rotate the pressure pad 5 of the guide 4 side ways 4 Separate the bonding strip from the backing tape 6 and route the strip through the slot 3 5 Rotate the pressure pad back onto the guide and cut the bonding strip at the edge 2 of the guide NOTE Position of the lower stamp The proper function of the bonding unit is only ensured if the l...

Страница 57: ...tion rotate the adjusting screw of throttle 8 3 Directions of rotation Rotate throttle counterclockwise to increase the speed Rotate throttle clockwise to reduce the speed Coordination of the motion sequence If the roller valve switches early the linkage strikes The distance between the start cam and the roller valve con tact 5 must be increased If the roller valve switches late the motion sequenc...

Страница 58: ...e delay and the response sensitivity of the thread monitors The adjustments are made separately with the corresponding potentiometers To extend the response delay or to increase the re sponse sensitivity the corresponding potentiometer 9 is rotated clock wise in the direction of 1 Response sensitivity of thread monitor 2 2 Response delay of thread monitor 2 3 LED thread monitor 2 4 Response delay ...

Страница 59: ... control initiators and transport unit are connected to the terminal strips X11 X13 1 Sewing machine Jumper set 2 Sewing machine Efka controller 3 Sewing machine Initiators 4 Sewing machine Connection for top transport X58 differential transport X57 puller X56 5 Sewing machine 24 V power supply 6 Sewing machine Fan 7 Sewing machine EPROM CRC 0105 Fig 14 ...

Страница 60: ...hotoc ES13 ES14 Tray photoc ES15 Cont guide photoc ES16 X25 Outputs Pressure foot up Y20 Tension blowing Y24 Contour roller Y38 Fly blowing Y31 Stacker start Y32 Stacker motion Y35 X26 Outputs Chain cutting Y22 Table blowing Y23 Dirt aspiration Y25 Contour guide down Y26 Puller down Y27 Roller down Y28 High foot pressure Y40 Pocket pouch stop Y29 Transport up Y36 Arm swinging Y37 Bonding clamp dow...

Страница 61: ...therwise the affected electrical compon ents can be damaged or become unusable Disconnect the machine from the power supply system and protect it from accidental reconnection Fig 16 Setting the PCB switches 1 Set the step number at the DIP switches 1 and 2 microstep at the hook switches 6 and 7 2 Set current lowering at DIP switch 3 3 Set DIP switch 4 to ON 4 Set motor phase current by rotating kn...

Страница 62: ...ell I O communication error Error during data transmission between control and I O module Check all cable connections flat ribbon cables to 9020013 9020024 if required replace contol module 9020013 or module 9020024 ES 02 Photocell 15 missing Connect photocell 15 remove link at X24 Pin2 Thread breakage at sewing head Sewing machine thread monitor has responded Pass thread through needle Error 45 4...

Страница 63: ... 1 N PE AC Power consumption 1 3 kW Fusing 16 A Dimensions of the machine Length x Width x Height in mm 2300 x 2200 x 1700 Table height Adjustable height in mm 790 1240 Weight Overall weight approx 200 kg Compressed air Operating pressure 6 bar Quality oil free Air consumption 40 NL AT Sewing head speeds EXT 3216 03 6500 rpm EX 5204 02 7000 rpm S 52 134 B 8000 rpm ...

Страница 64: ...D 1 Programming Instructions Automatic Single Head Serging Machine 1265 4 Beisler GmbH Section D Programming Instructions ...

Страница 65: ...t curve 16 Settings for the sewing head 17 Acctivating the stacker manually 17 Functions on access level 2 18 Basic parameters 18 Enabling disabling a seam in a sewing program 21 Preseams 22 Setting the start mode 23 Reducing the sewing speed manually 24 Activating the C machine manually optional 24 Resetting the day counter 24 Input output test 25 3 2 Programming menus 28 Occupying free memory 28...

Страница 66: ...or cancelling the ma chine cycle Numeric keypad 4 Use the numeric keypad to enter any changeable numeric values The sewing programs M01 M09 are activated by entering the cor responding numbers To activate the sewing programs M10 M20 press the M key then enter the corresponding numbers Use the P key to select submenus to confirm data input or to exit the pro gramming mode Arrow keys 5 Each pressing...

Страница 67: ...used for managing sewing programs they offer functions that support the set up and the testing of the machine transmission and storage of data input output tests for the initiators of the compressed air system diagnostic tests for motors additional programs Access to some of the service menus and programming menus requi res an access privilege that protects the data from unauthorized mani pulation...

Страница 68: ... values that control the basic functions of the machine Changes to basic parameters will result in changes of all stored sewing programs Sewing programs can be extended renamed or copied In a sewing program at least one seam must be activated If a sewing program consists of several seams a subset of seams may be deacti vated Basically it is possible to create entirely new sewing programs howe ver ...

Страница 69: ...arts at waist band M 03 Seam No 6 7 Front trousers inseam 6 and side seam 7 al ternatingly lining top sewing starts at waistband M 04 Seam No 5 4 Front trousers inseam 4 and side seam 5 al ternatingly lining bottom sewing starts at waistband M 05 Seam No 4 5 Front trousers inseam 4 and side seam 5 al ternatingly lining bottom sewing starts at waistband for machines with optional bonding station M ...

Страница 70: ...D 7 Programming Instructions Automatic Single Head Serging Machine 1265 4 Beisler GmbH D 2 Program control 2 2 Menu level overview Fig 2 ...

Страница 71: ...ess level 2 F2 Manual sewing controlled by footswitch F3 Select sewing parameters Enable or disable machine functions F4 Select machine parameters F5 Not used F6 Not used F7 Activate stacker manually F8 Pass thread through needles Selecting access level 2 Press the a key j Manual sewing controlled by footswitch When the front of the pedal is depressed the sewing process starts The sewing speed dep...

Страница 72: ...ack back ground 2 Increase or reduce the value using the arrow keys Press the or key 3 Confirm input Press the key Fig 3 Enabled functions 1 are displayed as inverted symbols A disabled function 3 appears as an icon on a bright background The parameter value assigned to a function is displayed in the corresponding input field 2 to the right of the function symbol The parameters assigned to the fun...

Страница 73: ...ons or machine functions For specific sewing patterns or as the result of a specific material beha vior all six functions can be enabled or disabled individually or in com binations 1 Select the function Press the c key s until the symbol assigned to the input field appears on a black back ground 2 Move to the basic parameter menu of the selected function Press the key 3 Enable or disable the func...

Страница 74: ... This section is determi ned by trial and error for each se wing piece The knee lining C extends over four of these five sections For each section the length can be varied and the pertaining fullness quantity can be preset with the program control Changing the fullness by accessing the complete parame ter list of the sewing function Basic setting When this menu is opened the input field 3 of the b...

Страница 75: ...ne 1265 4 Beisler GmbH D 3 Programming Examples for section layout Fig 7 Side seam sewing starts at waistband Fig 8 Inseam sewing starts at waist band fly Fig 9 Side seam sewing starts at hem Line up positi on when using the optional bonding station Fig 7 Fig 8 Fig 9 ...

Страница 76: ...ng is enabled 3 Length of an individual section for which fullness is to be enabled 4 Function SLOW SEWING only for differential transport NOTE Quick access The quick access for fullness value range 19 to 19 app lies only to an activated section If a section is deactiva ted sewing is performed using the basic settings or using the specific values that have been set for a section Settings for diffe...

Страница 77: ...fields are scrolled from left to right 1 Activate deactivate input field Press the or key 2 Modify the value Press the or key or enter the two digit value using the numeric keypad Input se quence Tens digit units digit 3 Confirm input and exit menu Press the key Puller speed The photocell determines the deviation of the fabric contour from the ideal routing and adjusts the puller speed accordingly...

Страница 78: ...arameter changes the length of the distance along which the roller transports the sewing piece on the worktable from the sewing head to the stacker 25 STITCH TILL ROLLER DOWN Sewing distance after sewing start before the roller is lowered only required for heavy materials 26 STITCH WITH ROLLER DOWN Length of the distance along which the roller transports 27 TILL ROLLER STOP CUTTER Distance along w...

Страница 79: ...t unit is lowered the pneumatic stop moves to the pressure foot and the contour guide controls the seam Sewing speed at waist curve The settings determine the puller speed for the sewing of the waist cur ve Depending on the waist curvature a puller speed that has been ad apted accordingly can be set 20 SLOW BY WAIST CURVE Major parameter basic setting for puller speed 21 TILL SPEED SLOW Distance a...

Страница 80: ...WING STITCHES Distance of the slow sewing start 05 CONTOUR GUIDE UP Sewing distance traveled at sewing start before the contour guide is lowered 06 TILL TABLE BLOWING ON Sewing distance traveled at sewing start before the worktable nozzles are supplied with compressed air 07 DURATION TABLE BLOWING 70 Distance along which the compressed air transports a sewing piece 09 REDUCED SPEED Reduced sewing ...

Страница 81: ... Enable preseams F4 Set start mode F4 Activate machine manually F6 Activate C machine optional manually F7 Reset the day counter to zero F8 Display inputs outputs Basic parameters Basic parameters are values that control the basic functions of the ma chine Changes to basic parameters will affect all stored sewing pro grams NOTE Modifications of basic parameters The basic parameters of the machine ...

Страница 82: ...process starts this setting depends on the sewing material 03 THREAD TENS CLOSE BEGIN Number of stitches while the top thread is slackened before being retensioned 04 CHAIN CUT SUCTION BEG Legth in cm for the chain cutting function at sewing start longer suction period required for three thread machines switch off for sa ving energy 05 CHAIN OFF STITCHES Distance for postsewing stitches when the s...

Страница 83: ...ensitivity 99 Low response sensitivity setting depends on thread used 13 HEAD POSITION UP Lower needle position 14 STITCH LENGTH Synchronisation of puller lowering position with sewing unit stitch length Procedure 1 Setting the fixed stitch length at sewing unit handwheel 2 ex ample stage 6 is approx 3 2 mm stitch length 2 Mark desired lowering position M of puller 1 on sewing piece 3 Adjusting pa...

Страница 84: ... a modified sewing program does not indicate which seams are disabled 1 Select the SEWING SEQUENCE function D Press the b key 2 Position the cursor on the number of the seam that is to be disabled Press the or key 3 Disable seam Press the 0 key at the numeric keypad 4 Confirm change Press the key On the display the seam number disappears from the sewing sequence To reenable the seam 1 Select the S...

Страница 85: ...r list Press the c key 1 PRESEAM SPEED Sewing speed PRESEAM TOP FEEDING Basic setting for fullness PRESEAM DIFFERENTIAL Basic setting for fullness TIL ROLLER DOWN Length in cm til roller down max value 99 cm 2 PRESEAM SPEED Sewing speed PRESEAM TOP FEEDING Basic setting for fullness PRESEAM DIFFERENTIAL Basic setting for fullness TIL ROLLER DOWN Length in cm til roller down max value 99 cm 3 PRESE...

Страница 86: ...y or enter a two digit or three digit value using the numeric keypad In put sequence Hundreds digit tens digit units digit 4 Confirm input Press the key 5 Exit menu and return to access level 2 Press the key Setting the start mode There are two ways for setting the start mode of the sewing process Start by photocell automatic sewing process Start with footpedal 1 To change the start mode Press the...

Страница 87: ...Sewing speed manually The sewing machine B Machine works with reduced speed z Press the e key Activating the C machine manually optional The C machine can be activated manually and will sew as long as the function key is depressed Press the f key Resetting the day counter This function is used to reset the day counter to zero before a new pro duction cycle or after a completed cycle 1 Select the f...

Страница 88: ...04 05 06 07 08 09 10 11 12 13 14 15 16 17 18 19 20 21 22 23 24 25 26 27 28 29 30 31 32 33 34 35 36 37 38 39 40 41 42 43 44 45 46 47 48 49 50 51 52 53 54 55 56 57 58 59 60 OUT 01 02 03 04 05 06 07 08 09 10 11 12 13 14 15 16 17 18 19 20 21 22 23 24 25 26 27 28 29 30 31 32 33 34 35 36 37 38 39 40 41 42 43 44 45 46 47 48 49 50 51 52 53 54 55 56 57 58 59 60 1 Select function for resetting inputs output...

Страница 89: ...on 1 Mark output number using the cursor Press the key for approx 3 seconds The function number is highlighted in black and flashes The output switches intermittently 2 Switch off intermittent operation of output Press the key The function number is highlighted steadily in black again The out put is still active 3 Deactivate output Press the key ...

Страница 90: ... 24 24 Tension blowing Y 25 25 Dirt aspiration Y 26 26 Contour guide down Y 27 27 Puller down Y 28 28 Roller down Y 31 31 Inseam blowing Y 32 32 Stacker start Y 35 35 Stacker movement Y 36 36 Transport to Y 37 37 Arm swinging Y 38 38 Assist roller Y 39 39 Puller swinging Switches Input No ES 02 02 GND link photocell 15 table plate ES 04 04 Lining clamp ES 05 05 Bonding start ES 09 09 Thread monito...

Страница 91: ...e memory 2 Add new seams or copy existing seams into a sewing program 3 Configure seams as required by production NOTE Backward scrolling in program levels When the programming menus are selected the menu used last is always displayed This level is indicated by the number 1 placed in front of the functions For selec ting certain functions you may have to scroll backward in the programming and serv...

Страница 92: ...O function Press the c key 4 Enter the number of the seam to be copied into the input field 5 Confirm copy process Press the key 6 The display shows O K PLEASE WAIT to indicate that the copy process has been successfully completed Then the seam number is shown in the display field of the sewing program Modifying a sewing program seam The sewing parameters that were changed as a result of the copy ...

Страница 93: ...ed sewing program cannot be erased 1 Select the programming menus Press the key 2 Select the INITIAL PARAMETER function Press the a key Programming level 2 is displayed 3 Select the ERASE SEAM function Press the d key 4 Enter the number of the seam into the input field 5 Start erasure Press the key The display shows the safety prompt ARE YOU SURE 6 Confirm erasure Press the key The display shows O...

Страница 94: ...ual seams should be copied to the memory card at regular intervals Do not use the supplied memory card that contains the standard sewing programs for data backup Formatting the memory card If additional memory cards optional are used for data backup they must be formatted before they can be used 1 Insert the memory card into the slot on the operating panel 2 Select the programming menus Press the ...

Страница 95: ...store all sewing programs select the ALL VARIABLES CARD function Press the c key 6 Confirm the selection Press the key 7 The display shows O K PLEASE WAIT until the data transmission has been completed Copying data to the storage medium of the operating panel Data stored on a memory card can be copied to the operating panel ei ther partially as individual sewing programs or completely all sewing p...

Страница 96: ...menus Press the key 3 Select the MEMORY CARD function Press the b key 4 To overwrite the selected seam shown on the display select the CARD CURRENT SEAM function Press the b key or 5 To overwrite all sewing programs select the CARD ALL VA RIABLES function Press the d key 6 Confirm the selection Press the key 7 The display shows O K PLEASE WAIT until the data transmission has been completed ...

Страница 97: ...d in the programming and service menus To select service menus Press the key To scroll back in service menus Press the or key Service code The functions in the service menus are protected by a dual stage ac cess privilege First enter the machine code 50190 for copying sewing parame ters basic parameters and sewing programs and for selecting some of the diagnostics programs Select the menu again an...

Страница 98: ...ially or completely removed machine components may be dama ged Perform tests only when the machine is at operating temperature F1 SERVICE TESTS These menus are only accessible after the service code has been entered and must only be selected as instructed by authorized ser vice personnel members F4 MAIN HEAD TESTS F5 C HEAD TESTS These functions are used to check the sewing motors and the pertai n...

Страница 99: ... 3 Complete the test Press the key F2 SEW MOTOR PULLER Stepper motor test F3 ROLLER Roller distance test F4 TOP FEEDING Top transport function test F5 DIFFERENTIAL Differential transport function test Selecting the language The language for the menu items and for the text shown at the display can be selected 1 Select the programming menus Press the key 2 Select the ADDITIONAL PROGRAMS function Pre...

Страница 100: ...e total number of the sewing pieces processed with the machine is edited in a counter function This counter cannot be reset to zero 1 Select the programming menus Press the key 2 Select the ADDITIONAL PROGRAMS function Press the e key 3 Select the PIECE COUNTER function Press the b key 4 Return to access level 1 Press the key ...

Отзывы: