


R5909934 /00
E2 Lite and EC-40
114
After linking chassis, a few menus provide the option of changing between which unit controls you
are viewing.
From the Menu bar at the top of all pages, you can select which processor
’
s details you are viewing,
by selecting that processor from the pull down menu.
There is no relationship between Unit ID and Master or Slave selection. Either unit can be Master or
Slave in a linked configuration. The only real significance
—
but totally transparent to users
—
is the
Event Master Toolset communicates only with the Master unit. The Master unit establishes its own
connection and handles all communications with the Slave.
How to Link Two E2 Lite Units
E2 Lite video processors do not come equipped with expansion link cards or cables. Expansion link cards and
cables must be purchased separately and installed in slots 1 and 2 of each E2 Lite unit that is to be linked.
Expansion Link cards are identified by a yellow stripe at the top. Make sure to use the locking mechanism and
then push each cable until it locks in place.
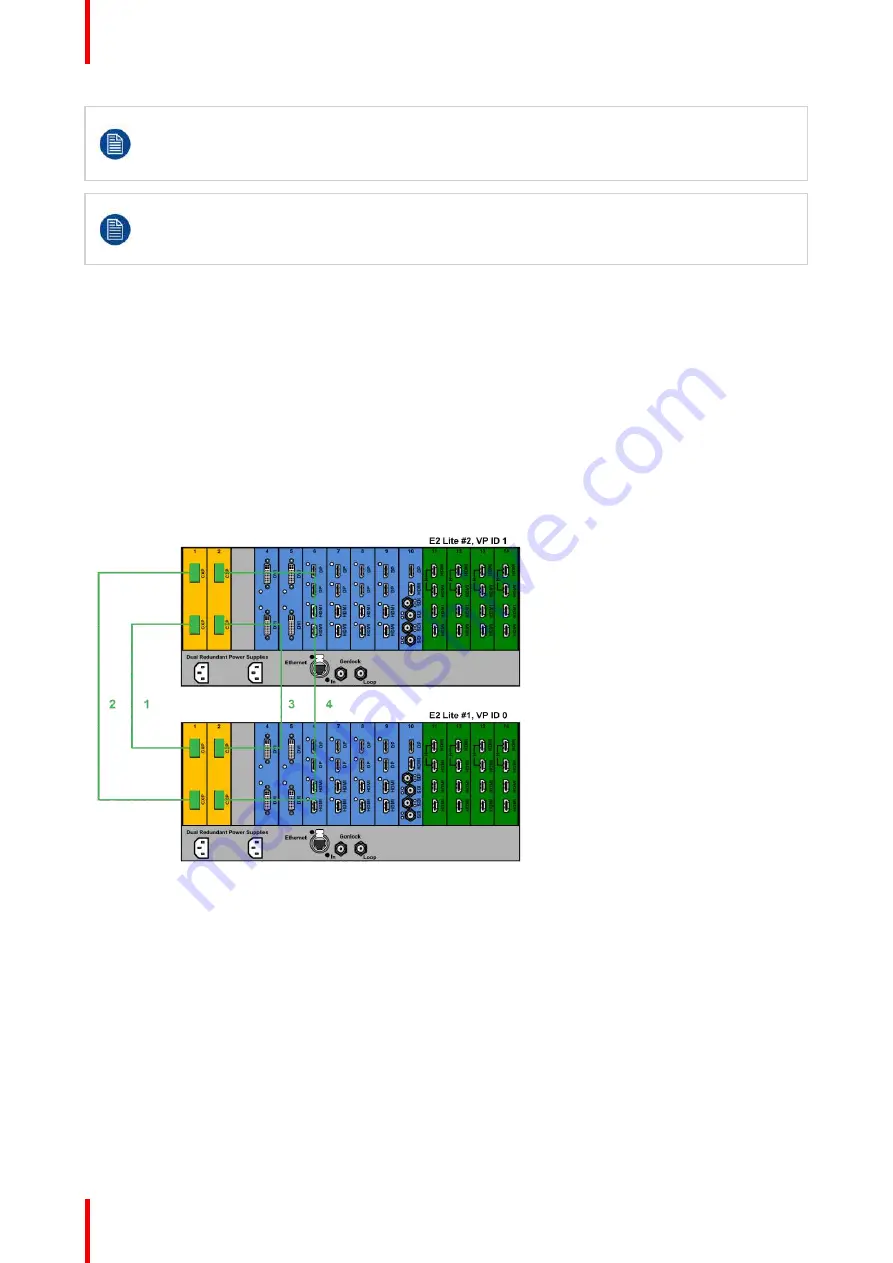
Connect the Link cables between the Expansion Link connectors on each E2 Lite unit as follows:
•
VP ID 0, Link Card slot 1, Link 1 >> VP ID 1, Link Card slot 1, Link 2 [1]
•
VP ID 0, Link Card slot 1, Link 2 >> VP ID 1, Link Card slot 1, Link 1 [2]
•
VP ID 0, Link Card slot 2, Link 1 >> VP ID 1, Link Card slot 2, Link 2 [3]
•
VP ID 0, Link Card slot 2, Link 2 >> VP ID 1, Link Card slot 2, Link 1 [4]
See Image 6-28 for an example of the cabling between two E2 Lite units.
Image 6-28: Cabling between two E2 Lite units
Event Master configuration for two E2 Lite units
1.
Start the Event Master Toolset.
2.
Make sure that the two E2 Lite units are discovered on the network and that they have different Unit IDs.
3.
Drop one of the two E2 Lite units in the GUI.
4.
Then drop the second E2 Lite.
You will be presented the option to add as a new system, add as a master, or add as a slave.
5.
Select either add as a master or add as a slave.
6.
(Optional) At this point it is suggested that you select and name appropriately each unit so that you can
identify it in your setup.
Содержание Event Master E2 Lite
Страница 1: ...ENABLING BRIGHT OUTCOMES User s Guide E2 Lite and EC 40...
Страница 10: ...R5909934 00 E2 Lite and EC 40 10...
Страница 14: ...R5909934 00 E2 Lite and EC 40 14 Introduction...
Страница 18: ...R5909934 00 E2 Lite and EC 40 18 Safety...
Страница 32: ...R5909934 00 E2 Lite and EC 40 32 General...
Страница 46: ...R5909934 00 E2 Lite and EC 40 46 Hardware orientation...
Страница 168: ...R5909934 00 E2 Lite and EC 40 168 EM GUI orientation...
Страница 208: ...R5909934 00 E2 Lite and EC 40 208 Controller Orientation...
Страница 214: ...R5909934 00 E2 Lite and EC 40 214 Controller Configuration...
Страница 220: ...R5909934 00 E2 Lite and EC 40 220 Controller Operation...
Страница 226: ...R5909934 00 E2 Lite and EC 40 226 13 2 Process Overview Flow chart Image 13 2 E2 Lite Maintenance...
Страница 284: ...R5909934 00 E2 Lite and EC 40 284 E2 Lite Maintenance...
Страница 289: ...289 R5909934 00 E2 Lite and EC 40 Environmental Information 15...
Страница 300: ...R5909934 00 E2 Lite and EC 40 300 Specifications...
Страница 316: ...R5909934 00 E2 Lite and EC 40 316 Remote Control Protocol...
Страница 317: ...317 R5909934 00 E2 Lite and EC 40 Troubleshooting C...
Страница 320: ...R5909934 00 E2 Lite and EC 40 320 Troubleshooting...
Страница 329: ...R5909934 00 E2 Lite and EC 40 329 Index...


