


PR25 - 4
WBPEEUI220771A0
Procedure
□
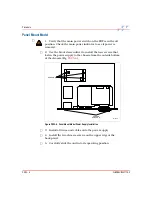
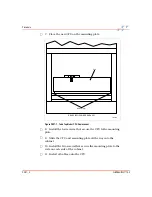
2. Use the bladed screwdriver to install the four screws that
hold the power supply to the center support wall of the PEP
(Fig.
□
3. Connect the DC distribution board connector.
□
4. Connect the wires between the power supply and the
incoming AC power.
□
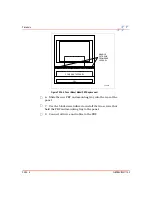
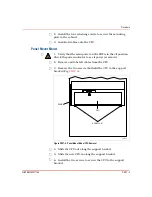
5. Install the cover onto the top of the PEP by using the bladed
screwdriver to install the nine screws.
□
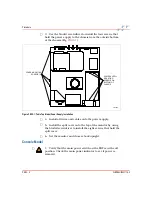
6. Use the bladed screwdriver to install the four screws that
secure the IIMKM02A module to the PEP (Fig.
). Be sure
to install the two nonconductive washers for each standoff.
□
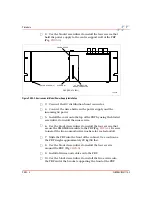
7. Slide the PEP into the front of the cabinet. Use caution as
the PEP weighs approximately 23 kg (50 lbs).
□
8. Use the bladed screwdriver to install the four screws
around the PEP. (Fig
□
9. Install all wires and cables onto the PEP.
□
10. Use the bladed screwdriver to install the two screws into
the PEP end of the bracket supporting the front of the PEP.
Figure PR25-3. Environmental Model Power Supply Installation
T01482A
POWER SUPPLY
SCREWS (4)
PEP (FRONT VIEW)
DC DISTRIBUTION
BOARD CONNECTOR
COVER SCREWS (9)
Содержание C-I-CV42C
Страница 1: ...Bailey Hartmann Braun TM Instruction Conductor Conductor VMS Series 42 Auxiliary Terminal ...
Страница 15: ...WBPEEUI220771A0 ...
Страница 43: ...WBPEEUI220771A0 ...
Страница 53: ...WBPEEUI220771A0 ...
Страница 67: ...WBPEEUI220771A0 ...
Страница 77: ...WBPEEUI220771A0 ...
Страница 93: ...PR1 2 WBPEEUI220771A0 Procedure 3 Turn each end latch turn 4 Open the door ...
Страница 97: ...WBPEEUI220771A0 ...
Страница 107: ...WBPEEUI220771A0 ...
Страница 113: ...WBPEEUI220771A0 ...
Страница 123: ...WBPEEUI220771A0 ...
Страница 125: ...WBPEEUI220771A0 ...
Страница 133: ...WBPEEUI220771A0 ...
Страница 137: ...WBPEEUI220771A0 ...
Страница 141: ...WBPEEUI220771A0 ...
Страница 143: ...WBPEEUI220771A0 ...
Страница 145: ...WBPEEUI220771A0 ...
Страница 147: ...WBPEEUI220771A0 ...
Страница 151: ...WBPEEUI220771A0 ...
Страница 177: ...PR27 6 WBPEEUI220771A0 Procedure 7 Install all cables onto the CPU ...
Страница 181: ...WBPEEUI220771A0 ...
Страница 184: ...Procedure WBPEEUI220771A0 PR29 3 Figure PR29 2 IIADP02 Bezel Removal T01401A REAR VIEW SCREWS 4 ADP ...
Страница 185: ...WBPEEUI220771A0 ...
Страница 195: ...WBPEEUI220771A0 ...
Страница 197: ...WBPEEUI220771A0 ...
Страница 213: ...WBPEEUI220771A0 ...


