


30
30
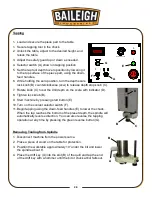
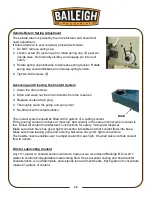
Timing Belt Replacement
This machine is designed with a timing pulley and belt to provide greater braking response and
torsion strength. The timing belt should be replaced when the belt is worn or broken.
1. Lockout power to the machine.
2. Remove the machine head cover (A).
3. Loosen (4) nuts to free the motor (S).
4. Slide the motor toward the pulley (AL).
5. Lift out or remove the timing belt (T).
6. Replace the belt.
7. Slide the motor away from the pulley to
tension the belt.
8. Check that the belt teeth sit properly in the
grooves of the timing pulley.
9.
Tension should be loose enough to allow .197”-.394” (5-10 mm) movement when pushing
the belt from the side.
10. Tighten nuts to secure the motor.
11. Replace the cover.
Storing Machine for Extended Period of Time
If the Drill Press is to be inactive for a long period of time, prepare the machine as follows:
•
Detach the plug from the electrical supply panel.
•
Empty and clean the coolant reservoir.
•
Clean and grease the machine.
•
Cover the machine.
S
AL
T
Содержание DP-1000VS
Страница 19: ...16 16 OVERALL DIMENSIONS ...
Страница 20: ...17 17 GETTING TO KNOW YOUR MACHINE Q F P J B C A G H I L M E F D N O K R ...
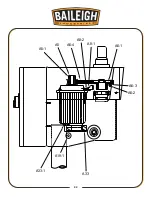
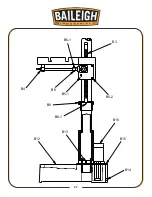
Страница 35: ...32 32 A6 2 A6 3 A6 1 A6 4 A8 1 A8 2 A5 A5 1 A33 1 A19 1 A33 ...
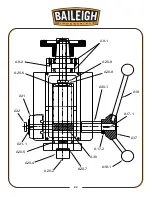
Страница 36: ...33 33 A20 7 A30 A17 2 A17 1 A17 A18 A18 1 A30 1 A20 9 A20 8 A9 1 A9 2 A20 6 A31 A32 A31 1 A20 5 A20 4 A20 2 ...
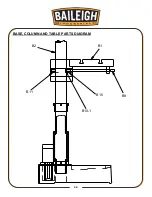
Страница 39: ...36 36 BASE COLUMN AND TABLE PARTS DIAGRAM B1 B2 B11 B10 B9 B10 1 ...
Страница 40: ...37 37 B3 B4 B6 1 B6 B5 1 B5 2 B8 B8 1 B12 B13 B16 B15 B14 ...
Страница 44: ...41 41 COOLANT PUMP ASSEMBLY PARTS DIAGRAM ...
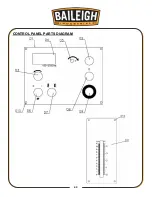
Страница 46: ...43 43 CONTROL PANEL PARTS DIAGRAM ...
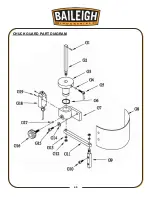
Страница 48: ...45 45 CHUCK GUARD PART DIAGRAM ...
Страница 51: ...48 48 ELECTRICAL ENCLOSURE COMPONENTS ...