15
Wall Mount Installation
1. Use the drilling paper included in the package to drill the holes in the wall where the user wants to
mount the camera.
P/N: 303AU340-AGR
46.00[1.81]
51.00[2.01]
Ø5.50[Ø0.22]
2. Use the screw to secure the A L-mount bracket on the wall.
Screw
For Cement wall:
M4 x20mm self-tapping screws(x4) + Plastic conical anchor
For Wooden wall:
M4 x20mm self-tapping screws(x4)
Содержание CAM520 Pro
Страница 1: ...CAM520 Pro User Manual ...
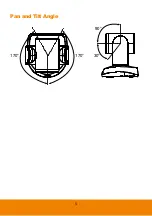
Страница 14: ...5 Pan and Tilt Angle 170 170 90 30 ...
Страница 58: ...49 Time Format Select the time format In live screen view select System Time Format 24 Hour or 12 Hour ...
Страница 69: ...60 Reset Password Set Web access password back to default The default password is aver4321 ...
Страница 75: ...66 Allow Remote Access Set the Web access authority Select Camera Allow remote access YES or NO ...

