Avaya S6200 Скачать руководство пользователя страница 30

Installing S6x00 Hardware

30 Installing the S6200, S6500, and S6800 Conferencing Server


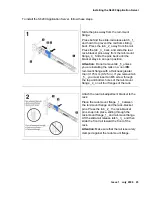
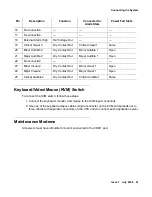
Installing the KVM Switch and Application Servers

The optional KVM switch and application servers must be installed in an IT style rack (front/rear 
mounting rails).

!

Important:

Important:

If a KVM switch is used, the applications servers must be installed close enough 
to the S6x00 components for the KVM cables to reach.

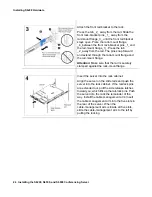
If chassis slides are included, please refer to the instructions included with the slides.

Before installing, unpack and verify the physical condition of the KVM switch and application 
servers. Contact audio web conferencing support if any discrepancies are found.

Содержание S6200

Страница 1: ...Meeting Exchange 4 1 Installing the S6200 and S6800 Conferencing Servers 04 601373 Issue 1 July 2006...

Страница 2: ...to interface with the Software Units may be linked to a specific identified Server Database License DL Customer may install and use each copy of the Software on one Server or on multiple Servers prov...

Страница 3: ...6 Environmental Requirements 17 Operating Conditions 17 Power and Cooling Requirements 17 S6200 Application Server 17 CMS 1000 Media Server 18 CMS 6000 Media Server 19 Separate Client Registration Web...

Страница 4: ...Connections 42 Power Up and Initial Testing 43 Power Up Sequence 43 Setting IP Addresses 43 Set IP Address for S6x00 CPU 43 Set IP Address for Application Servers 43 System Clean Up and Labeling 44 N...

Страница 5: ...hassis and associated media servers After the equipment is installed and connected to the LAN and network the servers are configured by Avaya Support using LAN or modem connections Audience This docum...

Страница 6: ...ed For example Press Enter to select Default all packages Italic Used for references to publications For example See the Meeting Exchange 4 1 Administration and Maintenance Guide for the S6200 S6500 a...

Страница 7: ...nferencing Servers The Meeting Exchange 4 1 Release Notes for the S6200 S6500 and S6800 Conferencing Servers Describes known bugs for this release and bugs fixed from the previous release Refer to the...

Страница 8: ...cluded in the system Table 1 S6200 S6500 S6800 Conferencing Server S6x00 Media Server Configurations S6200 S6500 S6800 Application Server Call handler Media server translator and SIP Agent S6200 S6200...

Страница 9: ...nterface Support for 1 recorded music channel and up to 4 connection based FDAPI music channels Convedia Hardware Media Servers The hardware media server configuration works in conjunction with the S6...

Страница 10: ...tion server and the CMS 1000 as a media server Figure 2 S6500 Media Server Note Note Refer Convedia s CMS 1000 Media Server Installation and Operations Manual part number 95 0064 00 08 for additional...

Страница 11: ...ed on the S6200 media server because the application server and the media processing function are both part of a single point of failure device Redundancy requires that these functions be separated In...

Страница 12: ...e installed to allow one monitor and keyboard to connect to the S6200 S6500 S6800 Conferencing Server and up to three associated application or hardware media servers Installation Steps Installation c...

Страница 13: ...unting point and that redundant power is available if specified AC power for any additional application servers Client Registration Web Portal Web Conferencing Modem Connections The Site Survey specif...

Страница 14: ...ng information specified in the Site Survey is still correct Note any changes to the information specified on the Site Survey and be sure to report any discrepancies to the Avaya Support Help Desk whe...

Страница 15: ...hat all have been received A list of ordered equipment is included with the Site Survey provided by the Project Manager Identifying Components The S6x00 ships with all cards and software installed For...

Страница 16: ...front rear mount or Telco style center mount racks The S6200 chassis mounts in 1U 1 75 or 44 mm and is 27 686 mm deep The CMS 1000 chassis mounts in 1U 1 75 or 44 mm and is 15 6 397mm deep The CMS 600...

Страница 17: ...nd power requirements for each platform S6200 Application Server The S6200 Application Server can be configured with one or two AC power supplies that work in tandem to provide N 1 redundancy The supp...

Страница 18: ...ur Input Requirements for AC System The system has redundant AC inputs which must be connected to a grounded mains outlet or UPS Input Requirements for DC System The system has redundant DC inputs The...

Страница 19: ...arate Client Registration Web Portal Web Conferencing Servers Separate Web Portal Servers and Web Conferencing Servers are off the shelf servers from IBM Dell or HP The following models are certified...

Страница 20: ...Keep cable runs between systems and concentrators short and reasonably clear of electrical noise sources such as motors and fluorescent lighting The specifications for the amount of disturbance that c...

Страница 21: ...any discrepancies between installed facilities and Site Survey Steps 1 and 2 were covered in Chapter 1 Getting Started This chapter covers steps 3 through 6 Before You Begin You should have a working...

Страница 22: ...nd materials are required to perform the installation Phillips and flat screwdrivers ESD wrist strap Tie wraps and labeler Crimpers pliers RJ45 plugs and RJ11 plugs Category 5 or 5E cable Fixed socket...

Страница 23: ...ss you are installing the rails on a non IBM rail mount flange with a thickness greater than 3 175 mm 0 125 in If you remove tab _5_ you must insert an M6 screw through the top and bottom holes of the...

Страница 24: ...h the rack mount flange and the rail mount flange Attention Make sure that the rail is securely clamped against the rack mount flange Insert the server into the rack cabinet Align the server on the sl...

Страница 25: ...all five slots slide the cable management arm to the left by pulling the locking cam back away from the server Connect the cables and secure the cable management arm to the rack Pull the cable managem...

Страница 26: ...rack The rail lock pins stop the server halfway along the rack Secure the cables by using the straps that are attached to the cable management arm Slide the server back into the rack cabinet If you ha...

Страница 27: ...edia Server To install the CMS 1000 Media Server or the CMS 6000 Media Server follow these steps 1 To install the chassis in a 19 IT style rack front mount use the mounting adapters as already install...

Страница 28: ...800 Conferencing Server 2 To install the chassis in a 19 telco style rack flush mount move the mounting adapters back to the center of the chassis Mount from the rear of the rack with the front of the...

Страница 29: ...is Mount from the front of the rack with the chassis centered 4 Where necessary place captive nuts into the rack rails to match the holes in the mounting adapters 5 Lift the chassis into place and sec...

Страница 30: ...ar mounting rails Important Important If a KVM switch is used the applications servers must be installed close enough to the S6x00 components for the KVM cables to reach If chassis slides are included...

Страница 31: ...aced in service locations Power Connections S6200 Application Server AC Power The S6200 Application Server uses dual AC power feeds For redundant operation connect each cord to a separate circuit Avay...

Страница 32: ...wire To ground the media server follow these steps 1 Unpack the ground cable that was shipped with your system 2 Strip the cable further if necessary to expose approximately 1 2 inch of copper wire on...

Страница 33: ...CMS 1000 Media Server has a dual AC power feed Connect each power cord to a suitable power source Avaya recommends the use of an Uninterruptible Power Supply UPS for the AC feed AC Power Cord Recepta...

Страница 34: ...input terminal block You must run separate returns for each power feed CAUTION CAUTION When tightening the nuts on the power input terminals never use more than 30 inch lbs of torque Torque greater th...

Страница 35: ...ound systems Connecting the CMS 6000 Media Server to Ground is extremely important After rack mounting the CMS 6000 Media Server ground it using the ground cable that was shipped with your system and...

Страница 36: ...the exposed wire is crimped by the ground post 6When the shelf end of the ground cable is securely connected to the chassis ground clamp connect the other end of the ground cable to earth To ground th...

Страница 37: ...redundant connections to time clocks External reference clocks must be Stratum 3 quality or better External timing sources when connected automatically override the media server s internal clock If t...

Страница 38: ...xternal reference clock 1 Connect the media server end of the timing source cable to the RJ 45 connector of one of the BITS ports on the back of the media server 2 Connect the other end of the cable t...

Страница 39: ...critical major and minor alarms If you want to connect to a CO alarm system you must provide an alarm cable with a properly configured DB 25 pin connector Details on fabricating the external alarm ca...

Страница 40: ...y contacts can withstand the following surges 2500 V 2x10 msec between the coil and the contacts in compliance with Bellcore standards 1500 V 10x160 msec between the contacts of the same pole in compl...

Страница 41: ...e Modems All servers must have a Multitech modem connected to the COM1 port 16 No connection 17 No connection 18 External Alarm High Ref Voltage Out 19 Critical Visual 2 Dry Contact Out Critical Visua...

Страница 42: ...While both may be physically connected to the same LAN you must specify which Ethernet controller port is used for the control LAN Use port 1 or A for the media LAN Use port 2 or B for the control LA...

Страница 43: ...xcept CRS Web Portal Web Conferencing run Windows 2003 Server For each application server follow these steps 1 Set the KVM switch to connect the keyboard monitor and mouse to the application server 2...

Страница 44: ...his could cause injury to personnel or the system if a cable is accidentally pulled All cables should be tie wrapped neatly 4 Physically inspect the system and general area to ensure no parts shipping...

Страница 45: ...rd is added to the S6200 Application Server customers can easily integrate existing PSTN T1 E1 users into their IP network Overview The AudioCodes TP 260 SIP is a PCI Board that may be installed in th...

Страница 46: ...tremely sensitive to static electricity to reduce the risk of damage due to ESD when installing or servicing electronic equipment it is recommended that anti static grounding straps and mats to be use...

Страница 47: ...r of the board 5 Store a copy of the AudioCodes packing list Installing the Gateway Board into the S6200 Application Server Follow these steps to install the gateway board in the media server 1 Verify...

Страница 48: ...d to mount PCI adaptor boards Slot 2 on the Adaptor Assembly comes with a riser board mounted Use this riser board to mount AudioCodes board 4 Remove the Slot 2 Adaptor Assembly which includes the Ris...

Страница 49: ...nsert the TP260 board into the riser connector mounted on the slot2 adaptor assembly a Verify that the TP260 Board Bracket is locked into the slot on the slot2 Adaptor Assembly towards riser board b E...

Страница 50: ...ur E1 T1 ports 2 Make sure the trunk cables are connected to correct ports on the splitter cable From top to bottom the first trunk socket terminates trunk ports 1 and 5 second trunk socket terminates...

Страница 51: ...edia server software is fully installed configured and tested as described in the preceding chapters before you install the TP260 card Installing and Configuring bootp Before you install the bootP app...

Страница 52: ...Request messages When this button is not selected then the system replies to all BootP Request messages received from Bootp Clients 2 Edit Client Button Click this button to enter Client Configuration...

Страница 53: ...Tip Store only one set of configuration files one cmp file and one ini file in the directory so that bootP chooses the correct file 6 Click Ok to save the changes Configuring the network Once the Boo...

Страница 54: ...0 server starts The BootP application displays a client entry with the corresponding MAC Address This MAC Address should match the recorded MAC Address of the gateway card 1 Double click the client en...

Страница 55: ...ication Server and Audio Gateway card Notice the log entry that displays the client information in the log window on BootP Important Important Verify that you are only accessing the gateway card The M...

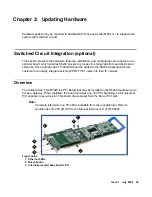
Страница 56: ...Updating Hardware 56 Installing the S6200 S6500 and S6800 Conferencing Server...

Страница 57: ...interface specifications Local Maintenance Port The Console Port COM1 is a PC AT style serial port with a DB9 connector LAN Interface S6200 S6500 S6800 Conferencing Server LAN ports specifications Fea...

Страница 58: ...he LAN The problem is most likely with the network connection If link integrity has been established and the system still does not communicate on the LAN the problem may be an incorrect configuration...

Страница 59: ...ce 57 local maintenance port interface 57 M Maintenance modem 20 Media Server Hardware 9 S6200 9 S6500 10 S6800 10 Software 9 Modem Connections 13 Mounting Options 16 P Power and Cooling CMS 1000 Medi...

Страница 60: ...60 Installing the S6200 S6500 and S6800 Conferencing Server Index...

Отзывы: