background image


V4.3 10/09/19 

UD0090 

Page 48 of 143 

This Document is uncontrolled when printed unless over stamped “CONTROLLED DOCUMENT" 

5.


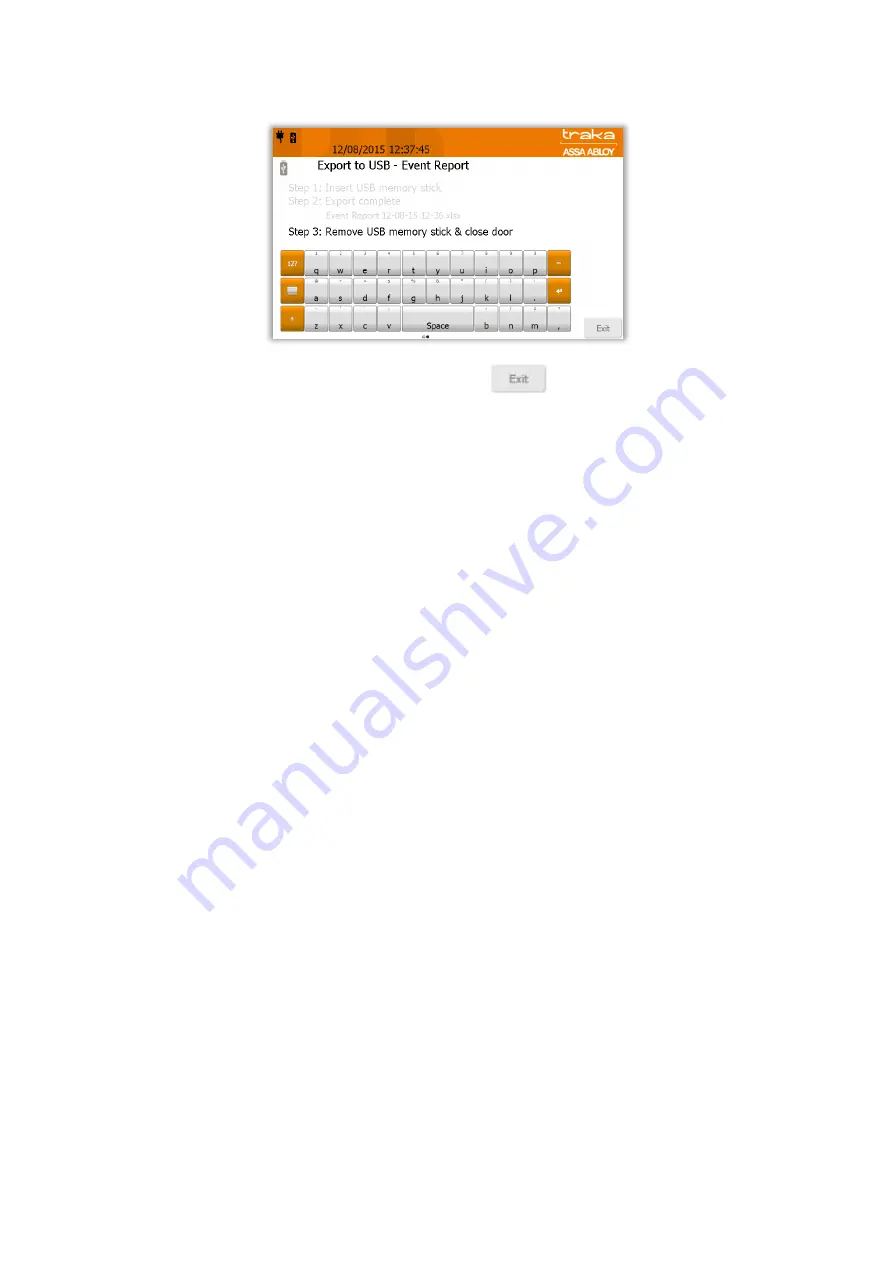
When the report has finished exporting, remove the memory stick and close the door (if applicable). 


6.


You will be taken back to the event report screen. Click the

button to be taken back to the login screen. 


Содержание Traka Touch Series

Страница 1: ...nt is the subject of copyright and must not be copied or otherwise reproduced either in whole or in part without the express written permission of TRAKA TRAKA TOUCH LOCKERS USER GUIDE UD0090 10 09 19...

Страница 2: ...to section 10 12 2 5 05 01 17 RC Updated document to include Tablet lockers and personnel lockers Updated Introduction Added Traka Touch Locker Details and Diagrams section Added Hitag1 S RFID Reader...

Страница 3: ...agrams 13 5 1 Traka Touch Tablet Locker 13 5 2 Traka Touch Personnel Locker 13 5 3 Traka Touch Modular Locker 13 5 4 Traka Touch Laptop Locker 14 5 5 Traka Touch Smartphone Locker 14 6 Locker Diagram...

Страница 4: ...peration 42 9 1 Removing Returning Items 42 9 1 1 Returning an Item 42 9 1 2 Removing an Item 43 9 1 3 Item in Wrong Position 44 9 2 Reports 45 9 2 1 Generating Reports 45 9 2 2 Exporting Reports 47 1...

Страница 5: ...sers with a Number of Hours and Minutes Curfew 83 10 11 5 All Curfews 84 10 11 6 Supress Curfew Acknowledgement 85 10 12 FIFO Advanced FIFO 87 10 12 1 Introduction 87 10 12 2 Standard FIFO on Traka We...

Страница 6: ...14 3 Reason Logging 112 14 4 Notes Logging 112 14 5 Custom Messages 112 14 6 Email Notifications 112 14 7 Item Booking 113 14 8 Fuel Distance Location Logging 113 14 9 Item Handover 113 14 10 Access S...

Страница 7: ...1 Battery Specification 133 16 7 2 Battery Location 133 16 7 3 Battery Connection Details 134 16 8 Zip and Export All Log Files and SQL CE Database to USB 134 17 Product Disconnection 136 17 1 Mains...

Страница 8: ...firm that its products have the functionality protection in place for an organisation to meet GDPR obligations including the fulfilment of the following rights to individuals please note that to fulfi...

Страница 9: ...odation Equipment Asset Management and Control in Casinos Petrochemical Mining Airports Docks Railways Quarries Military and Emergency Services Traka Service Customer satisfaction is our top priority...

Страница 10: ...icable Account Manager Name 2 Direct Contact Tel 2 Contact Email 2 Technical Support Help Desk Help Desk Direct Tel UK Telephone 0333 355 3641 International Telephone 0 44 333 355 3641 Help Desk Email...

Страница 11: ...Operating temp Ambient for indoor use only 5 C to 40 C at 95 non condensing relative humidity 3 3 USB MEMORY STICKS NOTE USB memory sticks should be formatted to FAT32 and not NTFS when used in a Trak...

Страница 12: ...o an item in the user details form Users of the Traka Touch Lockers will either be a General User or an Admin User General User A General User will have the ability to log in to the system open locker...

Страница 13: ...l Each compartment provides the option for charging It is important to return the Tablet to the locker in same orientation from which it was removed so that the charging lead may be attached in the co...

Страница 14: ...ers can be installed alongside the main Laptop Locker System allowing up to 100 compartments to be added to a single Control Panel 5 5 TRAKA TOUCH SMARTPHONE LOCKER The Traka Touch smartphone Locker i...

Страница 15: ...rimary job of any access device is to identify the user to the Traka system Once the system knows who you are it can grant or deny access to specific items accordingly 5 Compartments Traka Lockers can...

Страница 16: ...stems to be managed from a platform such as a phone tablet device or PC s that are capable of running a browser It has been built to provide simple administration quick links to actions such as remote...

Страница 17: ...y a USB stick in the system Battery Full This icon will be displayed when the backup battery is full Battery Low The battery low icon will only appear when the backup battery is low Battery Critical T...

Страница 18: ...iButton Dallas Keys or an OSDP Open Supervised Device Protocol card reader interface The minimum app and software requirement for these devices is Traka Touch 2 4 0 and Traka Web 3 5 0 For more infor...

Страница 19: ...NT ACCESS For details on how to set up the Sagem Fingerprint reader please review the Sagem Morphosmart Fingerprint Reader section 1 Touch the screen to bring the system out of idle mode 2 The reader...

Страница 20: ...formation please review the Item Release Screen section NOTE If this is the first time the system is being used there will be no Users currently setup Refer to the Users section for more information U...

Страница 21: ...s that have report and item permissions will be given the choice of selecting the I Know What I Want button or accessing the reports menu Users with Admin Report Permissions Users that have admin and...

Страница 22: ...here you can select the language you wish the Touch System to display by clicking the Globe above the keypad However selecting a language from this screen will only last as long as the current user is...

Страница 23: ...access to the system The secondary level of access is an optional PIN Personal Identification Number If a user has a PIN they will be required to enter this at the system following the input of their...

Страница 24: ...sers and their secondary PIN From here you can also force the user to change their PIN when they next log into the system User Active Date The user active date defines when a user becomes able to use...

Страница 25: ...y items the user can remove from the system Simply scroll through the different options using the directional arrow keys The options are as follows No item Allowance Enforced User is allowed a maximum...

Страница 26: ...either be a Card ID Keypad ID or Fingerprint ID This means any one of those forms of ID will allow you access to the system The secondary level of access is as optional PIN Personal Identification Num...

Страница 27: ...tes that you currently have access to the item The line symbol indicates that you do not have access to the item The grey tick symbol indicates that the user has already been allocated these items thr...

Страница 28: ...o define the date and time you wish the user to become active User Expiry Date The user expiry date defines when a user becomes unable to use the Traka Touch system E g after this time period the user...

Страница 29: ...the system Please view the Item Authorisation section for more details Item Allowance this section allows you to select how many item the user can remove from the system Simply scroll through the dif...

Страница 30: ...action can only be performed by an Admin user 1 Access the system and click Admin 2 From here click Users 3 The current user list will then be displayed Highlight the desired user and click the Edit b...

Страница 31: ...a system is as follows Define the user as in active so that the user cannot use the Traka system s any more Replace the User Forename Surname with non specific details such as Former employee 1 It is...

Страница 32: ...LLED DOCUMENT NOTE If you are deleting all of the users from the system the last user to be deleted must be an admin user 4 You will then notice the user has been removed from the user list 5 Click Ex...

Страница 33: ...than 500 users If there are 500 or less users within the system the option to show all will be displayed Clicking on show all will display all the users within the grid NOTE A user name can also be en...

Страница 34: ...reader fitted to your system select the one you wish to use for enrolling with the enrolment ID Click Save The Enrolment ID must be entered into the correct field in either the user record within the...

Страница 35: ...will be prompted to enter their Enrolment ID Enter the ID and click enter 5 If you are using a Sagem MorphoSmart Biometric reader you will be asked to present your finger to start the enrolment proce...

Страница 36: ...V4 3 10 09 19 UD0090 Page 36 of 143 This Document is uncontrolled when printed unless over stamped CONTROLLED DOCUMENT 6 Swipe your card to complete the enrolment...

Страница 37: ...allows you to configure each compartment number For example if you wanted the compartment numbers to run from left to right or if you wanted them to run from top to bottom any combination is possible...

Страница 38: ...system has the system will recognise this and present you with the message shown below In this example the hardware can connect up to 10 doors but only 6 are connected 10 Select Yes and the system wil...

Страница 39: ...tem will have to be fitted with an RFID Tag 8 5 2 RFID TAGGING In an RFID locker system the compartments are designed specifically for the item s being stored A guide on how to tag your item correctly...

Страница 40: ...orrect locations and close the doors 2 Log into the system 3 Click Admin 4 Click Items 5 The item list will currently be populated with unrecognised items To synchronise your items click the Setup but...

Страница 41: ...or Items section 9 At this point you can also configure an item to require authorisation to be accessed and also choose to assign a curfew to the item To do so simply click the Options button NOTE For...

Страница 42: ...st return the item to the correct compartment 1 Access the system 2 Select the door number you wish to open 3 Return the item to the compartment and close the door 4 When you return the item the butto...

Страница 43: ...mbols with a line indicate that the user does NOT have access to the item door Red symbols with a yellow warning triangle indicate an item in the wrong compartment RFID only Red symbols with a questio...

Страница 44: ...he correct compartment The red symbol with a cross shows the incorrect compartment and the compartment it should be returned to is highlighted with a green symbol with a tick If the item is not return...

Страница 45: ...hat can be run The Event Report Item Returned by a Different User Report and Active Alerts Event Report This report shows you all types of event activity Item Returned by a Different User Report This...

Страница 46: ...is screen shows you the Event type the Compartment number it is associated to if applicable the date and time of the event the User the event is associated with and the description of the item if appl...

Страница 47: ...locker compartment In this case the door will open automatically through this process giving you access to the USB port NOTE If your system does not have a USB port located inside a locker compartmen...

Страница 48: ...lled when printed unless over stamped CONTROLLED DOCUMENT 5 When the report has finished exporting remove the memory stick and close the door if applicable 6 You will be taken back to the event report...

Страница 49: ...ssions these buttons will also appear on the selection screen These two options allow the user to remove items from the system in different ways I Need to Search Will allow you to search for specific...

Страница 50: ...at include the terms that were entered into the search field If you leave the field blank and click the Show All button it will list all of the items currently in the system NOTE The search results wi...

Страница 51: ...tem s 10 1 2 I KNOW WHAT I WANT Selecting I know What I Want from the Item Release Screen will take you to the Item Selection Screen where you can see a visual representation of every item in the syst...

Страница 52: ...Require PIN please review the Reader Administration section Adding a PIN 1 From the main login screen select New PIN 2 You will then be asked to identify yourself at the cabinet via your Keypad ID ID...

Страница 53: ...configure a User to be an Authoriser please refer to the Users section 10 3 1 SETTING UP THE ITEMS NOTE This action can only be performed by an Admin user Please refer to the Users section for further...

Страница 54: ...at has 1 or more authorisers 2 The following window will pop up and inform the user that 1 2 or 3 authorisers are now required to identify themselves to the system before the item can be removed 3 Aut...

Страница 55: ...ED DOCUMENT 5 Once all authorisers have been verified the item will be released from the system NOTE If an Authoriser requests to take an item that has been configured with 1 or more authorisers provi...

Страница 56: ...SB memory stick 10 4 1 EXPORTING USERS NOTE This action can only be performed by an Admin user Please refer to the Users section for further details 1 Identify yourself to the system 2 Click Admin 3 C...

Страница 57: ...9 UD0090 Page 57 of 143 This Document is uncontrolled when printed unless over stamped CONTROLLED DOCUMENT 6 Type a file name and press the enter button to start the export 7 The system will then begi...

Страница 58: ...if the list is empty from the Traka Touch system Please follow the Exporting Users section above for more details 10 4 2 1 ENTERING DETAILS INTO THE SPREADSHEET This Spreadsheet covers user details it...

Страница 59: ...preadsheet onto a USB memory stick ready for importing to the Traka Touch system 10 4 2 2 FAQ S Overwriting Users When you enter a user s details into the Spreadsheet and that user already exists in t...

Страница 60: ...able and prompt you to insert a USB memory stick into a vacant socket NOTE For further information on USB memory stick specification refer to section 3 3 NOTE Depending on the configuration of your Tr...

Страница 61: ...uncontrolled when printed unless over stamped CONTROLLED DOCUMENT 6 Select the correct file from the USB memory stick 7 You will then be asked if you would like to import the user list Click Yes 8 Th...

Страница 62: ...less over stamped CONTROLLED DOCUMENT 9 Once complete the table will show that the import was a success You can now remove the USB memory stick NOTE Should an error occur during this process please co...

Страница 63: ...efer to the Language section for further details Item Allowance The item Allowance can restrict how many items a user is allowed to have out of the system any one time Using the directional arrows you...

Страница 64: ...ral options The default release options that are selectable in the general options are as follows Always Ask With this option enabled the selection screen will display both of the options below I Need...

Страница 65: ...knowledgement Clicking on the icon next to Suppress Curfew Acknowledgement will enable this option to be activated or deactivated 4 Selecting Next will take you back to the previous page Selecting Def...

Страница 66: ...n only be performed by an Admin user Please refer to Accessing the System for further details 1 Access the system and click the Admin button 2 Click the Network button 3 To enable communications with...

Страница 67: ...ing TLS 1 2 IMPORTANT A diagnostics option is available within Network Administration With the Enforce TLS 1 2 enabled you can configure TLS 1 2 logging levels This should only be used under the guida...

Страница 68: ...no communication is taking place and the system isn t attempting to make a connection When the Announce Listening light turns green this indicates that the system is attempting to make a connection O...

Страница 69: ...e straight to the Synchronisation Error block block 13 As long as the error remains the status block will continue to cycle through the stages they have already completed accompanied by the Synchronis...

Страница 70: ...Details to Require PIN Select this to force every user in the database to use a PIN This will mean every time a user is created they cannot be saved unless a PIN is entered into the user details Mini...

Страница 71: ...can be used straight from the login screen 1 Click the Search button 2 The search window will then appear allowing you to type text to search such as user names item descriptions and Compartment numbe...

Страница 72: ...ss over stamped CONTROLLED DOCUMENT Show All Selecting the Show All button will list every item in the system the position it came from its description the current user and the last user 5 To conduct...

Страница 73: ...s change the default language for the entire system 10 9 1 CHANGING THE LANGUAGE FOR A SINGLE LOGIN From the main screen before you login there are several language options to choose from Using the Gl...

Страница 74: ...ess the system and click the Admin button 2 Click the Users button 3 Highlight the required user and click Edit 4 From here you can select the language you wish this user to view whenever they access...

Страница 75: ...details 1 Access the system and click the Admin button 2 Click the General button 3 From here you can select the default language for the system To change the language simply use the dropdown menu to...

Страница 76: ...m can only be assigned to one relay at a time The On and Off columns detail what conditions must be met before an alarm is switched on or off In the example below an alarm with Battery Critical as the...

Страница 77: ...Guide for more details 10 11 1 ITEMS WITH A SPECIFIC TIME OF THE DAY CURFEW This curfew will prompt any user when they attempt to remove the item that it is due back in the system by a specific time...

Страница 78: ...log in again 4 After selecting Yes the compartment door will open allowing the user to remove the item The on screen icon will change from the green tick to the following 10 11 2 ITEMS WITH A NUMBER O...

Страница 79: ...here select the Number of Hours and Minutes curfew from the drop down box and set the hours and minutes using the directional arrow keys 7 Once you have set the curfew click the save button to be take...

Страница 80: ...urfew and is due back by a specific time This time is calculated based on the number of hours and minutes specified when setting up the item curfew In this example a curfew of 1 hour has been set 3 To...

Страница 81: ...s enabled in the user s profile 10 11 3 1 HOW TO SET THE CURFEW 1 An administrator will need to access the system 2 Click the Admin button 3 Click the Users button 4 Select a user from the currently l...

Страница 82: ...item A message will appear stating that the item is now under curfew and is due back by a set time that has been defined in the users details e g 17 00 3 To remove the item the user must click the Yes...

Страница 83: ...is enabled in the user s profile 10 11 4 1 HOW TO SET THE CURFEW 1 An administrator will need to access the system 2 Click the Admin button 3 Click the Users button 4 Select a user from the currently...

Страница 84: ...urfew In this example a curfew of 1 hour has been set for the user 5 To remove the item the user must click the Yes button Selecting No will cancel the transaction and will require the user to log in...

Страница 85: ...OCUMENT 10 11 6 SUPRESS CURFEW ACKNOWLEDGEMENT Activating the Supress Curfew Acknowledgement prevents notifications for curfews being displayed It does not affect curfew functionality 1 After logging...

Страница 86: ...OCUMENT 3 At the general options screen click on next to proceed At the next General Options screen a user can enable or disable the Suppress Curfew Acknowledgement option 4 Click on the icon to enabl...

Страница 87: ...FO ON TRAKA WEB OVERVIEW FIFO is a feature that allows the ability to automatically release the item that has been in the locker system the longest based on the idea that this would have the most char...

Страница 88: ...o Backup Database to SD card if inserted This option can be enabled or disabled by clicking the small tick or line Auto Shrink Database Selecting this option will automatically shrink the database whe...

Страница 89: ...Once you have selected one of these options simply follow the on screen instructions to complete the action Information page The information page displays the memory usage of flash disk and SD card a...

Страница 90: ...m please refer to the Accessing the System section 1 Click the Admin button 2 Click the Power button Power Options To change any of the power options simply click either of the arrow keys to the right...

Страница 91: ...utton displays all the power supply information such as the battery backup capacity and Voltage the mains power level etc Click the Options button to return to the power options When you have complete...

Страница 92: ...r for example Traka will then compile a new configuration file and send it to you to import via a USB memory stick To access the configuration page an admin user will need to log into the system For f...

Страница 93: ...Depending on the configuration of your Traka Touch Lockers the USB port may be located inside a locker compartment In this case the door will open automatically through this process giving you access...

Страница 94: ...rt process will then begin A message will appear stating the import was successful and an immediate restart is required Click OK to begin the system restart 8 The system will then restart this may tak...

Страница 95: ...all of the information for your point of contact in case of assistance The Help icon is on the main Traka Touch screen and does not require a user to access the system to view it 1 Click the Help butt...

Страница 96: ...em For further details on how to access the system please refer to the Accessing the System section 1 Click the Admin button 2 Click the Help button 3 To edit the help information simply click on the...

Страница 97: ...em For further details on how to access the system please refer to the Accessing the System section 1 Click the Admin button 2 Click the Data button 3 Click the Tools button from the bottom right hand...

Страница 98: ...k 1 Click the Backup Database to USB button 2 A compartment door will open if applicable and prompt you to insert a USB memory stick into the vacant socket NOTE For further information on USB memory s...

Страница 99: ...ONTROLLED DOCUMENT 3 You can rename the database file if you wish by using the provided keyboard When finished click the enter button 4 The system will now export the database to the USB device 5 Once...

Страница 100: ...models are currently supported MSO CBM 4MB IDENTLITE 3000 user capacity up to 2 fingers each Sagem Part no 252711976 Other variants have not been tested 11 2 2 TRAKA TOUCH OPERATING SYSTEM For the Sag...

Страница 101: ...sers who have poor fingerprints PIN functions as normal and the system will ask for it if the PIN is defined in the user record 11 4 READER DISCONNECTION RECONNECTION If the Sagem MorphoSmart Fingerpr...

Страница 102: ...at the Traka Touch System 1 The Admin user must access the system and navigate to the User List and then edit add the required user 2 On the User Details screen click Access Options Next Enrol and yo...

Страница 103: ...splayed Press Harder Move Finger Up Move Finger Down Move Finger Right Move Finger Left When complete the screen will display how many fingers are enrolled for the user 1 or 2 To cancel the Enrol proc...

Страница 104: ...rce a single finger enrolment or 2 finger enrolments this choice is controlled by the configuration file loaded into the Touch unit if you wish to swap from single finger to 2 finger enrolments contac...

Страница 105: ...ment is uncontrolled when printed unless over stamped CONTROLLED DOCUMENT 6 If the fingerprint captures are successful you will be presented with the following screen The User can now access the syste...

Страница 106: ...ed simply place your enrolled finger on the reader If recognised the system will log you in NOTE When the main login screen is shown the red light on the reader will NOT illuminate if no users have be...

Страница 107: ...e side of your nose this adds a fine layer of natural grease to your finger and will get you a much better read How to position your finger correctly on the sensor 11 8 FAQS The False Acceptance Rate...

Страница 108: ...ional Traka CAN Relay Interface PCB This additional hardware can be added to your system by a Traka engineer after your initial installation The feature may then be enabled through Traka Touch No furt...

Страница 109: ...ondition will still be able to navigate to the admin menu if they have the correct permissions however when the system lockdown begins item access is instantly removed therefore if a user is currently...

Страница 110: ...will display a message on the touch screen and log an event The message will be displayed in the orange bar at the top of the screen The system will also sound an alarm whilst the switch is activated...

Страница 111: ...abled or disabled through Traka Web Admin and can perform a highly configurable set of functions depending on your requirements This guide has been prepared in order to assist you with all aspects of...

Страница 112: ...b User Guide 14 4 NOTES LOGGING Notes Logging is a cost option that allows a user to enter a note into an on screen dialogue box at the Traka Touch system when removing or returning an item A maximum...

Страница 113: ...ve access to the system This feature is beneficial for customers who may want certain higher ranking members of staff to issue keys or assets to others staff members throughout the business but don t...

Страница 114: ...ystem within Traka Web without having to display an image of the actual locker or cabinet Configuration of the System Viewer Grid is done within Traka Web Admin on a per system basis Although the opti...

Страница 115: ...ed when printed unless over stamped CONTROLLED DOCUMENT The screen will change to display the default locker image 2 Click on the System Design tab to edit the selected system type 3 Within the System...

Страница 116: ...imum value that can be entered will be 150 NOTE The maximum value that can be entered within the Positions field is 150 If this value is exceeded an icon will appear in the left hand box Hovering the...

Страница 117: ...System Viewer Grid display is to be used then the status information will relocate from the bottom left of the page to the top right of the page above the activity grids location The System Viewer Gri...

Страница 118: ...each iFob that is not in the system When an iFob is removed from the system its position will remain but its icon will turn grey to show that the iFob is not in the system A new row will then be added...

Страница 119: ...is option allows someone using Traka Web to remotely log another user into the system Selecting this icon from the ribbon toolbar will present the Web user with a pop up box allowing them to select a...

Страница 120: ...be made available Should the Emergency Open option be activated and deactivated at any time an event will be recorded to show any activity These events may also have alarm relays programmed against th...

Страница 121: ...tomatically log you out and return to the main login screen If you choose to select the Logout button on the screen without first closing all the doors you will still remain logged in until all the do...

Страница 122: ...if a Locker contains an item with one or more critical faults logged against it Lockers containing items with critical faults will not be opened by the Emergency Open process The example below shows a...

Страница 123: ...you will be required to acknowledge that the item has a critical fault 5 Select the Continue button to accept the critical fault The door will now open allowing access to the item with the critical f...

Страница 124: ...one in an emergency Therefore to safely switch off the system and prevent any data loss follow the steps below To power on off the system you will need to gain access to the Traka Touch PCB located on...

Страница 125: ...is an RFID system each item will have been fitted with an RFID tag In most cases this tag will not be removable from the existing item and therefore a new tag will need to be fitted to the replacemen...

Страница 126: ...u have multiple items that need to be replaced then repeat steps 1 to 4 for each of them before moving on to step 5 5 Identify yourself once again at the Traka System by entering your PIN or swiping y...

Страница 127: ...displayed via the small blue progress bar in the top right corner of the window 11 Click the Exit button to be taken back to the administration menu and from there click the Exit button again to retur...

Страница 128: ...creen The following describes the process for opening the Control Panel on the most commonly used Control Pod design NOTE If your system design is different to the one described below and you are unsu...

Страница 129: ...rts and other features on the PCB see the Traka Touch PCB section 16 5 SERIAL NUMBER RATING PLATE LOCATION Every Traka System has a Serial Number Rating Plate label attached This label contains not on...

Страница 130: ...V4 3 10 09 19 UD0090 Page 130 of 143 This Document is uncontrolled when printed unless over stamped CONTROLLED DOCUMENT 16 6 TRAKA TOUCH IMX28 PCB...

Страница 131: ...2 LCD Data Cable connections Along with the standard 7 connector used on the previous Control Board there is now a 5 connector for use with a 5 LCD display This Control Board is required when upgradin...

Страница 132: ...o 15V Reader Connections Below is a closer look at the reader connections The Reader 1 Connector supports Wiegand and Clock Data card readers and shares the same pin out as the original Traka Touch an...

Страница 133: ...tem Yuasa NP7 12 12V 7Ah Sealed Lead Acid Battery 16 7 2 BATTERY LOCATION The location of the battery can vary depending on the design of your system however in most cases it will be located inside th...

Страница 134: ...attery WARNING Never disconnect the wires from the green connector whilst the cable is still connected to the battery terminals NOTE Ensure that the spade connectors are pushed fully onto the battery...

Страница 135: ...UD0090 Page 135 of 143 This Document is uncontrolled when printed unless over stamped CONTROLLED DOCUMENT 3 You can rename the database file if you wish by using the provided keyboard Once finished cl...

Страница 136: ...ted with a single or multiple power bars and wired to a BS60309 2 Commando plug disconnect all commando plugs from the sockets If the system is fitted with a single or multiple power bars and connecte...

Страница 137: ...ct Traka distributor for technical support navigate to the Help section at the main screen and provide the following details Support Code Cabinet Serial Number App Version SQL CE DB Version CB FW Vers...

Страница 138: ...rity have the meanings set out in and will be interpreted in accordance with such Applicable Laws Documentation means materials such as manuals user guides or similar materials associated with or rela...

Страница 139: ...do so save to the extent expressly permitted by law 4 4 The Customer will not attempt to ascertain or list the source programs or source code relating to the Embedded Software 4 5 The Customer will no...

Страница 140: ...of revenue loss of profits loss of goodwill loss of use loss of data or loss of any economic liability or 7 2 2 indirect or consequential losses however caused arising in connection with this EULA or...

Страница 141: ...ound by any court or body or authority of competent jurisdiction to be illegal unlawful void or unenforceable such term will be deemed to be severed from this EULA and this will not affect the remaind...

Страница 142: ...Laws preventing such Processing unless to do so would itself be a contravention of any Applicable Law and 17 7 2 put in place appropriate technical and organisational security measures to the standar...

Страница 143: ...eedoms of the relevant individuals in relation to the transfer of any Personal Data except to the extent that the transfer is i to a country that the European Commission has recognised as providing ad...

Отзывы: