04/30/16
11 1-800-810-WIRE • www.sargentlock.com • A8185A
Copyright © 2016, Sargen
t Manufacturing Company
, an A
SS
A AB
LO
Y G
roup company
. All right
s reser
ved
.
Reproductions in whole or in par
t without express writ
ten permission of Sargen
t Manufacturing Company is prohibited
.
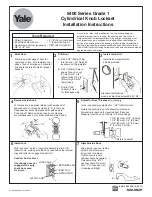
IN120 Exit Device
To comply with UL certifications and for security:
1. Fully tighten (2) chassis through bolts.
2. Fasten exit chassis to door using (4) #10 wood
screws (for wood door) or (4) #10-24 machine
screws (for metal door).
6 Secure Exit Chassis
(4) #10 Wood Screws or
#10-24 Machine Screws
Inside of Door
(2) #12-24 x 1-7/8”
Flat Head Screws
(Through-bolts
Cylinder to Chassis)
Fig. 6
For devices without cylinder, go to
Step 6 - Secure Exit Chassis
.
1. While installing the rim cylinder, support the tail piece of the cylinder,
verifying its engagement with the top hub of the exit chassis.
Note: Be sure ET harness is clear of cylinder and tailpiece.
2. Secure the cylinder by through-bolting the cylinder
through the exit chassis using (2) #12-24 x 1-7/8”
connecting screws (see Fig. 6).
3. Verify that the key retracts latchbolt.
Position cylinder so that the SARGENT
logo is right-side up.
Correct Incorrect
Fig. 5B
5 Install Cylinder
Fig. 5A