


12
SEMI-AUTOMATED URINE ANALYZER
AUTION ELEVEN
™
AE-4022
Maintenance – As Needed
1. Check that the [Standby screen] is displayed,
then open the printer cover.
2. Press
Chapter 4 Maintenance
AE-4022
4-12
4.2
Replacing the thermal recording paper
When a red line appears on each side of the thermal recording paper, the paper will soon run out. Replace the depleted
paper roll with a new one before it runs out. A new roll of thermal recording paper can be used for approximately 450
measurements.
Items required: New roll of thermal recording paper, scissors
1 Cut the thermal recording paper
a
Check that the [Standby screen] is displayed.
b
Open the printer cover.
c
If some thermal recording paper still remains in the printer, cut
the remaining paper strip using scissors and remove the depleted
roll’s paper core.
If the paper has completely run out, remove the paper core from
the paper holder and go to step
3
.
2 Remove the remaining thermal recording paper
a
Press
. The thermal recording paper remaining in the printer
is fed out. Remove the paper by holding it with your fingertips.
Printer cover
Take out.
Cut using scissors.
to remove any remaining paper in
the printer.
3. Cut the fi rst (outermost) layer of a new paper roll and trim
the end to make it straight. A skewed or odd-shaped end
may cause the paper to jam.
4. Place new roll of thermal recording paper in paper holder so
that paper feeds from the bottom. Guide the trimmed end of the
thermal recording paper into and through the slot that receives
the recording paper. The thermal recording paper is automatically
wound forward and fed into the unit.
5. Close printer cover.
Replacing thermal recording paper
NOTE:
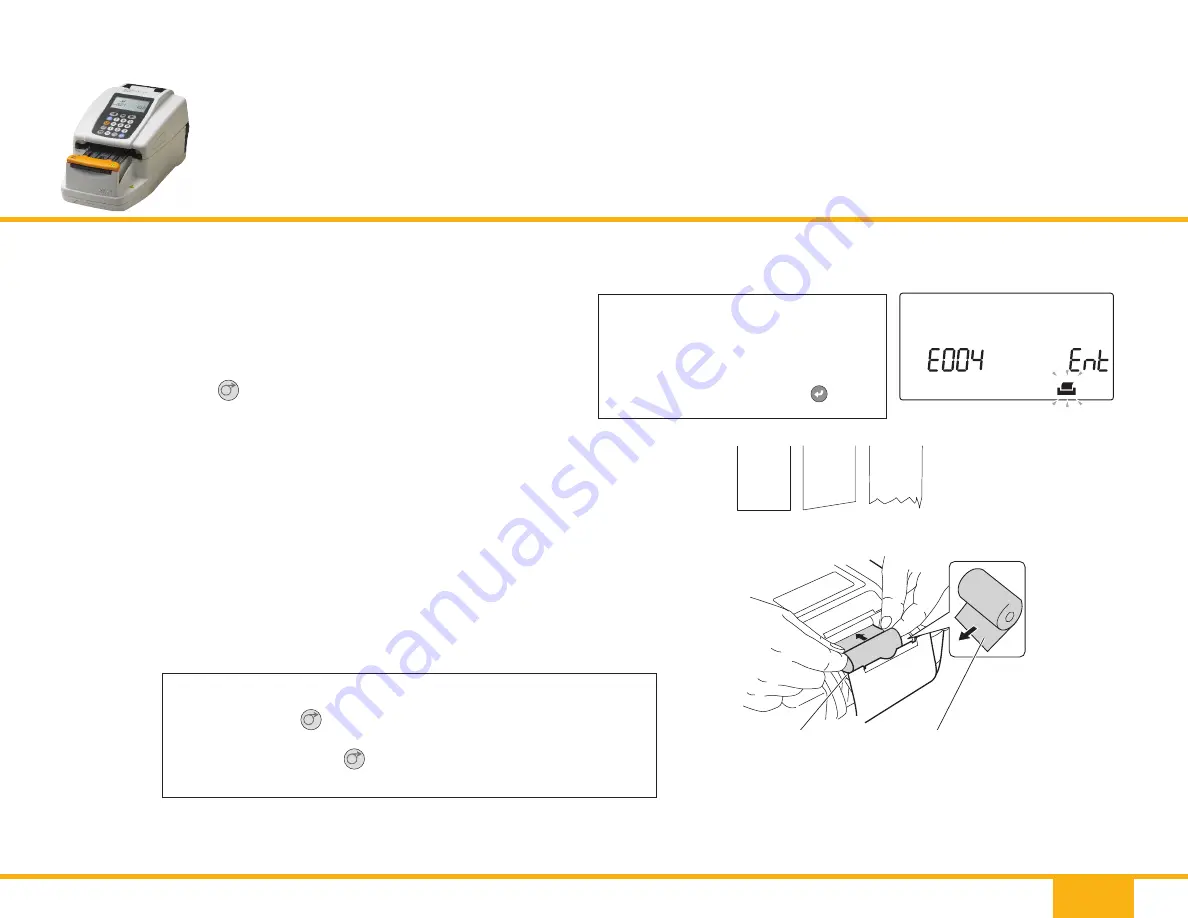
When paper is removed from printer,
error message E004 appears and a
beep sounds for 1 minute. The alarm
can be stopped by pressing
4.2 Replacing the thermal recording paper
AE-4022
4-13
3 Prepare a new roll of thermal recording paper
a
Cut the first (outermost) layer of a new thermal recording paper
roll, and trim the end to make it straight. A skewed or odd-shaped
end may cause the thermal recording paper to jam.
4 Set the new thermal recording paper roll
a
Place the new roll of thermal recording paper in the paper holder,
orienting it correctly so that the paper feeds from the bottom.
Guide the trimmed end of the thermal recording paper into and
through the slot that receives the recording paper.
The thermal recording paper is automatically wound forward and
fed into the unit.
NOTE:
When the thermal recording paper is completely removed
from the printer, the screen message shown in the right
figure appears and a continuous beep sounds for
approximately 1 minute. The alarm sound can be stopped
by pressing
.
Paper holder
Set the new roll of thermal
recording paper in the
paper holder in the proper
orientation so that the end
feeds from the bottom.
NOTE:
Always press the
button after replacing the thermal
recording paper.If you
do not
fully feed the thermal
recording paper through the unit by pressing the
button,
the printer will fail to print the measurement results.
REFERENCE:
If the printer fails to properly wind and feed the thermal recording paper, press
and verify that the paper feeds
correctly.
.
4.2 Replacing the thermal recording paper
AE-4022
4-13
3 Prepare a new roll of thermal recording paper
a
Cut the first (outermost) layer of a new thermal recording paper
roll, and trim the end to make it straight. A skewed or odd-shaped
end may cause the thermal recording paper to jam.
4 Set the new thermal recording paper roll
a
Place the new roll of thermal recording paper in the paper holder,
orienting it correctly so that the paper feeds from the bottom.
Guide the trimmed end of the thermal recording paper into and
through the slot that receives the recording paper.
The thermal recording paper is automatically wound forward and
fed into the unit.
NOTE:
When the thermal recording paper is completely removed
from the printer, the screen message shown in the right
figure appears and a continuous beep sounds for
approximately 1 minute. The alarm sound can be stopped
by pressing
.
Paper holder
Set the new roll of thermal
recording paper in the
paper holder in the proper
orientation so that the end
feeds from the bottom.
NOTE:
Always press the
button after replacing the thermal
recording paper.If you
do not
fully feed the thermal
recording paper through the unit by pressing the
button,
the printer will fail to print the measurement results.
REFERENCE:
If the printer fails to properly wind and feed the thermal recording paper, press
and verify that the paper feeds
correctly.
NOTE:
Always press the
Chapter 4 Maintenance
AE-4022
4-12
4.2
Replacing the thermal recording paper
When a red line appears on each side of the thermal recording paper, the paper will soon run out. Replace the depleted
paper roll with a new one before it runs out. A new roll of thermal recording paper can be used for approximately 450
measurements.
Items required: New roll of thermal recording paper, scissors
1 Cut the thermal recording paper
a
Check that the [Standby screen] is displayed.
b
Open the printer cover.
c
If some thermal recording paper still remains in the printer, cut
the remaining paper strip using scissors and remove the depleted
roll’s paper core.
If the paper has completely run out, remove the paper core from
the paper holder and go to step
3
.
2 Remove the remaining thermal recording paper
a
Press
. The thermal recording paper remaining in the printer
is fed out. Remove the paper by holding it with your fingertips.
Printer cover
Take out.
Cut using scissors.
button after replacing the thermal recording
paper. If you do not fully feed the thermal recording paper through
the unit by pressing the
Chapter 4 Maintenance
AE-4022
4-12
4.2
Replacing the thermal recording paper
When a red line appears on each side of the thermal recording paper, the paper will soon run out. Replace the depleted
paper roll with a new one before it runs out. A new roll of thermal recording paper can be used for approximately 450
measurements.
Items required: New roll of thermal recording paper, scissors
1 Cut the thermal recording paper
a
Check that the [Standby screen] is displayed.
b
Open the printer cover.
c
If some thermal recording paper still remains in the printer, cut
the remaining paper strip using scissors and remove the depleted
roll’s paper core.
If the paper has completely run out, remove the paper core from
the paper holder and go to step
3
.
2 Remove the remaining thermal recording paper
a
Press
. The thermal recording paper remaining in the printer
is fed out. Remove the paper by holding it with your fingertips.
Printer cover
Take out.
Cut using scissors.
button, the printer will fail to print the
measurement results.
4.2 Replacing the thermal recording paper
AE-4022
4-13
3 Prepare a new roll of thermal recording paper
a
Cut the first (outermost) layer of a new thermal recording paper
roll, and trim the end to make it straight. A skewed or odd-shaped
end may cause the thermal recording paper to jam.
4 Set the new thermal recording paper roll
a
Place the new roll of thermal recording paper in the paper holder,
orienting it correctly so that the paper feeds from the bottom.
Guide the trimmed end of the thermal recording paper into and
through the slot that receives the recording paper.
The thermal recording paper is automatically wound forward and
fed into the unit.
NOTE:
When the thermal recording paper is completely removed
from the printer, the screen message shown in the right
figure appears and a continuous beep sounds for
approximately 1 minute. The alarm sound can be stopped
by pressing
.
Paper holder
Set the new roll of thermal
recording paper in the
paper holder in the proper
orientation so that the end
feeds from the bottom.
NOTE:
Always press the
button after replacing the thermal
recording paper.If you
do not
fully feed the thermal
recording paper through the unit by pressing the
button,
the printer will fail to print the measurement results.
REFERENCE:
If the printer fails to properly wind and feed the thermal recording paper, press
and verify that the paper feeds
correctly.
Correct Incorrect Incorrect
Paper Holder
4.2 Replacing the thermal recording paper
AE-4022
4-13
3 Prepare a new roll of thermal recording paper
a
Cut the first (outermost) layer of a new thermal recording paper
roll, and trim the end to make it straight. A skewed or odd-shaped
end may cause the thermal recording paper to jam.
4 Set the new thermal recording paper roll
a
Place the new roll of thermal recording paper in the paper holder,
orienting it correctly so that the paper feeds from the bottom.
Guide the trimmed end of the thermal recording paper into and
through the slot that receives the recording paper.
The thermal recording paper is automatically wound forward and
fed into the unit.
NOTE:
When the thermal recording paper is completely removed
from the printer, the screen message shown in the right
figure appears and a continuous beep sounds for
approximately 1 minute. The alarm sound can be stopped
by pressing
.
Paper holder
Set the new roll of thermal
recording paper in the
paper holder in the proper
orientation so that the end
feeds from the bottom.
NOTE:
Always press the
button after replacing the thermal
recording paper.If you
do not
fully feed the thermal
recording paper through the unit by pressing the
button,
the printer will fail to print the measurement results.
REFERENCE:
If the printer fails to properly wind and feed the thermal recording paper, press
and verify that the paper feeds
correctly.
Set the new roll of thermal recording
paper in the paper holder in the
proper orientation so that the end
feeds from the bottom.
Содержание AUTION ELEVEN AE-4022
Страница 1: ...SEMI AUTOMATED URINE ANALYZER AUTION ELEVEN AE 4022 Quick Reference Guide ...
Страница 3: ...System Overview System Overview ...
Страница 5: ...Sample Preparation Sample Preparation ...
Страница 7: ...Sample Measurement Sample Measurement ...
Страница 11: ...Control Measurement Control Measurement ...
Страница 13: ...Check Measurement Check Measurement ...
Страница 15: ...Maintenance Maintenance ...
Страница 21: ...Warnings Warnings ...
Страница 23: ...Errors Errors ...
Страница 26: ...Minneapolis MN 55439 877 538 8872 corelab arkrayusa com www arkrayusa com 5266 00 Rev 1 17 ...


