35
35
MP3 Sound Codec
If MPEG-4 Translator detects a suitable MP3 codec on your PC, it
will use it, and your video
fi
le sound track will be MP3. Otherwise, it
will use the standard IMA ADPCM codec. There are MP3 encoders
(usually packaged together as an encoder and decoder) available on
the Web for you to download. If you choose to use the
LAME
codec,
make sure that you have a version built with the ACM front-end. You
can
fi
nd other MP3 codecs on the web by using the search terms
ACM
,
MP3
and
CODEC
in your favorite web search engine. Once
this MP3 codec is installed into your system, MPEG-4 Translator will
be able to create
fi
nal video
fi
les with MP3 sound, even if the source
video
fi
le does not have an MP3 sound track.
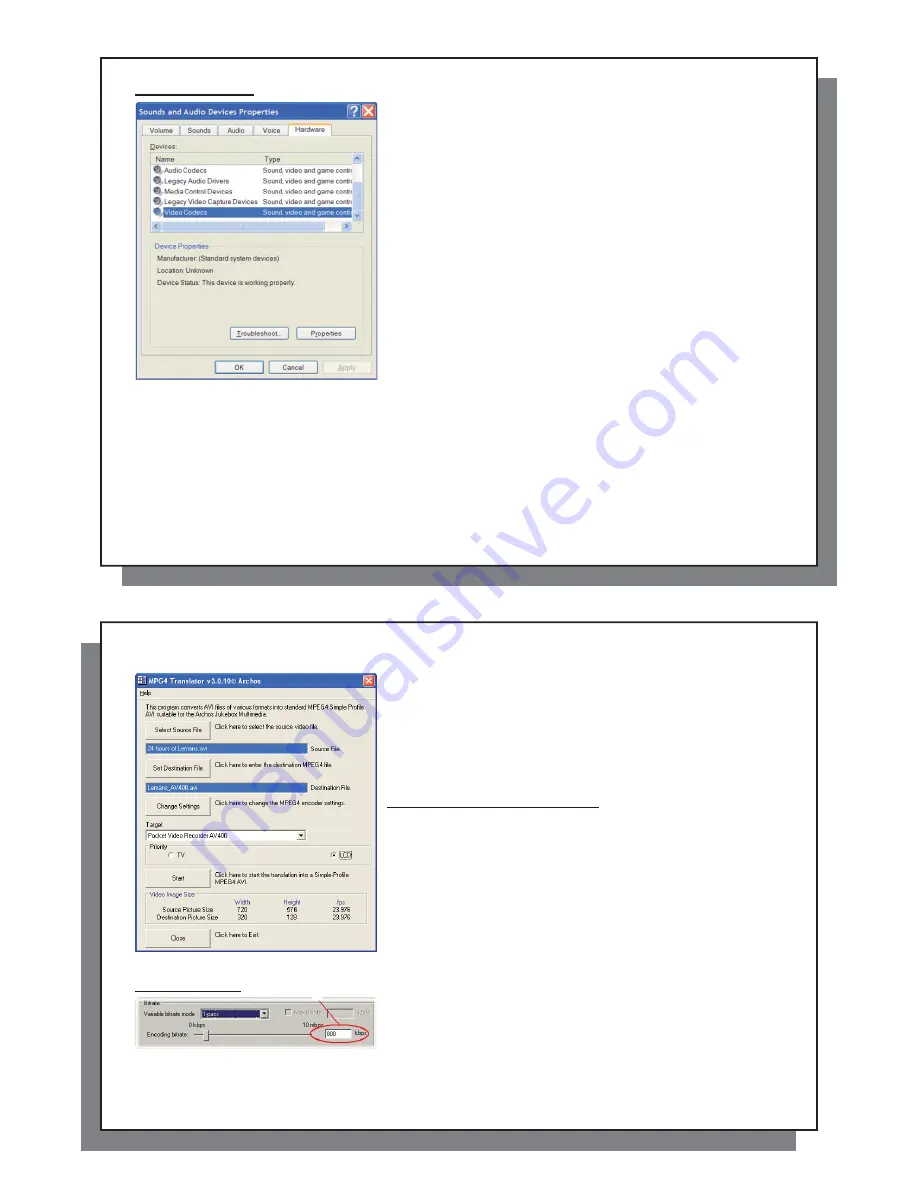
If you are unsure what codecs (audio and/or video) have been
installed on your computer, you can see the list by going to the
following location.
For Windows XP, click on
Start > Settings > Control Panel > Sounds and Audio Devices Properties > Hardware
,
choose
Audio Codecs
, then click on
Properties
. You will
fi
nd a list here of all the audio codecs that are installed
on your computer. Decoding of MPEG 2 video
fi
les is currently not supported by MPEG-4 Translator. These
are usually .mpg or .mpeg format
fi
les, not the required AVI
fi
le. There are other tools found on the Internet
(FlaskMPEG, Rippack, etc.) that may be downloaded in order to help you with these
fi
le types. A good starting
place is the website www.digital-digest.com.
36
36
9.2
Using MPEG-4 Translator
9.2 Using
MPEG-4
Translator
Here you see the image of the main MPEG-4 Translator program.
When you
fi
rst run the program, if the required codec has not been
installed yet. You should download the codec and install it on your
computer. If the Virtual dub program has not been installed, you will
also be noti
fi
ed, and you should install it (either with the ARCHOS
™
Installation Utility or the Virtual Dub website). If you have placed the
Virtual Dub program in a folder other than the installer default folder, it
will ask you to locate the
fi
le.
Select Source & Destination Files
In this example, a source
fi
le
24 hours of Lemans.avi
has been
selected as the source video. You can see on the bottom of the window
its original characteristics (width 720, height 576, frame rate 30). Next,
you must then tell the program where to place (Set Destination
fi
le)
the newly recoded version of the
fi
le (don’t worry, it will not erase the
original). You should give it a new descriptive name, such as shown
above
Lemans_AV 700.avi
. Make sure you add the .avi extension.
Change Settings
Next, you can change the parameters (Change Settings) of the
encoder to adjust the level of quality of the
fi
nal image. Like MP3
music, the higher the bit rate setting is made, the higher the quality
of the music, or video in this case, that you will get. However, this will
also take up more space on your hard drive. A setting of 900 kbps will
give you a nice looking image for viewing on a television. For near
DVD quality, you can set it up to 1200 kbps.


