background image

Basic Keypad Functions - DAS-MET-6SRC

39

 Metreau Keypads 

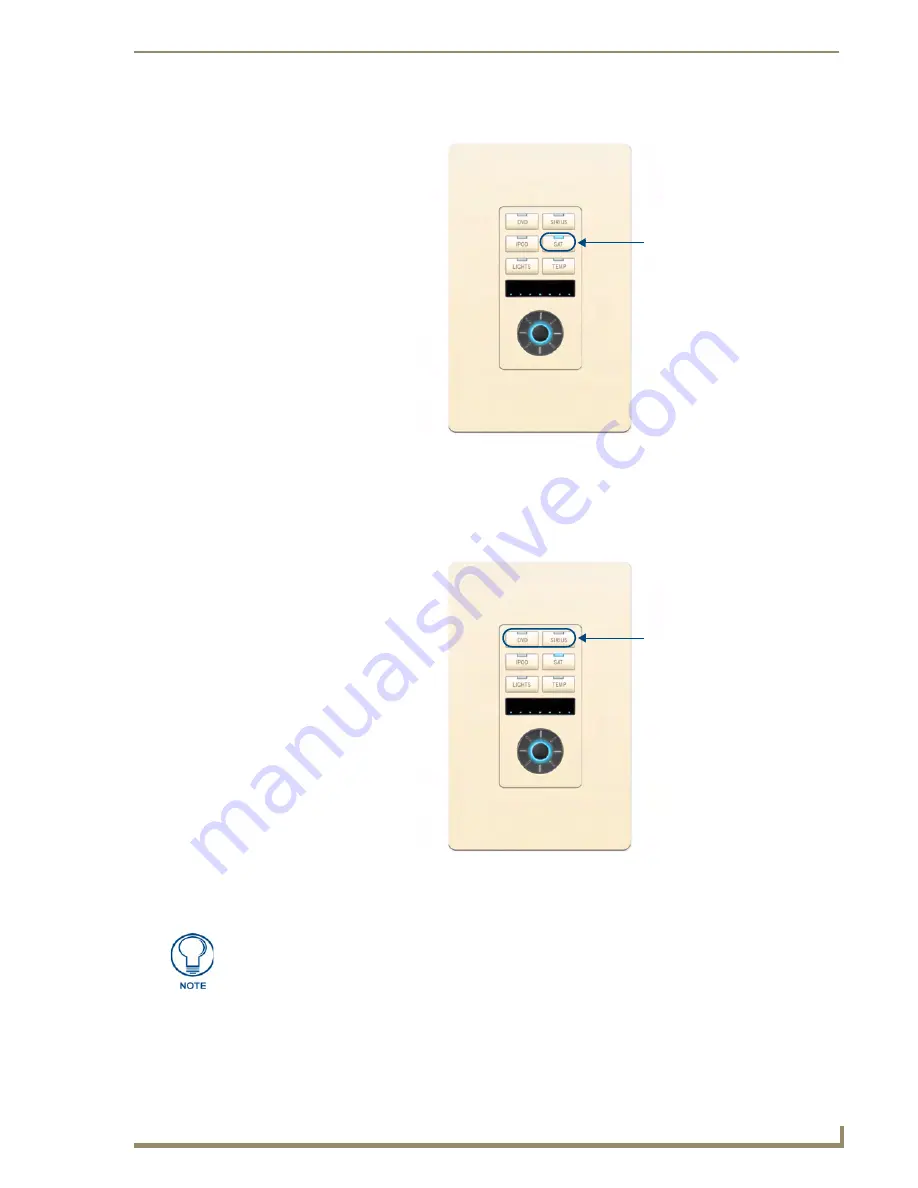
Turning Off/On a Source In All Zones 

Press and hold the active Source button for 4 seconds to turn it off in all zones. 

To turn the source back on in all zones, press and hold the same Source button for 4 seconds.

Turning Off All Zones (System OFF) 

Press and hold the top two Source buttons simultaneously for 4 seconds.

FIG. 9  

Turning Off a Specific Source in All Zones

FIG. 10  

Turning Off all Sources in All Zones

Press and hold a
Source button for 4
seconds to turn it off
in ALL zones.

Press and hold the top two
Source buttons to turn ALL 
sources off in ALL zones.

All zones will be turned off, and no sources will play. One minute after an ALL OFF 
has been performed, all sources will power down and the Controller will Default to 
“Standby Mode”.

Содержание DAS-MET-NUM

Страница 1: ...erence Guide Keypads Metreau Keypads MET 6N 6 Button Keypad with Navigation MET 7 7 Button Keypad MET 13 13 Button Keypad DAS MET6SRC 6 Source Audio Keypad DAS MET NUM Numeric Audio Keypad Initial Release 2 11 2008 ...

Страница 2: ...rked on the outside of each box The RMA is valid for a 30 day period After the 30 day period the RMA will be cancelled Any shipments received not consistent with the RMA or after the RMA is cancelled will be refused AMX is not responsible for products returned without a valid RMA number AMX is not liable for any damages caused by its products or for the failure of its products to perform This incl...

Страница 3: ...ns 5 MET 13 Metreau 13 Button Keypad 6 MET 13 Specifications 6 DAS MET 6SRC Metreau 6 Source Audio Keypad 7 DAS MET 6SRC Specifications 7 Pushbuttons 1 6 8 Navigation Wheel 8 DAS MET NUM Metreau Numeric Audio Keypad 9 DAS MET NUM Specifications 9 Custom Button Installation 11 Overview 11 Removing Buttons 11 Button Kits 12 Audio 12 Residential 12 Commercial 12 AxLink Device Addressing 13 Overview 1...

Страница 4: ...ration Drawing Using Four Conductor Speaker Wire 24 Tango System Integration Drawing Using the Audio Zone Expander 24 SWT Special Wiring Configurations 25 Auxiliary Amplifier Configuration 25 Remote Amplifier Configuration 26 Two Wire Configurations Keypad for Control Only 26 Split Zone Analog Volume Control 27 Programming The Metreau Keypads 29 Programming the AxLink Metreau Keypads 29 Button Lay...

Страница 5: ... System OFF 39 DAS MET 6SRC Zone Control Dynamic Pause 40 Single Zone Listening To Source 40 Multiple Zones Listening To The Same Source 40 DAS MET 6SRC Using the Navigation Wheel 41 Using the Navigation Wheel With the Internal AM FM Tuner 41 Advanced Functions DAS MET 6SRC 45 Overview 45 Direct Access 45 On Board Tuner Direct Selection of a Radio Station 45 CD Player Direct Selection of a Disk an...

Страница 6: ...d 59 Unlocking a Keypad 60 Unlocking All Keypads 61 Using the NetLinx Module 63 Overview 63 Main Page Initial View 63 Main Pages 64 Location Device Pages 64 Zone Options 65 Change Source 66 Device Control Pages 67 Internal Tuner 67 Internal Sirius 68 DVD 69 CD 70 Audio Server 71 Satellite 72 External Tuner 73 Other 74 Setup Pages 75 Setup Zones 75 Setup Alarms 76 Adding an Alarm 76 Removing an Ala...

Страница 7: ...Table of Contents v Metreau Keypads No Keypad Activity 81 Keypad Lights No Sound 81 ...

Страница 8: ...vi Metreau Keypads Table of Contents ...

Страница 9: ...The MET 6N MET 7 and MET 13 keypads are AxLink compatible for use with NetLinx control systems FIG 1 Metreau Audio Keypads SWT Compatible The DAS MET 6SRC and DAS MET NUM are SWT compatible for use with Matrix Audio distribution systems via Speaker Wire Technology SWT Metreau Audio keypads are compatible with all Matrix products including Tango and Mi Series Audio Controllers as well as XA Carbon ...

Страница 10: ...cts to be connected where the control wire has been run separately from the speaker cable All Metreau keypads are available in three popular colors White Black and Light Almond The following table lists the keypads in the Metreau family with descriptions and FG s for each color Metreau Keypads Device Family Name Description Colors FG s MET 6N Metreau 6 Button Keypad with Navigation White FG5794 01...

Страница 11: ...vigation Wheel consists of 5 pushbuttons 4 directional pushbuttons Up Down Right Left 1 center pushbutton and bi directional rotating wheel for channel adjustments The Navigation wheel itself provides two button functions as well rotate CW button 12 and rotate CCW button 13 as indicated in FIG 4 Rear Panel Components DIP switch 8 position mini DIP switch used to set the device address for the keyp...

Страница 12: ...s a channel event on button 12 When rotated counter clockwise the Navigation Wheel provides a channel event on button 13 The light on the Navigation Wheel can be illuminated by activating channel 11 MET 6N Specifications Cont Certifications FCC Class B CE IEC60950 RoHS Colors White FG5794 01 WH Black FG5794 01 BL Light Almond FG5794 01 LA Optional Accessories Single Button Kit FG5794 10 Lutron Cai...

Страница 13: ...These pre printed buttons are field replaceable The bottom button functions as 2 buttons there are 2 positions left and right that allow the user to control channel levels up down Rear Panel Components DIP switch 8 position mini DIP switch used to set the device address for the keypad on the AxLink Bus 1 255 AxLink connector 4 pin 3 5mm Phoenix connector for AxLink connection to the NetLinx Master...

Страница 14: ...er 12 VDC 30 mA Front Panel Components Pushbuttons 13 tactile pushbuttons with blue LED indicators that illuminate when pressed to confirm the source function was selected and that it is currently being used 12 single width 1 double width These pre printed buttons are field replaceable The bottom button functions as 2 buttons there are 2 positions left and right that allow the user to control chan...

Страница 15: ... use only Certifications FCC Class B CE IEC60950 RoHS Colors White FG5794 02 WH Black FG5794 02 BL Light Almond FG5794 02 LA Optional Accessories Single Button Kit FG5794 10 Double Button Kit FG5794 11 Lutron Cairo Wallplates available in a variety of sizes and colors FIG 7 DAS MET 6SRC Metreau 6 Source Audio keypad Light Almond shown DAS MET 6SRC Specifications Power 12 VDC 125 mA Front Panel Com...

Страница 16: ... directional rotating wheel for volume adjustments Note that the center pushbutton is dual purpose a push release provides one function while a press hold provides another Rear Panel Components Wiring connection Two 4 pin SWT connectors that provide connection from the Matrix Audio Controller and to the speakers Dimensions HWD Keypad and Mounting Plate 4 055 x 1 772 x 0 997 103mm x 45mm x 25 32mm ...

Страница 17: ...on on page 45 for information The DAS MET NUM is a SWT keypad suitable for use in Matrix Distributed Audio Systems DAS MET NUM Specifications FIG 9 DAS MET NUM Metreau Numeric Audio keypad White shown DAS MET NUM Specifications Power 12 VDC 125 mA Front Panel Components Pushbuttons 13 tactile pushbuttons Rear Panel Components Wiring connection One 14 pin connector that provides connection to the m...

Страница 18: ...Cont Certifications FCC Class B CE IEC60950 RoHS Colors White FG1122 02 WH Black FG1122 02 BL Light Almond FG1122 02 LA Optional Accessories Single Button Kit FG5794 10 Double Button Kit FG5794 11 Lutron Cairo Wallplates available in a variety of sizes and colors ...

Страница 19: ...ve and replace buttons on the Metreau keypads is to place the keypad assembly FIG 10 face down on a flat level surface so that the buttons stay in position until you are ready to remove them FIG 10 Metreau keypads Exploded view Plastic Faceplate Metal Mounting Plate Buttons Circuit board tabs 2 on each side remove screw remove screw remove screw remove screw Disconnect the power supply and all wir...

Страница 20: ...ccidentally drop the buttons or any other part of the keypad assembly 3 Gently lift each button off of their mounting posts on the Circuit Board 4 Select the location of the custom buttons and gently snap them into place on the Circuit Board Be sure to note the orientation of the LED window on each button to avoid accidentally mounting them upside down 5 Carefully insert the Circuit Board with new...

Страница 21: ...each keypad in a NetLinx Control System see FIG 12 1 If connected disconnect the power supply 2 Locate the 8 position mini DIP switch on the rear panel 3 Set the DIP switch according to the values shown below AxLink device addressing applies only to the MET 6SRC MET 7 and MET 13 keypads Metreau Audio Keypads DAS MET 6SRC and DAS MET 13 do not require device addressing FIG 12 DIP Switch and SWT Jum...

Страница 22: ... As an example the DIP switch in FIG 13 defines AXLink device number 129 1 128 129 If you later change the device number remove and reconnect the power connector to enter the new device number into memory FIG 13 8 position mini DIP Switch AMX has created the Dip Switch2 software application to assist in calculating dip switch position values Download the free program Dip Switch2 from www amx com ...

Страница 23: ...S decora style wall plates and boxes wallboxes not included Mounting Dimensions MET 6N DAS MET 6SRC FIG 14 provides detailed dimensions for the MET 6N and DAS MET 6SRC keypads Before touching the device discharge the static electricity from your body by touching a grounded metal object FIG 14 MET 6N and DAS MET 6SRC Mounting Dimensions ...

Страница 24: ...Mounting and Installation 16 Metreau Keypads MET 7 FIG 15 provides detailed dimensions for the MET 7 keypads FIG 15 MET 7 Mounting Dimensions ...

Страница 25: ...WD 2 5 8 x 1 3 4 x 1 5 8 Wallbox Mounting 1 Use the cutout dimension for the wallbox to cutout the install surface 2 Connect the AxLink connector or SWT cable connectors to the rear of the keypad 3 Place the Mounting Plate on the wallbox align the screw holes with the mounting holes and fasten the Mounting Plate to the wallbox using the screws supplied FIG 16 MET 13 and DAS MET NUM Mounting Dimens...

Страница 26: ...ent Frame on the wallbox align the screw holes with the mounting holes on the wallplate Fasten the wallplate to the wallbox Based on the extensive number of international wallboxes it is not pragmatic to ship every possible screw that could be used Please use the screws appropriate for your specific wallbox 3 Confirm that the terminal end of the AxLink cable is disconnected and not receiving power...

Страница 27: ...el Components FIG 17 shows the basic rear components of the AxLink MET 6N MET 7 and MET 13 keypads Before touching the device discharge the static electricity from your body by touching a grounded metal object If using power from AxLink disconnect the wiring from the control system before wiring the Metreau keypad Do not connect power to the keypads until the wiring is complete Before touching the...

Страница 28: ...ve wires 1 Strip 0 25 inch 6 35 mm of wire insulation off all wires 2 Insert each wire into the appropriate opening on the connector according to the wiring diagrams and connector types described in this section 3 Turn the flat head screws clockwise to secure the wires in the connector AxLink Data and Power Connections Connect the NetLinx Controller s AxLink connector to the AxLink connector on th...

Страница 29: ...as follows If the LED is on and not flashing disconnect the AxLink connector and recheck all AxLink connections Then reconnect the AxLink connector to the panel and verify the LED is flashing once per second FIG 19 AxLink and 12 VDC power supply wiring diagram 12 VDC power supply PWR AXP AXM GND Metreau keypad NetLinx Controller PWR AXP AXM GND PWR GND If you are not using power from AxLink discon...

Страница 30: ...ded copper wire in a single continuous run Preparing Captive Wires SWT wiring utilizes four color snap connectors to secure the wires no screws You will need a wire stripper to prepare and connect the captive wires 1 Strip 0 25 inch 6 35 mm of wire insulation off all wires 2 Insert each wire into the appropriate opening on the connector according to the wiring diagrams and connector types describe...

Страница 31: ...ecting to the Main DAS MET 6SRC Keypad The DAS MET NUM Metreau numeric keypad connects to the main DAS MET 6SRC keypad via a 14 pin connector as indicated in FIG 22 The red line on the cable indicates Pin 1 The cable cannot be twisted it must be straight across Pin 1 to Pin 1 FIG 21 SWT wiring FIG 22 DAS MET NUM connected to main DAS MET 6SRC keypad SWT connectors on Mi Series Controller Speakers ...

Страница 32: ...Integration Drawing Using the Audio Zone Expander FIG 23 System Integration Drawing Using Four Conductor Speaker Wire FIG 24 System Integration Drawing Using the Audio Zone Expander IR OUT LINE IN Tango Controller Shared 4 conductor speaker wire IR OUT LINE IN Tango Controller Shared 4 conductor speaker wire Tango Audio Zone Expander Zones 1 8 LINE IN RJ11 ...

Страница 33: ...IG 25 shows the construction of a simple circuit of discrete components to reduce the speaker level output of the Matrix Controller to line level so that it can drive an auxiliary amplifier This amplifier would typically be installed at the equipment rack head end FIG 25 Auxiliary Amplifier Configuration Matrix Controller Zone Output Terminal Connector DATA Ground Left Speaker Right Speaker Left R...

Страница 34: ...ough the keypad In cases such as this it is possible to run a separate cable pair CAT 3 CAT 5 Twisted Pair cable from the Matrix Controller to the keypad for control purposes When using CAT3 CAT5 over long runs it is recommended to double up the control wires only 2 conductors are required and there are 4 8 wires available FIG 27 shows the connections of the control signal path to the keypad and t...

Страница 35: ...ng 2 pairs of speakers in a zone and the speakers are 8 Ohms it is not necessary to use an impedance matching autoformer type volume control A standard stereo volume control will perform properly The impedance will be approximately 4 Ohms If you are using an impedance matching volume control with 2 pairs of speakers set the impedance matching to the 2X setting FIG 28 Split Zone Analog Volume contr...

Страница 36: ...Wiring and Connections 28 Metreau Keypads ...

Страница 37: ...9 Button Layout MET 6N MET 7 and MET 13 FIG 30 Navigation Wheel button layout MET 6N MET 7 MET 13 1 2 3 4 5 6 10 9 11 7 8 Center pushbutton button 11 rotate Navigation Wheel rotate Navigation Wheel clockwise button 12 counter clockwise button 13 dual function push release press hold 1 2 3 4 5 6 7 8 1 2 3 4 5 6 14 7 8 9 10 11 12 13 12 Bottom pushbutton is a two position Pushbutton left side button ...

Страница 38: ...session from the PC to the NetLinx master All text is based on a Unicode index SEND_COMMANDs BRT Set Brightness level for all LEDs pushbuttons and levels indicator bar for both On and Off states Syntax BRT on brightness 0 32 off brightness 0 32 Variables on brightness LED On brightness and can range from 0 min to 32 max off brightness LED Off level brightness and can range from 0 min to 32 max Exa...

Страница 39: ... to device number 127 then the IR Receiver on that MET 6N will appear as device number 128 Firmware must be sent to the keypad not the IR Receiver in this example device 127 7 Click Send and then Close 8 Upon confirmation of a successful send you can exit NetLinx Studio2 SEND_COMMANDs Cont BMODE Sets the bargraph mode Syntax BMODE bargraph mode 0 9 Sets the specified bargraph to operate in one of ...

Страница 40: ...Keypads SWT only Metreau keypads DAS MET 6SRC and DAS MET NUM are configured via options that are accessible through the Tango Audio Controller Refer to the Tango Audio Controller Operation Reference Guide available from www amx com for details FIG 31 Send to Axcess Dialog Window ...

Страница 41: ...the source button i e CD or DVD on the room zone keypad to listen to the most recent selection If the Source is off the system will turn it on If the Source is stopped the system will initiate Play If the Source has been paused or muted the system will un pause un mute it Changing Tracks Press the left and right sides of the Navigation Wheel to change tracks Press the button in the center of the N...

Страница 42: ...ing To the Radio Press the AM FM SIRIUS or XM button on the room zone keypad to listen to the most recent station Select a new station by pressing a custom programmed button The UP DOWN LEFT RIGHT Centre PRESS and Centre HOLD buttons are programmed by the installer however the standard configuration for the AM FM Tuner and for the SIRIUS XM Tuner is as follows AM FM Tuner on a 6 source keypad UP D...

Страница 43: ...el is indicated in the LED display Flat center LED 4 lit Press and hold the center Select pushbutton on the Navigation Wheel for 3 seconds to return to the default Bass Level setting Press the center Select pushbutton on the Navigation Wheel to set the current bass level and proceed to Treble Adjustment mode FIG 2 DAS MET 6SRC FIG 3 Bass Level Adjust Mode Press bottom two buttons simultaneously fo...

Страница 44: ...el and proceed to Balance Adjustment mode Adjusting Balance For a Room Zone When the Treble Level is set via the Select button see above the next adjustment is for Balance Adjust The middle row left LED will blink to indicate that Balance Adjust mode is active FIG 5 Rotate the Navigation Wheel to adjust the balance right clockwise or left counter clockwise The balance setting is indicated in the L...

Страница 45: ... SRS mode Press the center Select pushbutton on the Navigation Wheel to set the current SRS settings and proceed to LED ON Brightness Adjust mode Turning SRS Off Press and hold the Center Navigation button while in SRS mode DAS MET 6SRC Privacy Mode Off On When Privacy Mode is engaged the room zone cannot be paged apart from this the room zone will function normally FIG 6 SRS Adjust Mode FIG 7 Pri...

Страница 46: ...e Source is an external Tuner the last station listened to will begin playing If the Source is a CD player changer the first Track of the first CD will begin playing unless the source has the ability to retain its previous settings If the Source is Satellite then the last station listened to will begin playing DAS MET 6SRC Zone Control On Off Turning a Single Zone On Off To turn a single Zone ON p...

Страница 47: ...OFF Press and hold the top two Source buttons simultaneously for 4 seconds FIG 9 Turning Off a Specific Source in All Zones FIG 10 Turning Off all Sources in All Zones Press and hold a Source button for 4 seconds to turn it off in ALL zones Press and hold the top two Source buttons to turn ALL sources off in ALL zones All zones will be turned off and no sources will play One minute after an ALL OF...

Страница 48: ... Source for one Zone does not dynamically pause the Source With multiple Zones listening to the same Source switching to a different Source from one of the Zones does not pause the original Source and the original Source continues to play in all other Zones that are On With multiple Zones listening to the same Source turning off the Source for one zone does not dynamically pause Source and the ori...

Страница 49: ...en used with a CD Player Changer FIG 12 Using the Navigation Wheel With The Internal AM FM Tuner FIG 13 Using the Navigation Wheel With The Internal SIRIUS Satellite Radio Tuner FIG 14 Using the Navigation Wheel With CD Player Changer Rotate the wheel counter clockwise to adjust the Zone volume DOWN Rotate the wheel clockwise to adjust the Zone volume UP Seek UP Seek DOWN Previous Preset Next Pres...

Страница 50: ...ng the Navigation Wheel With DVD Player Changer Rotate the wheel counter clockwise to adjust the Zone volume DOWN Rotate the wheel clockwise to adjust the Zone volume UP Up Down Left Right Push and Release Select Press and Hold Menu These are suggested settings All buttons are user definable FIG 16 Using the Navigation Wheel With Satellite Radio Video Box Rotate the wheel counter clockwise to adju...

Страница 51: ...tate the wheel counter clockwise to adjust the Zone volume DOWN Rotate the wheel clockwise to adjust the Zone volume UP Next Previous Previous Page Next Page Push and Release Select Press and Hold User defined 1 These are suggested settings All buttons are user definable FIG 18 Using the Navigation Wheel With External Tuner Rotate the wheel counter clockwise to adjust the Zone volume DOWN Rotate t...

Страница 52: ...urces FIG 19 Using the Navigation Wheel With Other sources Rotate the wheel counter clockwise to adjust the Zone volume DOWN Rotate the wheel clockwise to adjust the Zone volume UP User defined Up User defined Down User defined Left User defined Right Push and Release User defined Select Press and Hold User defined Press Hold These are suggested settings All buttons are user definable ...

Страница 53: ...mized just like any other AxLink keypad Direct Access On Board Tuner Direct Selection of a Radio Station Using the DAS MET NUM keypad enter the station identification and press ENTER 1 Key in the Station identifier number using the PRESET button to enter a point for FM stations 2 Press ENTER to complete Examples 1050 ENTER 1050AM 104 5 ENTER 104 5FM The SWT Metreau Keypads function essentially the...

Страница 54: ...r 2 Press the PRESET button 3 Key in the Track number for example 25 4 indicates CD 25 Track 4 4 Press ENTER to complete Examples 52 3 ENTER Disk 52 Track 3 1 22 ENTER Disk 1 Track 22 103 2 ENTER Disk 103 Track 2 FIG 2 Direct Selection of a Disk and Track Enter the desired Disk Track number Press ENTER to save Use the Preset button to enter a point to specify the disk and track numbers 25 4 indica...

Страница 55: ...mber 2 Press Enter to complete Examples 3 ENTER current disk Track 3 19 ENTER current disk Track 19 Cable and Satellite Direct Selection of a Channel To select a channel on a Cable or Satellite receiver the format is CCC ENTER CCC Channel FIG 3 Direct Selection of a Track On the Current Disk FIG 4 Direct Selection of a Cable or Satellite Channel Enter the desired Track number Press ENTER to save E...

Страница 56: ...ogrammed including Matrix on board AM FM Tuners External Tuners Satellite Receivers CD Players Changers DVD Players Changers Audio Servers and Satellite Radio Creating A Preset This information also applies to selecting a Digital Cable Music DCM Channel Strings of 2 to 4 numbers are recognized Presets are Source specific but not Room specific FIG 5 Creating A Preset Press and hold ENTER for 4 seco...

Страница 57: ... a Tuner as the Source b Key in 104 5 to tune to the desired station c Press ENTER d Press PRESET e Press 3 f Press and hold ENTER for four seconds Recalling A Preset 1 Select a Source 2 Press PRESET and enter the desired Preset number 1 10 3 Press ENTER to recall the specified Preset Examples PRESET 5 ENTER Recalls Preset 5 PRESET 1 ENTER Recalls Preset 1 PRESET 4 ENTER Recalls Preset 4 FIG 6 Rec...

Страница 58: ...Presets 1 Select a Source 2 Press PRESET 3 Enter 00 4 Press and hold ENTER for four seconds Example Press PRESET 00 press hold ENTER All presets will be cleared FIG 7 Clearing All Presets Press PRESET Enter 00 Press and hold ENTER for 4 seconds to clear all Presets ...

Страница 59: ...1 Select a Source CD or Tuner 2 Tune or select the desired entry as the favorite for the selected Source 3 Press and hold buttons 3 and 4 simultaneously for four seconds to set the selected Favorite for this Source LED s will turn On 4 Press ENTER to complete LED s will turn Off Examples Tuner 104 5 ENTER 3 and 4 ENTER 104 5FM is saved as the Favorite CD 2 4 ENTER 3 and 4 ENTER Disk 2 Track 4 is s...

Страница 60: ...CD or Tuner 2 Simultaneously press and hold buttons 3 and 4 to enter Favorites mode for this Source LED s will turn On 3 Key in 00 4 Press and hold ENTER to complete FIG 9 Clearing Favorites For All Sources in a Specific Zone Press and hold buttons 3 4 Press and hold ENTER simultaneously for 4 seconds for 4 seconds to save ...

Страница 61: ...To enter Group Mode press the Group button see FIG 10 Group Mode is indicated by all Source LED s turned On Adding a Zone To a Group 1 Press the Group button to enter Group Mode all Source LED s turn On 2 Enter the Zone number to add to the group 3 Press ENTER to complete Source LED s turn Off Example from Keypad in Zone 1 Press Group 2 ENTER Zone Grouping now includes Zone 1 2 Press Group 4 ENTER...

Страница 62: ...uping All Zones 1 Press the Group button to enter Group Mode all Source LED s turn On 2 Enter 00 3 Press ENTER to complete FIG 11 Adding A Zone To Group FIG 12 Ungrouping All Zones Press ENTER to save Enter 99 Press the Group button to enter Zone Grouping mode all Source LEDs light Press ENTER to save Enter 00 Press the Group button to enter Zone Grouping mode all Source LEDs light ...

Страница 63: ...below 1 Press the Group button to enter Group Mode all Source LED s turn On 2 Adjust Volume using the Navigation Wheel on the DAS MET 6SRC keypad 3 Press ENTER to complete FIG 13 Grouping Volume Control Press ENTER to save Rotate wheel to adjust volume Press the Group button to enter Zone Grouping mode all Source LEDs light All Zones will have the volume incremented by the adjustment being made To...

Страница 64: ...ally Setting the System Clock on the Tango Audio Controller From the LCD on the front panel of the Tango Audio Controller 1 Select CLOCK 2 Select Set Time to display the following screen FIG 14 3 Press Hour to increment the HH hours from 1 through 24 4 Press Minute to increment the MM minutes from 01 through 60 5 Press Second to increment the SS seconds from 01 through 60 6 Press Set to set the cl...

Страница 65: ...6 30 ENTER alarm set for 6 30 AM press 5 and 6 18 30 ENTER alarm set for 6 30 PM Clearing the Alarm For a Specific Zone 1 Press and hold buttons 5 and 6 simultaneously for four seconds Source LED s turn ON 2 Enter 00 3 Press ENTER to complete source LED s turn OFF FIG 15 Setting Alarm In a Zone FIG 16 Clearing the Alarm For a Specific Zone Press and hold buttons 5 6 Press ENTER to save Enter alarm...

Страница 66: ...uttons 5 and 6 simultaneously for four seconds 2 Key in 00 3 Press and hold ENTER for four seconds to complete FIG 17 Clearing All Alarms For All Zones Press and hold ENTER Enter 00 for 4 seconds to clear all alarms for ALL zones Press and hold buttons 5 6 simultaneously for 4 seconds to enter Alarm mode ...

Страница 67: ...has a DAS MET NUM keypad installed Locking a Keypad 1 Press and hold buttons 7 and 8 simultaneously for four seconds Source LED s turn On 2 Enter the Zone number to Lock 3 Press ENTER to complete Source LED s turn Off Examples Press and hold 7 and 8 for 4 seconds 2 ENTER keypad in zone 2 will be locked Press and hold 7 and 8 for 4 seconds 4 ENTER keypad in zones 2 4 will be locked FIG 18 Locking A...

Страница 68: ...NTER keypad in zone 2 will be Locked Press and hold 7 and 8 for 4 seconds 4 ENTER keypad in zones 2 and 4 will be Locked Press and hold 7 and 8 for 4 seconds 2 press and hold ENTER for four seconds Keypad in zone 2 will be Unlocked Keypad in zone 4 remains Locked FIG 19 Unlocking A Keypad Press ENTER to save Enter the Zone number that you want to unlock Press and hold buttons 7 8 simultaneously fo...

Страница 69: ...LED s turn Off Examples Press 7 and 8 2 ENTER keypad in zone 2 will be Locked Press 7 and 8 4 ENTER keypad in zones 2 4 will be Locked Press 7 and 8 00 press hold ENTER for four seconds Keypads in Zones 2 and 4 will both be Unlocked FIG 20 Unlocking All Keypads Enter 00 Press and hold ENTER for 4 seconds to unlock all keypads Press and hold buttons 7 8 simultaneously for 4 seconds to access Lockou...

Страница 70: ...Advanced Functions DAS MET 6SRC 62 Metreau Keypads ...

Страница 71: ...ding it onto the NetLinx Master Main Page Initial View The initial view of the touch panel pages is the Main Page featuring the Menu Bar along the left edge as shown in FIG 21 Press the Menu Bar to access the two primary menu options Main and Setup as shown in FIG 22 FIG 21 Main Page Initial View FIG 22 Main Page Menu Bar options Touch the Menu Bar to access the main menu options Main and Setup To...

Страница 72: ...ns to invoke the Location Device page for the selected Zone This page provides playback controls for the device currently associated with the selected Location Zone As an example FIG 24 indicates that the Dining Room is currently using a DVD Player as it s Source Device FIG 23 Locations Page FIG 24 Example Location Device Page Device currently associated with this Location Currently selected Locat...

Страница 73: ...e for this Location Zone Options From a Location Device page press Zone Options to invoke the Zone Options popup shown in FIG 25 Use the Up Down buttons to adjust Bass and Treble for this Location The current levels are indicated in the vertical status bars adjacent to each set of Up Down buttons default flat Touch and drag the slider to adjust the Balance setting default centered Touch the SRS me...

Страница 74: ...vice to be used for the selected Location Note that the currently selected Location is indicated on the right side of this page To change sources for this Location simply press the desired Source button This action invokes the Device Control Page for the selected Device type Use the options in the Device Control page to control playback FIG 26 Sources Page for the Dining Room Location Currently se...

Страница 75: ...n the number entered Presets Use the Presets buttons to recall up to ten station presets Zone Options Press to access the Zone Options popup for configuring audio settings for the selected Location Zone Note that the currently selected Location is indicated in the upper right corner of the page see the Zone Options section on page 65 Change Source Press to access the Sources page for this location...

Страница 76: ...s to access the Zone Options popup for configuring audio settings for the selected Location Zone Note that the currently selected Location is indicated in the upper right corner of the page see the Zone Options section on page 65 Change Source Press to access the Sources page for this location Note that the currently selected Source is indicated in the upper left corner of the page see the Change ...

Страница 77: ...selected Location Zone Note that the currently selected Location is indicated in the upper right corner of the page see the Zone Options section on page 65 Change Source Press to access the Sources page for this location Note that the currently selected Source is indicated in the upper left corner of the page see the Change Source section on page 66 Mute Press to mute the audio Volume Up Down Pres...

Страница 78: ...io settings for the selected Location Zone Note that the currently selected Location is indicated in the upper right corner of the page see the Zone Options section on page 65 Change Source Press to access the Sources page for this location Note that the currently selected Source is indicated in the upper left corner of the page see the Change Source section on page 66 Mute Press to mute the audio...

Страница 79: ...the selected Location Zone Note that the currently selected Location is indicated in the upper right corner of the page see the Zone Options section on page 65 Change Source Press to access the Sources page for this location Note that the currently selected Source is indicated in the upper left corner of the page see the Change Source section on page 66 Mute Press to mute the audio Volume Up Down ...

Страница 80: ...up for configuring audio settings for the selected Location Zone Note that the currently selected Location is indicated in the upper right corner of the page see the Zone Options section on page 65 Change Source Press to access the Sources page for this location Note that the currently selected Source is indicated in the upper left corner of the page see the Change Source section on page 66 Mute P...

Страница 81: ...on presets Zone Options Press to access the Zone Options popup for configuring audio settings for the selected Location Zone Note that the currently selected Location is indicated in the upper right corner of the page see the Zone Options section on page 65 Change Source Press to access the Sources page for this location Note that the currently selected Source is indicated in the upper left corner...

Страница 82: ...iguring audio settings for the selected Location Zone Note that the currently selected Location is indicated in the upper right corner of the page see the Zone Options section on page 65 Change Source Press to access the Sources page for this location Note that the currently selected Source is indicated in the upper left corner of the page see the Change Source section on page 66 Mute Press to mut...

Страница 83: ...ial view of the Setup pages is the Zones page FIG 35 Setup Zones Touch any of the Zones buttons to edit the selected Zone s label via the on screen keyboard shown in FIG 36 Press Enter to create a carriage return Press Done to save your changes Press Abort to close the keyboard without saving changes FIG 35 Setup page initial view Zones FIG 36 On Screen Keyboard editing a Zone label ...

Страница 84: ...ble to quickly convert regular time to 24 hour clock time standards Regular and 24 hour clock time use the same number of minutes per hour and they use minutes in exactly the same way There is no need to convert minutes when going back and forth between the two time systems The alarm clock treats midnight as the start of a new day and express it as 0000 FIG 37 Setup Alarms page Regular Time 24 hou...

Страница 85: ...olume Up and Down buttons on the Volume bar to set the alarm volume for the selected Source device 6 Touch save alarm to save your changes and return to the Alarms page FIG 38 Setup Alarms page with Zone and Time selected FIG 39 Alarms page select a Source The exit button allows you to close the Sources window without selecting an Alarm Source Once a Source is selected the Sources windows closes a...

Страница 86: ...Module 78 Metreau Keypads Removing an Alarm Once an alarm has been set for this Zone the Remove Alarm option is enabled FIG 40 Touch Remove Alarm to remove the alarm for the selected Zone FIG 40 Alarms page Remove Alarm ...

Страница 87: ...it to see that it is intact If you have an ohm meter test for continuity across the fuse sometimes they look good but they re really broken near one of the ends If you are using a power bar they often have mini breakers on them and you should check to ensure that all is well The fuse in the rear of the Unit is a T8AL250v Symptom Possible Causes Section Everything is dead Power Power All keypads ar...

Страница 88: ...the zone Possible Causes Zone connectors at Tango Controller are not secure Connector at Keypad to Tango Controller is not secure Wiring standard not followed Make certain the center two wires are in the same orientation at the Tango Controller and the keypad They may have been inadvertently reversed during the installation Input and output connectors on keypad are reversed Keypad not recognized b...

Страница 89: ...d speakers are reversed Keypad not recognized by system Restart system Keypad Lights No Sound Power and command connectivity are getting to the zone Check other zones and select each source to determine if this is specific to the source or the room in general If the problem is in a particular room then there may be an issue with cabling to the speakers or it may be the keypad itself If you get sim...

Страница 90: ...SWT Troubleshooting 82 Metreau Keypads ...

Страница 91: ...Numeric Keypads Advanced Functions 83 Metreau Keypads ...

Страница 92: ...registered trademarks of AMX AMX reserves the right to alter specifications without notice at any time It s Your World Take Control 3000 RESEARCH DRIVE RICHARDSON TX 75082 USA 800 222 0193 469 624 8000 469 624 7153 fax 800 932 6993 technical support www amx com ...

Отзывы: