HOST CONFIGURATION
ADVANCED MICRO CONTROLS INC.
6
46
RSLogix 5000 Configuration (continued)
Configuring a Built-in Ethernet Port (As Needed)
You will still have to set an IP address for the Ethernet Port if the port is built into your processor. Right click
on the port name in the I/O Configuration screen and select “Properties”. A Module Properties window simi-
lar to the one shown in figure 6.2 will open. In this window you must set an IP Address for the port, not the IP
address of the SD17060E.
Adding the SD17060E
You can add the SD17060E to the project once the Ethernet port (built-in or bridge module) is configured.
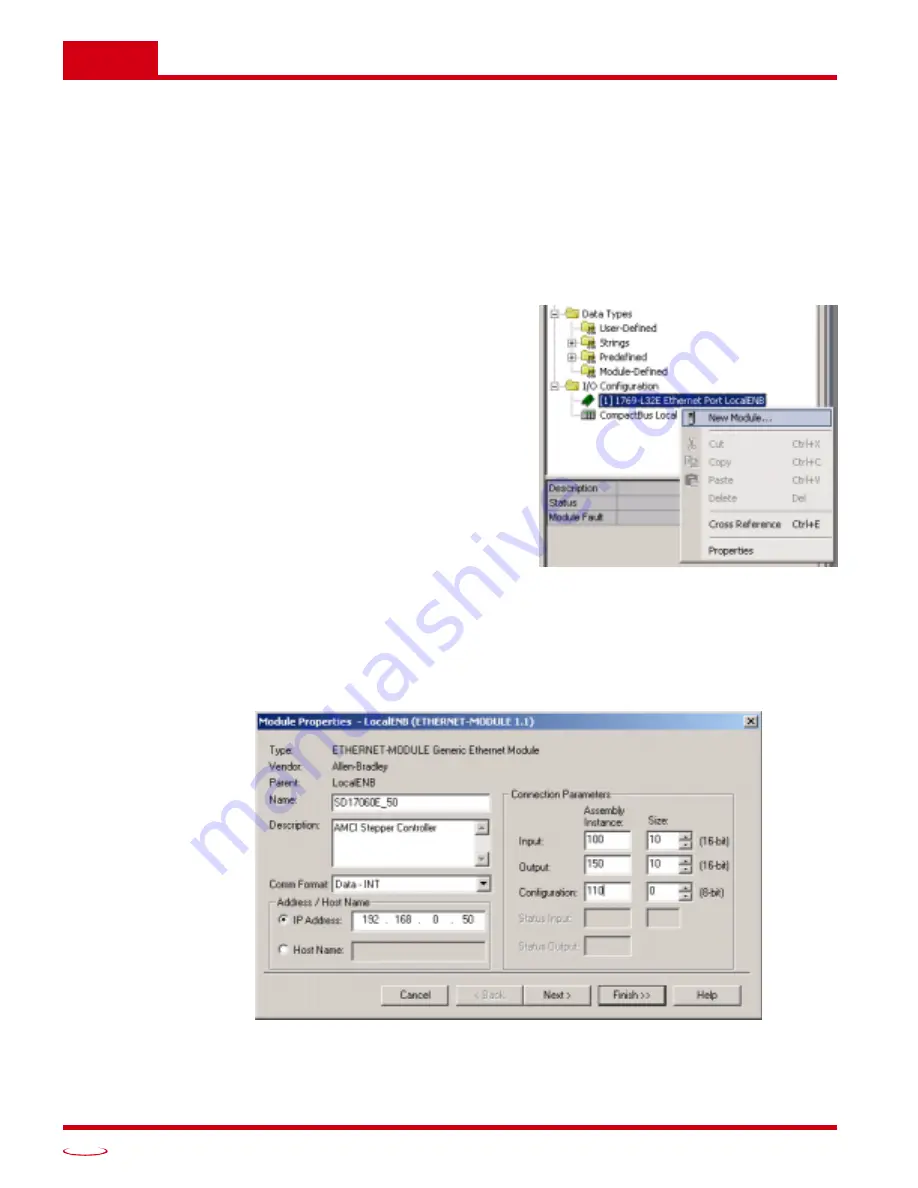
1) As shown in figure 6.3 on the right, the Ethernet
port will be listed under the I/O Configuration tree.
Right click on the port and then click on “New
Module...” in the pop-up menu.
2) In the resulting window, scroll down the list until you
find the entry that has a description of “Generic
Ethernet Module”. (Module Type is ETHERNET-
MODULE in figure.) Click on the module name to
select and then click the [OK] button. A Module
Properties window will open.
3) Set the following parameters in the Module
Properties window. All parameters not listed here
are optional. Figure 6.4 shows a completed screen.
h
Name:
A descriptive name for the SD17060E.
h
Comm Format:
Data - INT (MUST be
changed from the default Data - DINT.)
h
IP Address:
Must be the address you set for
the SD17060E. Refer to Chapter 5 starting on
page 41 for information on setting the IP
Address of the SD17060E.
h
Input:
Assembly Instance = 100, Size = 10
h
Output:
Assembly Instance = 150, Size = 10
h
Configuration:
Assembly Instance = 110, Size = 0
4) Click on [Next>]. Set the RPI time as required for your system. The minimum RPI time for the
SD17060E is 3 milliseconds. When done, click on [Finish>>] to complete the setup.
Figure 6.3 Adding a SD17060E
Figure 6.4 Sample SD17060E Configuration Screen


