45
13
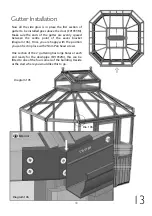
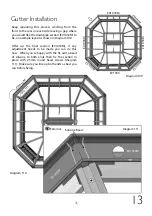
Keep repeating this process working from the
front to the rear on each side leaving a gap where
you would like the downpipe section (EV1032M) to
be, an example layout is shown in Diagram 109.
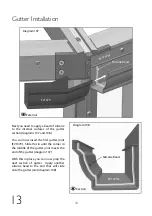
Offer up the final section (EV1032M), if any
adjustment needs to be made you can do this
now. When you’re happy with the fit, add a bead
of silicone to both ends then fix the section in
place with 25mm round head screws (diagram
111). Make sure you line up both ends as best you
can before fixing.
Diagram 109
Gutter Installation
EV1033
EV
10
31
M
M
EV1033M
EV1033M
EV1033M
EV
10
31
M
EV
10
31
M
Diagram 111
External
EV1032M
EV
10
33
M
Silicone Bead
Diagram 110
D
ia
. 11
1
EV
10
32
M

