7
PART NAMES
USING THE SYSTEM
APPENDIX
SETTING AND ADJUSTMENT
Screen
This station features a touchscreen. Simply touch the icons or buttons displayed on the screen.
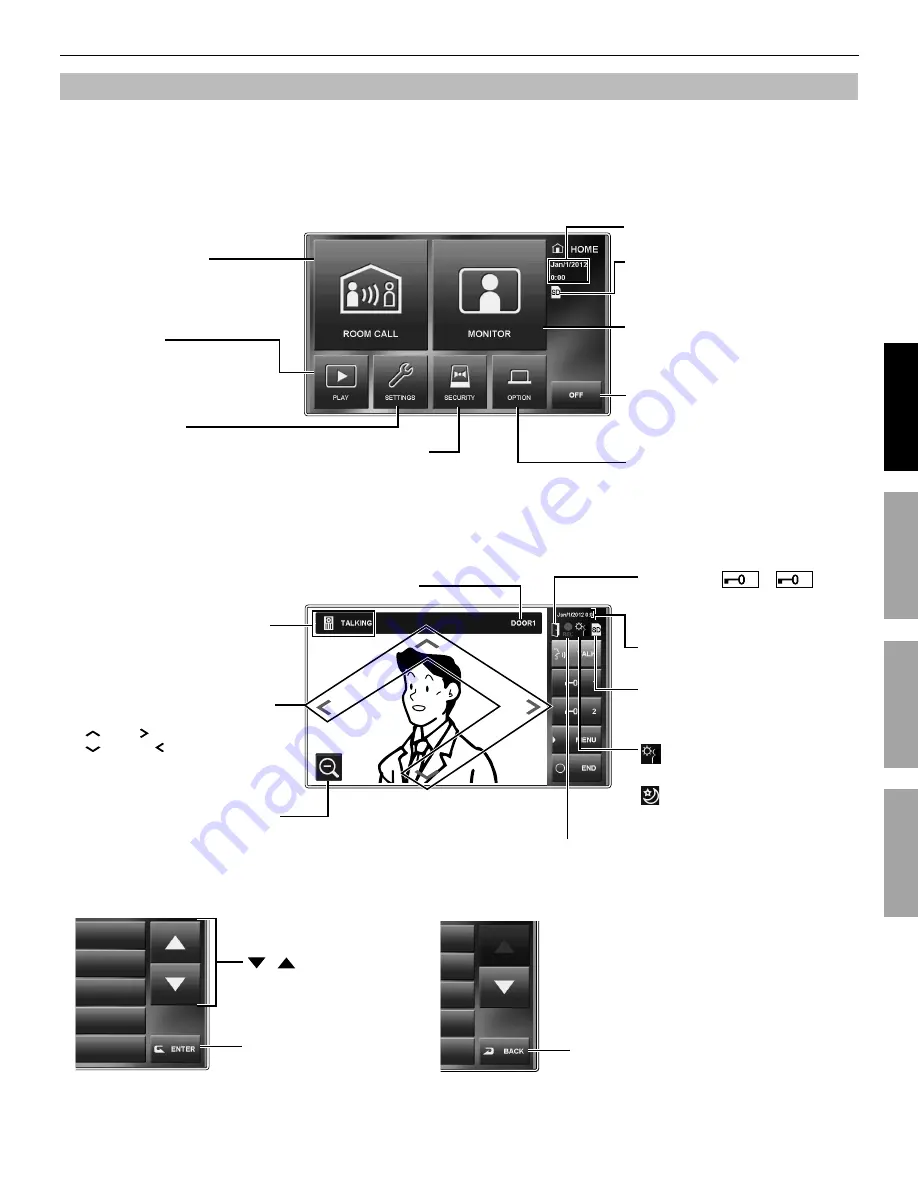
The following are examples of typical windows and icons.
The displayed windows and icons may differ depending on the devices connected to this system.
*
HOME window
This window appears when the screen is turned on.
While communicating with a video door station
Frequently-used icons
/
Scrolls the window up and
down to display more options.
BACK
Touch to return to previous window.
ENTER
Touch to select item or value.
NOTE:
The above example may differ from actual product.
Indicates when an SD (or SDHC)
card has been installed and is
available.
Current date and time
is displayed when a backlight
adjustment is performed during the day.
is displayed when an adjustment is
performed during the night.
Switches the display mode between
zoom and wide.
Moves the images from right to left
or up and down.
<Up>, <Right>
<Down>, <Left>
Shows the status (calling, talking,
etc.) of this station.
Displays which door station is calling.
Zoom mode
Blinks while recording.
Appears when
1 or
2 is
touched to release the corresponding
door.
ROOM CALL (
→
P. 23)
Touch this to call a single sub master
station or all sub master stations
simultaneously.
MONITOR (
→
P. 24)
Touch this to monitor a door station or sub
master station.
PLAY (
→
P. 26)
Touch this to play recorded
images from door stations.
SETTINGS (
→
P. 8)
Touch this to program settings and
adjustments.
SECURITY (
→
P. 29)
Touch this to activate the security
mode or to change security
settings.
OFF
Touch this to turn screen off and set
this station in standby mode.
OPTION (
→
P. 30)
Touch this to activate the connected
external device(s).
Depending on settings, this button may
*
not be displayed.
Indicates when an SD (or SDHC)
card has been installed and is
available.
Current date and time


