background image

20

<Setting initial zoom position>

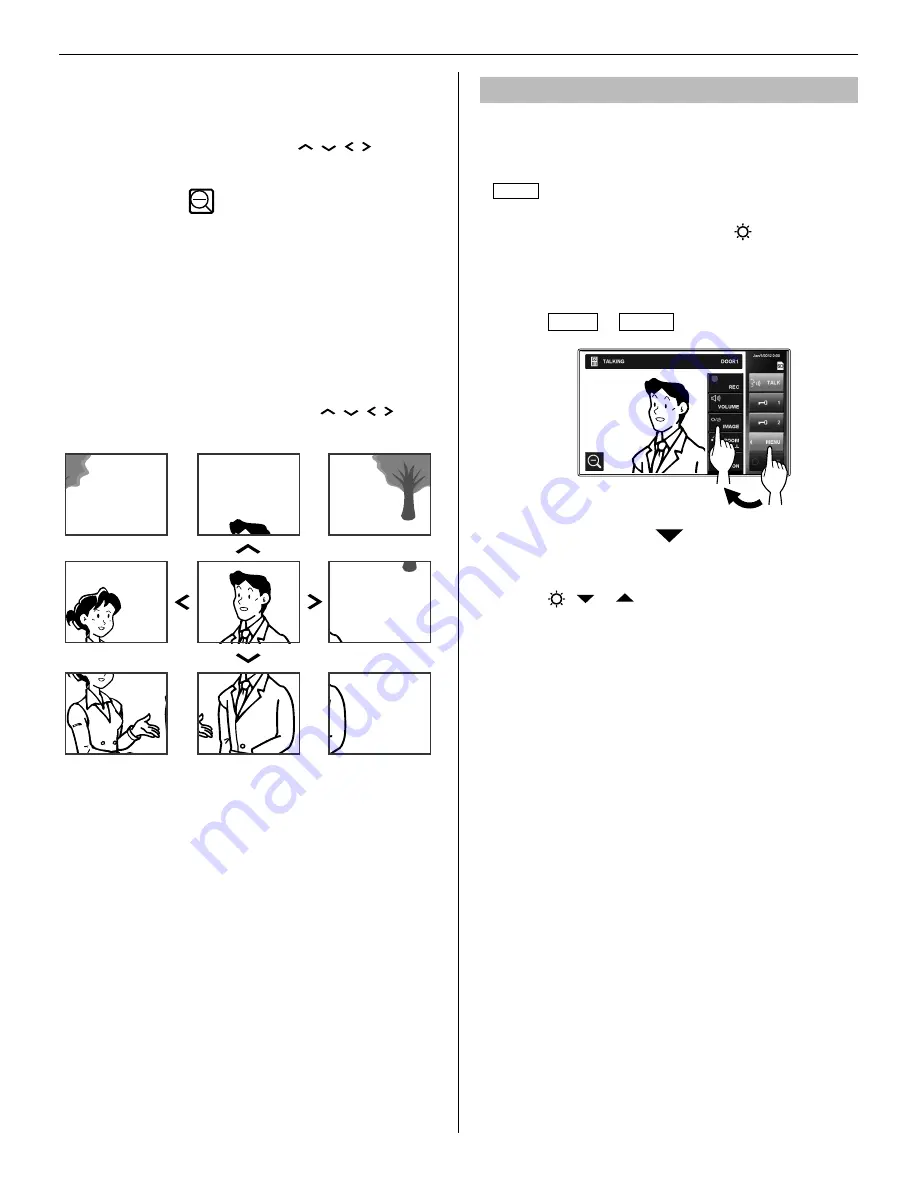
When an image at a door station is displayed, change 

the display to the zoom mode, and then move to 
the desired position by touching  ,  ,  ,   on the 
screen.

Touch and hold 

 for 2 seconds until a beep is 

heard.

NOTES:

Each door station can have personalized settings.

• 

The preset position can be changed at any time.

• 

This setting is also applied to all the sub master stations.

• 

This setting is stored should this station lose power.

• 

 Pan & Tilt

When a zoom image is displayed, touching

  ,  ,  ,   

on the 

screen moves the image as shown below.

NOTES:

The image range of the zoom mode and wide mode differs. The 

• 

edge of wide image will not be displayed with the zoom mode.

At night, the image quality is degraded.

• 

At night, the object image may be blurred and less-visible when 

• 

moving from right to left or up and down because illumination is 
reduced. The same applies to a moving object.

If a CCTV camera is connected instead of a video door station at 
entrance:

Zoom/Wide and Pan & Tilt functions are disabled.

Adjusting images [IMAGE]

While communicating with a door station, you can adjust the 
screen brightness and viewability of images.

Adjustment can also be made while receiving a call from, 

communicating with, or monitoring a video door station (when 

MENU  is displayed on the screen).

 Adjusting screen brightness [ 


]

You can adjust the brightness of the screen in 10 levels.

NOTE:

This adjustment has no effect on the recorded images.

Touch 

MENU  

  IMAGE .

The setting window appears.

Touch 

 -


 or 

 to change the level.

Содержание JM-4MED

Страница 1: ...read this manual for safe and correct use of the system and keep it in a safe place for future reference Please note that images and illustrations depicted in this manual may differ from the actual product JM 4MED HANDS FREE COLOR VIDEO INTERCOM MASTER STATION OPERATION MANUAL PART NAMES USING THE SYSTEM APPENDIX SETTING AND ADJUSTMENT FK1873 B P0113OZ ...

Страница 2: ...DEO DOOR LED 12 Monitor settings MONITOR 13 Settings for indoor monitoring ROOM MONITOR 13 Night illumination when monitoring door stations VIDEO DOOR LED 13 Setting the duration time of entrance monitoring DOOR MONITOR DURATION 13 Setting the duration time of indoor monitoring ROOM MONITOR DURATION 13 Enabling Disabling the operation sound GENERAL SOUND SETTING AUDIBLE TOUCH TONE 13 Enabling Disa...

Страница 3: ...22 Transferring a door call to a sub master station ROOM CALL 22 CALLING MONITORING OTHER STATIONS 23 Calling all sub master stations simultaneously 23 Calling a single sub master station 23 Monitoring 24 Monitoring door station entrance 24 Monitoring sub master station Audio only 24 RECORDING AND PLAYING IMAGES 25 Recording 25 Automatic recording 25 Manual recording 25 Viewing images 26 Locking r...

Страница 4: ...using leakage of the liquid crystal inside the screen If you get the liquid crystal in your eye or mouth wash it away immediately GENERAL PRECAUTIONS 1 Keep the unit more than 1m 3 3 away from radio or TV set 2 Comply with all third party manufacturing specifications that will be used with this system sensors door releases etc 3 If the unit is down or does not operate properly unplug the power sup...

Страница 5: ...to communicate due to malfunctions problems or operational errors in this product We will under no conditions be liable for any damages or losses resulting from this product s contents or specifications This manual was created by Aiphone Co Ltd all rights reserved Copying in part or in whole this manual without prior permission from Aiphone Co Ltd is strictly forbidden Please note that images and ...

Страница 6: ...card not included Insert an SD or SDHC card in this slot with the label side facing front After inserting the card confirm that SD is displayed on the screen When the card has an erasure prevention switch be sure to set the switch to the unlocked position before inserting the card Handset Speaker Call tones audio from a station and alarms are heard from here Color LCD touchscreen See the next page...

Страница 7: ...tment is performed during the night Switches the display mode between zoom and wide Moves the images from right to left or up and down Up Right Down Left Shows the status calling talking etc of this station Displays which door station is calling Zoom mode Blinks while recording Appears when 1 or 2 is touched to release the corresponding door ROOM CALL P 23 Touch this to call a single sub master st...

Страница 8: ... each PIN SETTING CURRENT PIN NEW PIN Select four numbers from 0 9 1111 DATE TIME MONTH DAY YEAR HOUR MINUTE JAN 1 2012 00 00 ALARM SETTING SECURITY SETTING EXIT DELAY SETTING 0 sec 30 sec 60 sec 120 sec 300 sec 600 sec 60 sec RETURN DELAY SETTING 0 sec 30 sec 60 sec 120 sec 300 sec 600 sec 60 sec ALARM PIN ENABLE Select four numbers from 0 9 DISABLE DISABLE UTILITY SETTING ALARM AT DOOR ENABLE DI...

Страница 9: ...the procedue below From HOME window touch 1 SETTINGS GENERAL DATE TIME Set the month date year hour and minute 2 individually by touching or When the setting has finished touch 3 ENTER NOTES A maximum of 60 seconds time gain loss can occur in the displayed time over a month It is recommended to correct the time periodically If there is no power supply for 30 minutes or more the date and time retur...

Страница 10: ...ult is 1111 Touch 3 ENTER The new PIN entry window is displayed If a wrong PIN is entered an error message will be displayed requesting the correct PIN Enter the new 4 digit PIN 4 When the setting has finished touch 5 ENTER The new PIN is now stored You can change the PIN any time by following the above procedure NOTES When this station is initialized by the INSTALL menu the PIN returns to 1111 de...

Страница 11: ...eceive a call from door station 1 Repeat for other door stations 4 When the setting has finished touch 5 ENTER Designate sub master station s to receive a call from this station ROOM STATION CALL SETTINGS You can set whether or not the sub master stations receive a call all call or single call from this station The setting can be made for each sub master station A sub master station set to DISABLE...

Страница 12: ...OR CALL DURATION 45 sec and 90 sec are displayed Touch the desired time length 2 Touch 3 ENTER to save change Talk settings TALK You can make the following settings available when talking Setting the microphone on off for a call from a sub master station PRIVACY MODE When receiving a call from a sub master station individually When set to ENABLE privacy mode is set In this state a caller cannot he...

Страница 13: ...ION until the desired monitoring time is displayed When the setting has finished touch 3 ENTER CAUTION When set to CONTINUOUS the backlight LED of the screen may degrade faster potentially shortening the lifespan of this station Setting the duration time of indoor monitoring ROOM MONITOR DURATION You can set the indoor monitoring time This setting is also applied to all sub master stations in this...

Страница 14: ...e INSTALL menu and a sensor is connected to each input Make the following settings for using the security function Setting the EXIT DELAY SETTING and RETURN DELAY SETTING Select an alarm delay to allow for enough time to vacate or enter the premises before alarm is triggered Setting range 0 30 60 120 300 600 seconds From HOME window touch 1 SETTINGS GENERAL ALARM SETTING SECURITY SETTING Touch 2 E...

Страница 15: ...ion 1 when ALARM AT DOOR is set to ENABLE Setting range 10 seconds 1 minute 10 minutes 1 hour CONTINUOUS no time restriction CONTINUOUS is available only when ALARM AT DOOR is set to ENABLE From HOME window touch 1 SETTINGS GENERAL ALARM SETTING UTILITY SETTING Touch 2 ALARM AT DOOR and select ENABLE or DISABLE Touch 3 ALARM DURATION until the preferred time is displayed When the setting has finis...

Страница 16: ...r a name How to rename EX To enter ROOM 1 Touch 1 to delete the current name Enter 2 R O O M Touch 3 SPACE Touch 4 123 to change the main keys to numbers symbols Touch 5 1 Touch 4 ENTER to save change Repeat for other stations 5 Adjusting brightness and volume ADJUST You can adjust the brightness of the screen and sound volumes From HOME window touch 1 SETTINGS ADJUST The setting window appears Ad...

Страница 17: ...preset position WIDE Images are recorded in wide mode From HOME window touch 1 SETTINGS RECORD SELECT RECORD SETTINGS Touch the preferred recording mode until highlighted 2 Touch 3 ENTER to save changes NOTES This setting also adjusts the default image position when a video door station calls in When using a CCTV camera the ability to change view settings is not available for that image Erasing al...

Страница 18: ... free mode or after 3 minutes using handset NOTE If this station is not set to receive a call from a specific door station there will be no call tone and no image displayed while the door station is calling in to this system To add door see page 11 However call tone is heard from the connected optional call extension speaker When there is a call from a door station without a camera or sub master s...

Страница 19: ...ring a call from a sub master station When receiving a call from a sub master station a call tone sounds and talking becomes enabled automatically Communication ends automatically after approx 10 minutes The ID number of the calling station will not be displayed If a sub master station is calling all the stations simultaneously touching TALK or lifting handset begins communication and ends call to...

Страница 20: ...yed with the zoom mode At night the image quality is degraded At night the object image may be blurred and less visible when moving from right to left or up and down because illumination is reduced The same applies to a moving object If a CCTV camera is connected instead of a video door station at entrance Zoom Wide and Pan Tilt functions are disabled Adjusting images IMAGE While communicating wit...

Страница 21: ...tting window appears Touch 2 ADJUST The image becomes more visible is displayed when activated To return lighting to default Touch ADJUST again The icon is no longer visible NOTES Any lighting adjustments return to default when the screen is turned off ADJUST changes camera shutter speed As a result visitor s face will be brighter but moving objects may appear blurred Setting light adjustment for ...

Страница 22: ...ed while forwarding call to sub master stations Your speaking is heard and the image of the door station is displayed on the target sub master station s When someone touch 3 TALK or lift handset on the target sub master station or one of the target stations talking begins with the target station side Say that you will transfer the call from a door station to 4 the target station and then touch END...

Страница 23: ...from sub master station cannot be heard If someone touches 5 TALK or lifts handset at a sub master station communication between this station and the sub master station is initiated To complete communication Do one of the following Touch END on the screen Hang up handset Press the HOME button Calling a single sub master station Sub master stations must be set to receive a call from this station Pr...

Страница 24: ...umination is automatically activated on door station depending on settings Monitoring sub master station Audio only You can monitor sounds at a sub master station Press the HOME button touch screen or lift 1 handset Touch 2 MONITOR from HOME window and select the sub master station to monitor A call tone sounds at both this station and target station and then the symbol image for monitoring is dis...

Страница 25: ...yet The LED turns off when PLAY is touched Automatic recording does not begin while monitoring a door station To save images while monitoring see manual recording below Manual recording You can also record images displayed on the screen Touch MENU REC when an image is displayed Manual recording is possible only when MENU is displayed on the screen The recording is the same with the automatic recor...

Страница 26: ...to format an SD or SDHC card when using it in this station for the first time If there remain some data other than recorded images in the card a recording may fail because of a shortage of memory Do not remove the SD or SDHC card or reboot this station while recording formatting the card or copying images onto the card otherwise the card may fail to perform when recording or playing images Should ...

Страница 27: ...e erased Touch PLAY from HOME window select the set of images to lock then touch LOCK is displayed to show selected set of images is locked To unlock Touch PLAY select the set of images to unlock and touch LOCK disappears from the window NOTE You can lock up to 5 sets of images in the built in memory and up to 100 sets of images on the SD or SDHC card Erasing recorded images Touch 1 PLAY from HOME...

Страница 28: ...r SDHC card Copied images are stored with the following file names NOTES This action will overwrite all existing images in the EXPORT folder on the SD or SDHC card If there is insufficient memory the images cannot be copied If the number of images or folders exceeds the limit of FAT16 32 they cannot be copied The images copied onto an SD or SDHC card cannot be played on this station The images on ...

Страница 29: ...MED cannot be selected When a sensor is triggered A message is displayed the sensor ID number is shown the status LED blinks in red and an alarm sounds on all of the master and sub master stations NOTES The alarm sounds in the maximum volume 10 even if the volume of call tone is set to 0 Door station 1 also sounds alarm and turns on the white LED All the functions of this station are available whi...

Страница 30: ...uts are triggered the latter one takes priority Releasing a door with another door release button This is available when the inputs 1 and or 2 of this station is set to REQUEST TO EXIT in the INSTALL menu window during installation and a door release button is connected to each of the inputs The door at the door station 1 or 2 or both doors can be unlocked by pressing the connected button s during...

Страница 31: ...s displayed a short exists within the door station wires Check the wires Trouble When this station gets out of commission reboot this station by pressing the reset button SPECIFICATIONS Power supply DC 24V from power supply Current consumption 390 mA Communication Handset Simultaneous communication Hands free Auto voice actuation Ambient temperature 0 40 C 32 F 104 F Screen 7 inch color LCD screen...

Страница 32: ...o not covered by this warranty Aiphone will not be responsible for any costs incurred involving on site service calls Aiphone will not provide compensation for any loss or damage incurred by the breakdown or malfunction of its products during use or for any consequent inconvenience or losses that may result The object area of is the EU FCC This device complies with Part 15 of the FCC Rules Operati...

Отзывы: