


User Manual of TV5600-B01 Series Dispensing Control System
77
5.Automatic needlealignment
1. Set needle alignmentparameters
Enter system parameters - other parameters – autoalignment, andset the following parameters:
Needlealignmentscanning timeout: (scanningtime,needlealignment will fail ifno signal is sensed
atscanningtime; generally set to 30 seconds
Needlealignmentscanningdistance: (the maximum value is 10 to prevent the sensor from being
damaged, so the fixed position should be as close as possible to the middle of the sensor, but not
within the sensor range)
Induction level of needle alignment sensor: Refers to the input level when the sensor does not
sense the object
Whether use autoalignment: (default is no; if it is used, change to yes)
Needlealignmentscanningspeed: (default is 1mm/s, which can be set according to the actual
situation; do not set it too large, so as not to the speed too fast)
Needle alignmentstep distance/needlealignment Z-axis drop distance: According to the accuracy
requirements, if the step size is small, the needle scanning timeout should be set larger, and the
drop distance should be0.1~0.5mm higher than the lift distance
Needle alignmentmode: Mode 1: Through the X sensor signal, roughly find the Z highest point,
home, find the X, Y midpoint, and reset. Mode 2: directly find the X, Y midpoint, find the Z
highest point, and reset
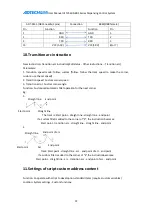
Needlealignment fixed position setting: Set the fixed initial scanning position for needlealignment.
The fixed initial scanning position is generally set in the A point area, as shown in the figure below.
In the figure, X and Y indicate the sensing signals of the X and Y axes. The needle should be below
the sensing line, but not too deep, or else the needle will time out and cause a failure.
Needlealignmentscanning distance, if there is still a sensor signal at this time, it will prompt the
needlealignment failure, so the Z axis fixed position should not be too low.
Needlealignmentstatus: The coordinates of the automatic matching point are displayed after the
needle is successfully aligned, and display not setif thealignment is unsuccessful.
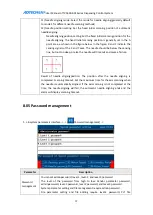
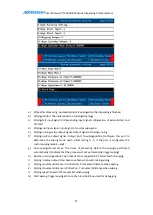
2. Setting port
System parameters - input port, configure X, Y sensor signal and needle alignment start port
input port
Automatic needle alignmentstart port: Set this option if external button control is used; use
“positioning” directly in the machining interface if it isn’tneeded.
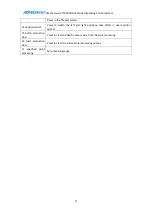
6.USBflash drive parameters, file backup
First insert the USB flash drive into the handheld box, enter the file management by pressing the
file manage on the handheld box, and press the right button next to F1-F6 in the file
Содержание DJ1600V1-A01
Страница 1: ...I TV5600 B01 Series Dispensing Control System User Manual ...
Страница 2: ...User Manual of TV5600 B01 Series Dispensing Control System 2 ...
Страница 15: ...User Manual of TV5600 B01 Series Dispensing Control System 15 Front view Side view Side view ...
Страница 47: ...User Manual of TV5600 B01 Series Dispensing Control System 47 ...
Страница 123: ...User Manual of TV5600 B01 Series Dispensing Control System 123 ...
Страница 131: ...User Manual of TV5600 B01 Series Dispensing Control System 131 8 AMC1600serial port AMC1600 COM1 port ...


