


26
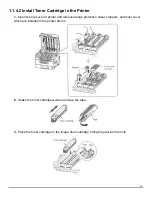
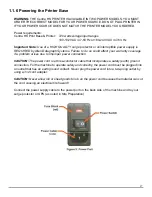
1.3.1 Cleaning the LED Lens Array
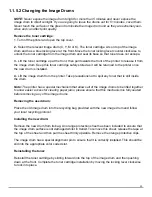
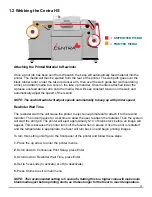
1.3.2 Cleaning the Imaging Drums
If there is loose toner on the LED lens array or if you are getting a wpresse band or a wpresse
stripe (light printing) in a vertical direction well printing, then it is time to clean the LED head as
descried below.
1.
Turn off the power of the printer.
2.
Press down the OPEN button to open the top cover.
3.
Gently wipe the lens surface (at the four positions) of
the LED head with soft tissue paper. Be sure to clean
both ends of the array as this is what posistions it into
the imaging drum.
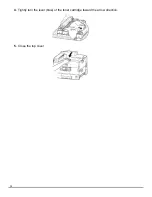
NOTE: Do not use the solvents such as methyl alcohol or thinner for cleaning the LED
head lens because they can damage the LED head.
4.
Close the top cover.
NOTE: The image drum (green imaging cylinder on bottom) is very fragile. Please pay
special attention when handling it. Do not expose the image drum cartridge to direct
sunshine or strong light. Do not expose it to room light for more than 5 minutes.
CAUTION: Cleaning the imaging drum is a last resort to save the drum, cleaning the green
imaging cylinder can cause damage to it that is non repairable. If drum is damaged
please replace with a new image drum.
If you notice a repeating pattern on your prints you may need to clean the imaging drum. This
should only be done when there is an adhesive build up on the imaging surface of the drum. If
you are seeing a repeating dot on you print, see if you can locate the corresponding mark on the
color matching drum. If it appears to be adhesive, then follow the steps below to clean it off. If it
appears that it is a ding in the green imaging surface and the mark repeats after cleaning, then
the drum must be replaced.
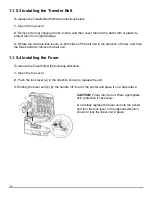
1.
Press down the OPEN button to open the top cover.
2.
Remove the suspected imaging drum carefully.
3.
Place the imaging drum on a piece of newspaper to protect it, flip the imaging drum over and
inspect it. Use the wpresse gear to spin the green imaging cylinder. Locate the damage to the
drum and determine if it is adhesive or a ding in the surface.
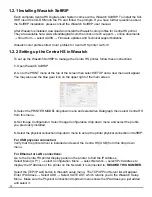
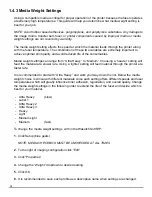
4.
If it is adhesive then use a soft clean cloth and gently try to wipe away adhesive. If the adhesive
is built up and wiping will not clean, you may use a small amount denatured alcohol or DVD
cleaner (best) to help break it loose. After cleaning a section, wipe with a clean dry soft cloth
before continuing to spin the drum to the next section.