ADSI iTech Centra HS Скачать руководство пользователя страница 20

20

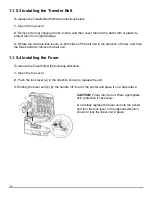
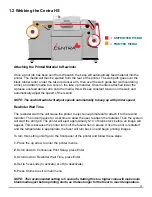
1.2 Webbing the CENRTA HS

Webbing the Infeed of the Centra HS

1. 

Open the media guides by turning the guide handle counter clockwise. Lift the guide arm closest to 

the operator side to allow the roll of media to be loaded onto the mandrel.

2. 

Close the guide arm and rotate the guide handle clockwise to close the guides in on the material 

in order to center the roll. Turn the red knob on the mandrel to tighten the roll. Turn the guide handle 

counterclockwise to loosen the guides until there is about 1/32” gap on either side of the roll.

3. 

Web the media over the outside of the supply guide roller, then bring the material back to the supply 

roll. Square the edges of the material, while keeping material tight adjust your guides on the supply 

guide roller and tighten them in place. Remember to leave 1/32” gap betweek material and guide. 

4. 

Web the material over the supply guide roller then under the supply dancer, and then between 

the silver feed roller & rubber grip roller. Hand feed a couple inches of material through so it can be 

grabbed after cutting.

5. 

Holding the material as taught and straight as possible, press hold. Lower the supply dancer bar 

onto the media if raised.

6. 

Press cut to cut the media and allow a straight edge to be created. Remove excess media from cut.

NOTE: Measure the take up mandrel core stop from the back plate to equal distance as the 

material to the back plate.

= UNPRINTED MEDIA

Содержание iTech Centra HS

Страница 1: ...01 Operations Manual Manual Version 2 2 January 2015 Congratulations on your new purchase Copyright Allen Datagraph Systems Inc All rights reserved...

Страница 2: ...02...

Страница 3: ...Manufacturer s manuals and your in house manuals will assure safe reliable and cost effective performance of ADSI machinery If you are in need of service please contact our Technical Support staff as...

Страница 4: ...from the date of installation All warranty services are performed at the ADSI factory Replacement parts not installed at the factory will be billed to the customer at regular prices and credit will b...

Страница 5: ...t Roll Diameter 14 inches 355 mm Cutter Management Tool Allen Direct Cut Network Connections Ethernet 100BASE TX 10BASE T USB High Speed 2 0 Power Requirements Centra HS Print Base Printer 720 watts v...

Страница 6: ...rench L Short Arm 1 Items Shipped Unassembled from Machine Inspect the ADSI equipment immediately upon arrival at the installation site as follows Note any visual in transit damage to the packing crat...

Страница 7: ...ase 14 1 1 7 Connecting Printer Base to PC 15 1 1 8 Printer Base Controls 15 1 1 9 Printer Driver 15 1 2 0 Webbing the Roll Media and Test Print 16 1 2 1 Installing Wasatch SoftRIP 17 1 2 2 Setting up...

Страница 8: ...hing Do not wear loose clothing neckties necklaces or jewelry which may be caught in moving parts Shoulder length hair and longer should be pulled back and secured at all times to prevent entanglement...

Страница 9: ...cord is a three conductor cable that uses a safety earth ground connection The power cord must be plugged into an outlet that has an earth ground contact NEVER plug the power cord into a two prong out...

Страница 10: ...ge will appear in the fuse block cover 4 Close the fuse block cover and verify that the desired voltage is showing Risk of Electrical Fire Do not change the fuse location in the fuse block Do not put...

Страница 11: ...not throw toner cartridges and image drum cartridges into fire Doing so may cause dust explosion leading to burns Do not use an inflammable spray near the printer as this may cause a fire If the cove...

Страница 12: ...f which ambient humidity is 30 or less use a humidifier or antistatic mat Each printer weighs about 77 kg 170lbs Lift with three persons or more Remove plastic handles from handle holes in the side of...

Страница 13: ...top cover of printer and remove orange protection sheet stoppers and toner cover which are installed in the printer drums 2 Shake the toner cartridge well and remove the tape 3 Place the toner cartrid...

Страница 14: ...14 4 Tightly turn the lever blue of the toner cartridge toward the arrow direction 5 Close the top cover...

Страница 15: ...from the printer Take precautions not to spill any toner that is still inside the drum Note The printer has a special mechanism that allows all of the image drums to be lifted together to allow easier...

Страница 16: ...w and hold the blue handle to remove the belt unit 1 1 5 4 Installing the Fuser To remove the Fuser follow the following directions 1 Open the top cover 2 Push the lock lever a in the direction shown...

Страница 17: ...ilure to do so could affect your warranty coverage if a problem arises due to improper power connection CAUTION The power cord is a three conductor cable that incorporates a safety earth ground connec...

Страница 18: ...r driver can be found on our website http allendatagraph com tech support online documents tech support library digital label sys tems support Follow this guide to install the Printer Driver on multip...

Страница 19: ...f the supply mandrel Feed Grip Roller Holds and feeds material into the printer Emergency Stop In case of emergency press to power off the printer base Take up Dancer Controls the speed of the take up...

Страница 20: ...n bring the material back to the supply roll Square the edges of the material while keeping material tight adjust your guides on the supply guide roller and tighten them in place Remember to leave 1 3...

Страница 21: ...to attach it to the rewind mandrel Then it will pause for a set time to allow the user to attach the material Then the system will start the print job The printer will eject approximatly 5 10 of blan...

Страница 22: ...u may also use the blue gear icon on the upper right of the main screen 3 Select the PRINTER MODEL dropdown menu and select Allen Datagraph then select Centra HS from this menu 4 Set Image Configurati...

Страница 23: ...on the AllenDirectCUT CD Centra HSTrainingLabel_5_inch eps labels in CorelLabel zip IllustratorLabel zip in the techsupport Centra HS directory or any other EPS PDF JPEG or TIFF that may be readily av...

Страница 24: ...shortcut in the future Now in the Print Setup Menu select EDIT PROPERTIES Set the setting to match the image below If you are not using the sample label then your page length will be different Press O...

Страница 25: ...oved image drum cartridge with a dark material 4 Remove the fuser unit a Raise the blue fuser unit lock lever b Using the handle of the fuser unit remove it 5 Using a similar soft clean cloth or soft...

Страница 26: ...o it that is non repairable If drum is damaged please replace with a new image drum If you notice a repeating pattern on your prints you may need to clean the imaging drum This should only be done whe...

Страница 27: ...p to temperature Open and Close the top cover by pressing down on the OPEN button and open the top cover Then push it back down until it locks closed The unit will make some noise and the LED display...

Страница 28: ...heavier setting will feed the material at a slower rate Using a lighter setting will feed material through the printer at a faster rate It is recommended to start with Ultra Heavy and work your way do...

Страница 29: ...an 15 The speed adjusts based on the value the user selected To get to the Exit Speed setting follow the steps below Press Up on the printer front panel d pad this will open the Menu scroll down to Ca...

Отзывы: