


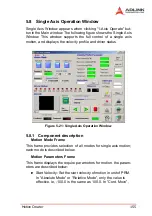


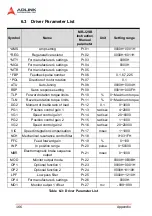


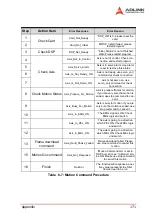


Motion Creator
159
5.8.4
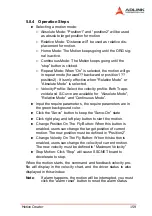
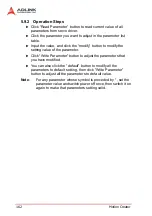
Operation Steps
X
Selecting a motion mode:
Z
Absolute Mode: “Position1” and “position2” will be used
as absolute target position for motion
Z
Relative Mode: “Distance will” be used as relative dis-
placement for motion.
Z
Home Mode: The Motion keeps going until the ORG sig-
nal is active.
Z
Continuous Mode: The Motion keeps going until the
“stop” button is clicked.
Z
Repeat Mode: When “On” is selected, the motion will go
in repeat mode (forward?? backward or position1 ??
position2). It is only effective when “Relative Mode” or
“Absolute Mode” is selected.
Z
Velocity Profile: Select the velocity profile. Both Trape-
zoidal and S-Curve are available for “Absolute Mode”,
“Relative Mode” and “Continuous Mode”.
X
Input the require parameters, the require parameters are in
the green background color.
X
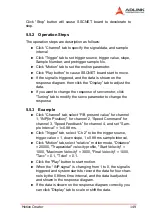
Click the “Servo” button to keep the “Servo-On” state
X
Click right play, and left play button to start the motion.
X
Change Position On The Fly Button: When this button is
enabled, users can change the target position of current
motion. The new position must be defined in “Position2”.
X
Change Velocity On The Fly Button: When this button is
enabled, users can change the velocity of current motion.
The new velocity must be defined in “Maximum Velocity”
X
Stop Motion: Click “Stop” will cause SSCNET board to
decelerate to stop.
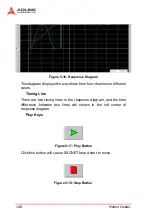
When the motion starts, the command and feedback velocity pro-
file will display in the velocity chart, and the driver status is also
displayed in this window.
Note
:
If alarm happens, the motion will be interrupted, you must
click the “alarm reset” button to reset the alarm status.
Содержание PCI-8366+
Страница 4: ......
Страница 14: ...x List of Figures ...
Страница 17: ...Introduction 3 Figure 1 3 Flowchart for Building an Application ...
Страница 26: ...12 Installation 2 2 PCI 8372 8366 Outline Drawing Figure 2 1 PCI 8372 8366 Mechanical Drawing ...
Страница 31: ...Installation 17 2 Press HPI boot ...
Страница 32: ...18 Installation 3 Press Flash DL button and select a kernel4 hex ...
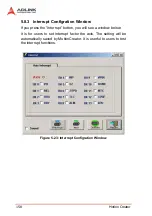
Страница 34: ...20 Installation Figure 2 3 SSCNET Communication Test Utility ...
Страница 49: ...Signal Connections 35 Figure 3 9 Skin Type ...
Страница 144: ...130 Operation Theory ...
Страница 149: ...Motion Creator 135 Figure 5 6 Software Version Information ...
Страница 158: ...144 Motion Creator Figure 5 10 Tuning Window 5 5 1 Component Description Figure 5 11 Trigger Setting Frame ...
Страница 160: ...146 Motion Creator Figure 5 13 Channel Selection Frame Figure 5 14 Motion Frame ...


