


Motion Creator
143
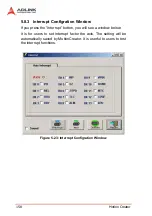
Figure 5-9: Pulse Output
5.4.3
Component description
Apply To
X
Specify the axis that uses pulse output function. Notice that
the axis number can’t be overlapped by SSCNET axis.
Mode
X
Select the attribute of pulse output signal.
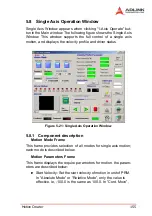
5.5
Tuning Window
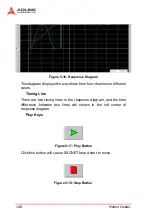
Tuning Window appears when clicking “Tuning” button in the Main
window. The following figure shows the Tuning Window. This win-
dow displays the response diagrams of selected channels by set-
ting the motion parameter in “Single-Axis Operation Window” and
trigger setting in this window.
Содержание PCI-8366+
Страница 4: ......
Страница 14: ...x List of Figures ...
Страница 17: ...Introduction 3 Figure 1 3 Flowchart for Building an Application ...
Страница 26: ...12 Installation 2 2 PCI 8372 8366 Outline Drawing Figure 2 1 PCI 8372 8366 Mechanical Drawing ...
Страница 31: ...Installation 17 2 Press HPI boot ...
Страница 32: ...18 Installation 3 Press Flash DL button and select a kernel4 hex ...
Страница 34: ...20 Installation Figure 2 3 SSCNET Communication Test Utility ...
Страница 49: ...Signal Connections 35 Figure 3 9 Skin Type ...
Страница 144: ...130 Operation Theory ...
Страница 149: ...Motion Creator 135 Figure 5 6 Software Version Information ...
Страница 158: ...144 Motion Creator Figure 5 10 Tuning Window 5 5 1 Component Description Figure 5 11 Trigger Setting Frame ...
Страница 160: ...146 Motion Creator Figure 5 13 Channel Selection Frame Figure 5 14 Motion Frame ...


