37
Opening the server
Caution!
Before you proceed, make sure that you have turned
off your system and all peripherals connected to it. Read the
“Preinstallation instructions” on page 35.
You need to open the server before you can install additional
components. The bezel and left side panel are removable to allow
access to the system’s internal components. Refer to the following
sections for instructions.
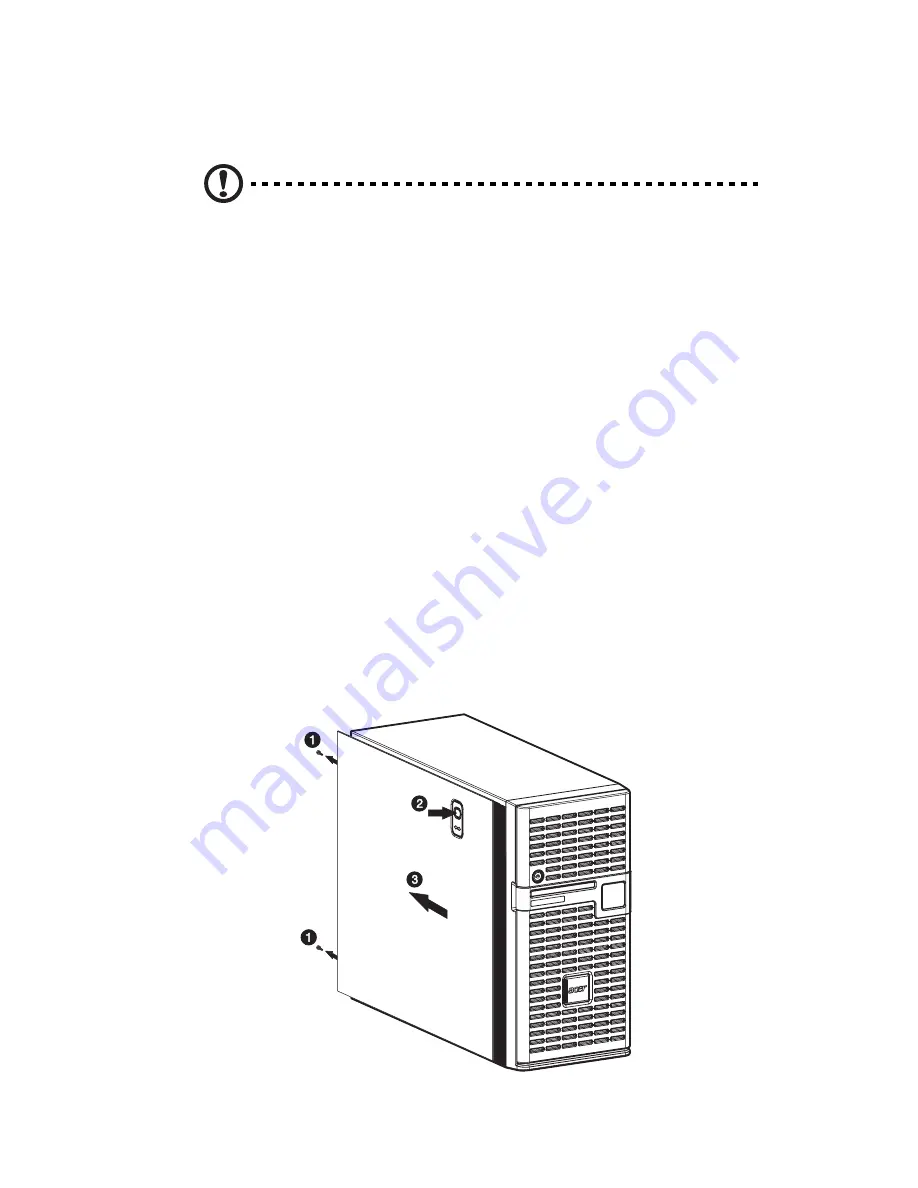
Removing the left-side panel
1
Observe the ESD precautions and pre-installation procedures
described on page 35.
2
Remove the bezel door and the bezel.
Refer to the preceding sections for detailed instructions.
3
Remove the left-side panel.
(1) Remove the two screws located at the end of the side
panel
(1)
.
(2) Press the release button located on the left-side panel
(2)
.
(3) Slide the side panel toward the rear of the chassis
(3)
.
Содержание Altos G5350
Страница 1: ...Acer Altos G5350 Series User s Guide ...
Страница 10: ...x ...
Страница 11: ...1 System tour ...
Страница 31: ...21 5 4 pin power cable connector 6 I2 C bus interface connector No Code Description ...
Страница 32: ...1 System tour 22 ...
Страница 33: ...2 System setup ...
Страница 43: ...3 System upgrade ...
Страница 88: ...3 System upgrade 78 ...
Страница 89: ...4 BIOS setup ...
Страница 123: ...113 Save Changes Saves changes made in the BIOS setup Parameter Description ...
Страница 124: ...4 BIOS setup 114 ...
Страница 125: ...5 Troubleshooting ...
Страница 136: ...5 Troubleshooting 126 ...
Страница 137: ...Appendix A System management utility ...
Страница 144: ...Appendix A System management utility 134 ...
Страница 145: ...Appendix B Acer Altos G5350 rack installation guide ...
Страница 146: ...This appendix shows you how to set up the Altos G5350 server in a rack mount configuration ...
Страница 161: ...Appendix C SCSI RAID configuration ...
Страница 162: ...This appendix shows you how to create a RAID volume in your SCSI drives ...


