


III
Copyright
Copyright © 2008 by Acer Incorporated. All rights reserved. No part of this publication may be reproduced,
transmitted, transcribed, stored in a retrieval system, or translated into any language or computer language, in
any form or by any means, electronic, mechanical, magnetic, optical, chemical, manual or otherwise, without
the prior written permission of Acer Incorporated.
Disclaimer
The information in this guide is subject to change without notice.
Acer Incorporated makes no representations or warranties, either expressed or implied, with respect to the
contents hereof and specifically disclaims any warranties of merchantability or fitness for any particular
purpose. Any Acer Incorporated software described in this manual is sold or licensed
as is
. Should the
programs prove defective following their purchase, the buyer (and not Acer Incorporated, its distributor, or its
dealer) assumes the entire cost of all necessary servicing, repair, and any incidental or consequential
damages resulting from any defect in the software.
Acer is a registered trademark of Acer Corporation.
Intel is a registered trademark of Intel Corporation.
Pentium and Pentium II/III are trademarks of Intel Corporation.
Other brand and product names are trademarks and/or registered trademarks of their respective holders.
Содержание 5530 5634 - TravelMate - Athlon X2 2.1 GHz
Страница 6: ...VI ...
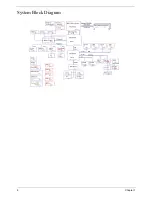
Страница 14: ...4 Chapter 1 System Block Diagram ...
Страница 36: ...26 Chapter 1 ...
Страница 54: ...44 Chapter 2 ...
Страница 56: ...46 Chapter 2 ...
Страница 64: ...54 Chapter 3 6 Remove the HDD cover as shown 7 Remove the WLAN cover as shown ...
Страница 85: ...Chapter 3 75 6 Turn the upper cover over The upper cover appears as follows ...
Страница 106: ...96 Chapter 3 7 Lift the Thermal Module clear of the Mainboard ...
Страница 112: ...102 Chapter 3 6 Disconnect the left and right Inverter board cables as shown ...
Страница 126: ...116 Chapter 3 3 Replace the RJ 11 cable in its housing ...
Страница 137: ...Chapter 3 127 2 Replace the bracket as shown 3 Replace the single securing screw ...
Страница 140: ...130 Chapter 3 2 Connect the seven cables on the mainboard as shown B C D E F G A ...
Страница 146: ...136 Chapter 3 7 Replace the adhesive strip to secure the cable 8 Replace bracket and secure with provided screw ...
Страница 152: ...142 Chapter 3 ...
Страница 180: ...170 Chapter 5 ...
Страница 196: ...Appendix A 186 ...
Страница 202: ...192 Appendix B ...
Страница 204: ...194 Appendix C ...
Страница 207: ...197 Windows 2000 Environment Test 188 Wireless Function Failure 156 WLAN Board 56 ...
Страница 208: ...198 ...


