


8
Chapter 1
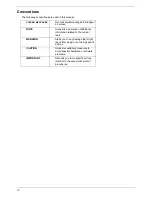
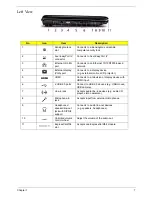
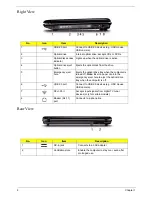
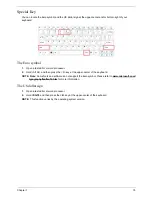
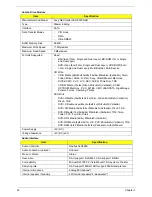
Right View
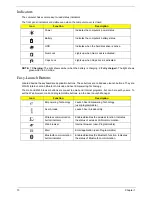
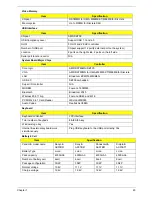
Rear View
No.
Icon
Item
Description
1
USB 2.0 port
Connect to USB 2.0 devices (e.g. USB mouse,
USB camera).
2
Optical drive
Internal optical drive; accepts CDs or DVDs.
3
Optical disk access
indicator
Lights up when the optical drive is active.
4
Optical drive eject
button
Ejects the optical disk from the drive.
5
Emergency eject
hole
Ejects the optical drive tray when the computer is
turned off.
Note:
Insert a paper clip into the
emergency eject hole to eject the optical drive
tray when the computer is off.
6
USB 2.0 port
Connect to USB 2.0 devices (e.g. USB mouse,
USB camera).
7
RF-in Port
Accepts input signals from digital TV tuner
devices (only for certain models).
8
Modem (RJ-11)
port
Connects to a phone line.
No.
Icon
Item
Description
1
DC-in jack
Connects to an AC adapter
2
Ventilation slots
Enable the computer to stay cool, even after
prolonged use.
Содержание 5530 5634 - TravelMate - Athlon X2 2.1 GHz
Страница 6: ...VI ...
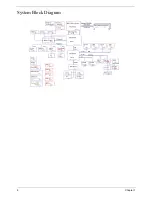
Страница 14: ...4 Chapter 1 System Block Diagram ...
Страница 36: ...26 Chapter 1 ...
Страница 54: ...44 Chapter 2 ...
Страница 56: ...46 Chapter 2 ...
Страница 64: ...54 Chapter 3 6 Remove the HDD cover as shown 7 Remove the WLAN cover as shown ...
Страница 85: ...Chapter 3 75 6 Turn the upper cover over The upper cover appears as follows ...
Страница 106: ...96 Chapter 3 7 Lift the Thermal Module clear of the Mainboard ...
Страница 112: ...102 Chapter 3 6 Disconnect the left and right Inverter board cables as shown ...
Страница 126: ...116 Chapter 3 3 Replace the RJ 11 cable in its housing ...
Страница 137: ...Chapter 3 127 2 Replace the bracket as shown 3 Replace the single securing screw ...
Страница 140: ...130 Chapter 3 2 Connect the seven cables on the mainboard as shown B C D E F G A ...
Страница 146: ...136 Chapter 3 7 Replace the adhesive strip to secure the cable 8 Replace bracket and secure with provided screw ...
Страница 152: ...142 Chapter 3 ...
Страница 180: ...170 Chapter 5 ...
Страница 196: ...Appendix A 186 ...
Страница 202: ...192 Appendix B ...
Страница 204: ...194 Appendix C ...
Страница 207: ...197 Windows 2000 Environment Test 188 Wireless Function Failure 156 WLAN Board 56 ...
Страница 208: ...198 ...


