background image

V: 1.0  Revised: May. 2019

14

Chapter 5:  Initializing the AcuLink 810

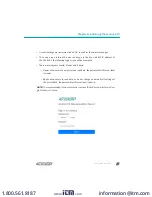
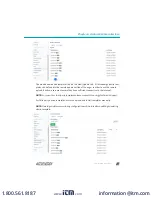
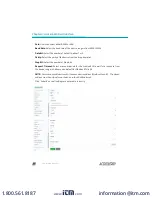
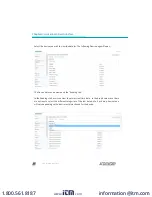
•  The following page will open, select 'Internet Protocol Version 4 (TCP/IPv4) and click on 

'Properties'.

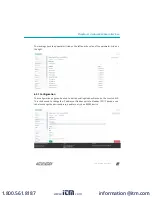
•  Select 'Use the following IP address:' and change the IP address of the computer.  The 

AcuLink 810 Ethernet 1 address is 192.168.8.101, the computers IP will need to be within the 
same subnet.  The IP of the computer can be 192.168.8.xxx, where xxx can be any number 
ranging from 1-254.  For the example an IP address of 192.168.8.10 is used.

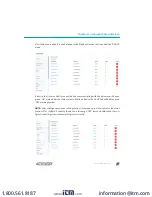
NOTE: The computers IP address and the AcuLink 810 Ethernet 1 IP address cannot be the 
same.

www.

.com

[email protected]

1.800.561.8187
Содержание AcuLink 810

Страница 1: ...AcuLink 810 Data Acquisition Server User s Manual www com information itm com 1 800 561 8187...

Страница 2: ...sed May 2019 II Copyright 2019 V1 00 This manual may not be altered or reproduced in whole or in part by any means without the expressed written consent of Accuenergy www com information itm com 1 800...

Страница 3: ...ng the installation and operation of the meters Electric Shock Symbol Carries information about procedures which must be followed to reduce the risk of electric shock and danger to personal health Saf...

Страница 4: ...0 5 Initializing the AcuLink 810 11 5 1 Accessing the AcuLink 810 Web Interface 11 5 1 1 Method 1 Direct Connection via Ethernet 11 5 1 2 Method 2 Using WIFI to connect to the Meters Web Interface 16...

Страница 5: ...6 11 Email SMTP 42 6 12 Alarm Notification 43 6 13 Post Channels 43 6 13 1 HTTP Post Method 43 6 13 2 FTP Post Method 44 6 14 Data Logging 45 6 15 AcuCloud 47 6 16 Data Management 51 6 16 1 Download...

Страница 6: ...or FTP protocols as well as pushing data to different web based energy management systems or any front end software plat form There is no software required for the AcuLink as all configuration is done...

Страница 7: ...USB expansion port USB 2 0 Host 2 4 Inputs Serial Port RS485 Modbus supports up to 32 external devices expandable Baud Rate 9600 115200 bps Digital Input 8 pulse counters Input Voltage Range 8 28Vdc...

Страница 8: ...V 1 0 Revised May 2019 6 Chapter 3 Appearance Dimensions 3 Appearance and Dimensions D A T A A C Q U S I T I O N S E R V E R 159 9mm 6 3 90mm 3 5 10mm www com information itm com 1 800 561 8187...

Страница 9: ...computer to AcuLink 810 connection Power Supply 24V WIFI Antenna Optional Hardware Additional Modbus RTU devices 2 wire Modbus RS485 connection LAN Information Ethernet 10 100MB connection point rout...

Страница 10: ...installation The AcuLink 810 is DIN rail mounted a standard 35 mm DIN rail can be used 4 2 1 Powering the unit The power supply of the AcuLink 810 is rated for 24Vdc D A T A A C Q U S I T I O N S E R...

Страница 11: ...gether ensure that a unique device address Mod bus Slave ID is configured for each RS485 device The AcuLink 810 can support up to 32 external RS485 devices NOTE A termination resistor at the end of th...

Страница 12: ...d a DI COM terminal In pulse output cir cuits a closed loop is required for the pulse to be generated In the Image below you will see a closed circuit on Digital Inputs 1 and 6 The positive output is...

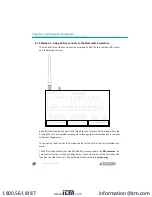
Страница 13: ...ault IP addresses and default modes are Ethernet 1 192 168 8 101 Ethernet 2 DHCP WIFI Access Point Mode The following will outline the methods on how to initially access the meters web interface 5 1 A...

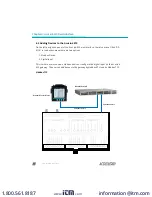
Страница 14: ...g ured within the same subnet as the AcuLink Ethernet 1 IP address The Ethernet 1 port has a default IP address of 192 168 8 101 The following outlines how to change the computers IP Start by accessin...

Страница 15: ...g the AcuLink 810 On the left panel of the screen select Change adapter settings Double click on Ethernet or right click on Ethernet and select Properties The following page will open click on Propert...

Страница 16: ...IP address of the computer The AcuLink 810 Ethernet 1 address is 192 168 8 101 the computers IP will need to be within the same subnet The IP of the computer can be 192 168 8 xxx where xxx can be any...

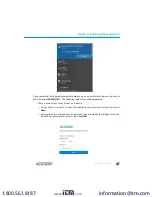
Страница 17: ...gin screen will be prompted There are two Access Levels Viewer and Admin Viewer allows users to only view and read data the password for this user level is viewer Admin allows users to read data as we...

Страница 18: ...ist of wireless net works The SSID will be by default AcuLink810 WIFI S8Pxxxxxxxx where the S8Pxxxxxxxx is a unique serial number of the AcuLink gateway The serial number of the AcuLink can be found o...

Страница 19: ...192 168 100 1 The following login screen will be prompted There are two Access Level Viewer and Admin Viewer allows users only to view and read data the password for this user level is view Admin allo...

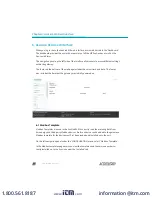
Страница 20: ...des the server time and date The footer also includes the time that the gateway was initially powered on 6 1 Modbus Template Modbus Templates are used in the AcuLink 810 to correctly read the metering...

Страница 21: ...to use the remote upload function users must ensure they have sufficient connection to the Internet NOTE For specific or third party templates please contact Accuenergy Technical Support For third pa...

Страница 22: ...evices menu there are two options 1 Modbus Device 2 Digital Input This is where users can add a Modbus device or configure the digital input on the AcuLink 810 gateway The user can add devices to the...

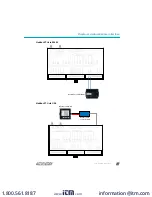
Страница 23: ...r interface Modbus RTU via RS485 Modbus RTU via USB Acuvim L Series Meter RS485 to USB converter cable D A T A A C Q U S I T I O N S E R V E R D A T A A C Q U S I T I O N S E R V E R AcuRev 1310 Serie...

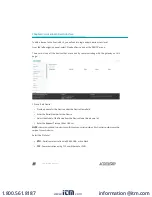
Страница 24: ...his page Click on Add Device Provide a name for the Device under the Device Name field Enter the Serial Number for the Device Select the Model of the Device from the Device Model drop down list Enter...

Страница 25: ...e Modbus port of the device Modbus ID Enter the Modbus address of the device Request Timeout Enter the timeout setting default for TCP is 3 seconds Click Submit once all settings are entered in correc...

Страница 26: ...vice from the drop down list Stop Bit Select the number of Stop Bits Request Timeout Select a timeout period for the AcuLink 810 to wait for a response from the device range is 1 60 seconds default fo...

Страница 27: ...ith the gateway will have a green ON mark under the status column Whiles a device that is offline will display a red OFF warning symbol NOTE After adding a new device to the gateway it may take up to...

Страница 28: ...sers to forward a Modbus TCP request to the corresponding meter Adding Modbus Gateway Device To add a Modbus Gateway device select add device Under the Device Model select Modbus Gateway Function Only...

Страница 29: ...3 Viewing Data of Modbus Devices To view the readings from your device select Modbus Devices on the left panel under the DEVICES menu On this page all the Modbus devices added to the AcuLink 810 will...

Страница 30: ...view the meters real time data In the drop down menu there are options to select the different categories of the real time data Each drop down menu will vary depending on the device template chosen f...

Страница 31: ...arameter listed on the right 6 3 1 Configuration The configuration page can be used to edit an existing Modbus Device on the AcuLink 810 This can be used to change the IP address or Modbus port of a M...

Страница 32: ...ate to the Modbus Devices under the DEVICES menu on the left panel of the interface Then click on the delete icon under the Action column After selecting delete device a message will appear asking the...

Страница 33: ...the Modbus devices connected to it The gateway allows users to monitor selected parameters using an under over alarm When the monitored parameter goes over under the preset limit the alarm will be tri...

Страница 34: ...Click on Save once all settings are entered in correctly For example if the parameter selected was Frequency with a minimum threshold of 0 and a maximum threshold of 50 the alarm will be triggered wh...

Страница 35: ...The alarms can also be viewed from the Alarm Logs which will be discussed later in the manual Users can delete the alarm at any time from this page by clicking on the delete icon on the far right col...

Страница 36: ...o configure the digital input settings Enter in a Description and the units the pulses will be representing A multiplier can be ap plied to the count if necessary Users can also input a starting count...

Страница 37: ...hat is applied to the Digital Input channel 6 7 Logs 6 7 1 Alarm Logs Users can check the historical data of the triggered alarms by clicking on Alarm Log under LOG menu Alarm logs can be filtered by...

Страница 38: ...panel under the CONFIGURA TION menu The This page gives users a summary of the AcuLink 810 s hardware version serial number the current firmware version and the date it was updated Users can restart t...

Страница 39: ...date is chosen the user must click on Update Time Time Sync Users can force the time to update on the AcuLink 810 by selecting the Sync button NTP Time Servers By default the gateway uses 0 u pool nt...

Страница 40: ...AcuLink are displayed By default the DNS settings are DNS 1 8 8 8 8 DNS 2 8 8 4 4 6 10 1 WIFI Users can configure the WIFI settings by selecting the WIFI tab on the Network Configura tions page Wi Fi...

Страница 41: ...an existing WIFI network SSID Users can select from the list of wireless networks in range of the AcuLink 810 Network Key Network key of the selected wireless network must be entered in this set ting...

Страница 42: ...d or discon nected to the Ethernet 1 port DHCP Select Manual to manually configure the IP address for Ethernet 1 If set to Manual users will also need to set the Subnet Mask and Gateway Select Auto to...

Страница 43: ...by default has the DHCP settings configured to Auto This means that when connected to an internet source such as a router switch the network will assign an IP address to it Once the IP is assigned use...

Страница 44: ...mails Email Server Enter the SMTP Server for the email account Email Port Enter the outgoing port number the SMTP uses to send emails TLS SSL Select Auto On Off for the email s server Please select Au...

Страница 45: ...ick on Test Email button to check if a test email is received 6 13 Post Channels The AcuLink 810 supports 3 HTTP FTP channels To configure the HTTP FTP data forward from the web interface click on Pos...

Страница 46: ...tton to test whether the AcuLink 810 can successfully reach the HTTP server NOTE If users receive a fail message please verify the server URL port number and double check the network connectivity 6 13...

Страница 47: ...e data log Post Channel Select the Post Channel from the drop down list None AcuLink 810 will log and store the data on its memory Post Channel 1 2 3 AcuLink 810 will log and push the data to the conf...

Страница 48: ...interval can be from 1 minute to 1 month Log File length Select the length of the log file it can be from 1 minute to 1 month NOTE The log interval must be less than or equal to the log file length Lo...

Страница 49: ...er meters and is free for all Ac cuenergy meters To configure the AcuLink 810 to post data to AcuCloud click on AcuCloud from left navigation panel under the CONFIGURATION menu Users will need an AcuC...

Страница 50: ...t with sufficient access to add new devices The following details need to be entered Select the name of the Facility in which the device will belong to from the Facility drop down list Select the AcuL...

Страница 51: ...device under Location Click SUBMIT Once the gateway has been successfully created a token will be returned on the ensuing page The user will need to copy the token that is provided as it will be used...

Страница 52: ...rt to the AcuCloud EMS software Check to see if AcuCloud is receiving data from the gateway by going to the Devices page in AcuCloud and observing whether the name of the selected devic es from the ga...

Страница 53: ...ecorded for the devices that have been selected in logger 1 2 3 or AcuCloud Click on Download once all information is entered in correctly The data will be down loaded as a csv file to your computer d...

Страница 54: ...and Viewer access levels Once the new password is entered click on Save 6 16 3 Firmware Update The firmware of the AcuLink 810 can be updated from the Firmware page under the CON FIGURATIONS menu Thi...

Страница 55: ...erface Manual Firmware Update To manually update the firmware of the AcuLink 810 click browse and upload the firmware file The file should have a aup file extension Click on Upload to begin uploading...

Страница 56: ...ink 810 will restart Remote Firmware Update The firmware of the AcuLink 810 can be updated using the remote firmware option This will allow users to check for the latest firmware updates To use the re...

Страница 57: ...er interface Click on Update to begin downloading the firmware from the remote firmware server NOTE When updating the AcuLink 810 firmware remotely ensure that you have sufficient connection to the in...

Страница 58: ...2019 56 Chapter 6 AcuLink 810 User interface After the firmware update is complete the AcuLink 810 will restart Once the download is complete the firmware update will begin www com information itm co...

Страница 59: ...page which can be used to monitor the network status of the gateway In the Network Status tab users can see the Ethernet Network status the routing table DNS network stat and the WIFI status NOTE In o...

Страница 60: ...hether the AcuLink can communicate over the network it is connected to Under the Connection Test tab user can test the local network that the AcuLink is connect ed to The test result will show SUCCESS...

Страница 61: ...urn off SSH From the debug page users can also download the AcuLink 810 s diagnostic file The debug diagnostic options are recommended to be all OFF as this feature is mainly used for troubleshooting...

Страница 62: ...he AcuLink 810 s diagnostic file can be downloaded by the user from the Debug page If users are experiencing any issues with the gateway the diagnostic file can be sent to Accuenergy Technical Support...

Страница 63: ...ivided into three groups 7 1 AcuMesh LEDs The AcuMesh has a total of six LEDs which are related to the AcuMesh status RSSI There are three RSSI LEDs which indicate the signal strength of the incoming...

Страница 64: ...s working and functioning properly 7 3 RS485 LEDs The RS485 has a total of 3 LEDs which are related to the RS485 status COMM OK When ON indicates that all RS485 and USB devices in RS485 network are on...

Страница 65: ...Function how ever all other Modbus templates will be removed After the reset all network communications will be restored back to default meaning the Ac uLink will have the following network settings...

Отзывы: