background image

28

ACCU 12

2

0

Operations

Operator’s Manual

5.1.1-1

5.1.1

Wheel Mounting Errors.

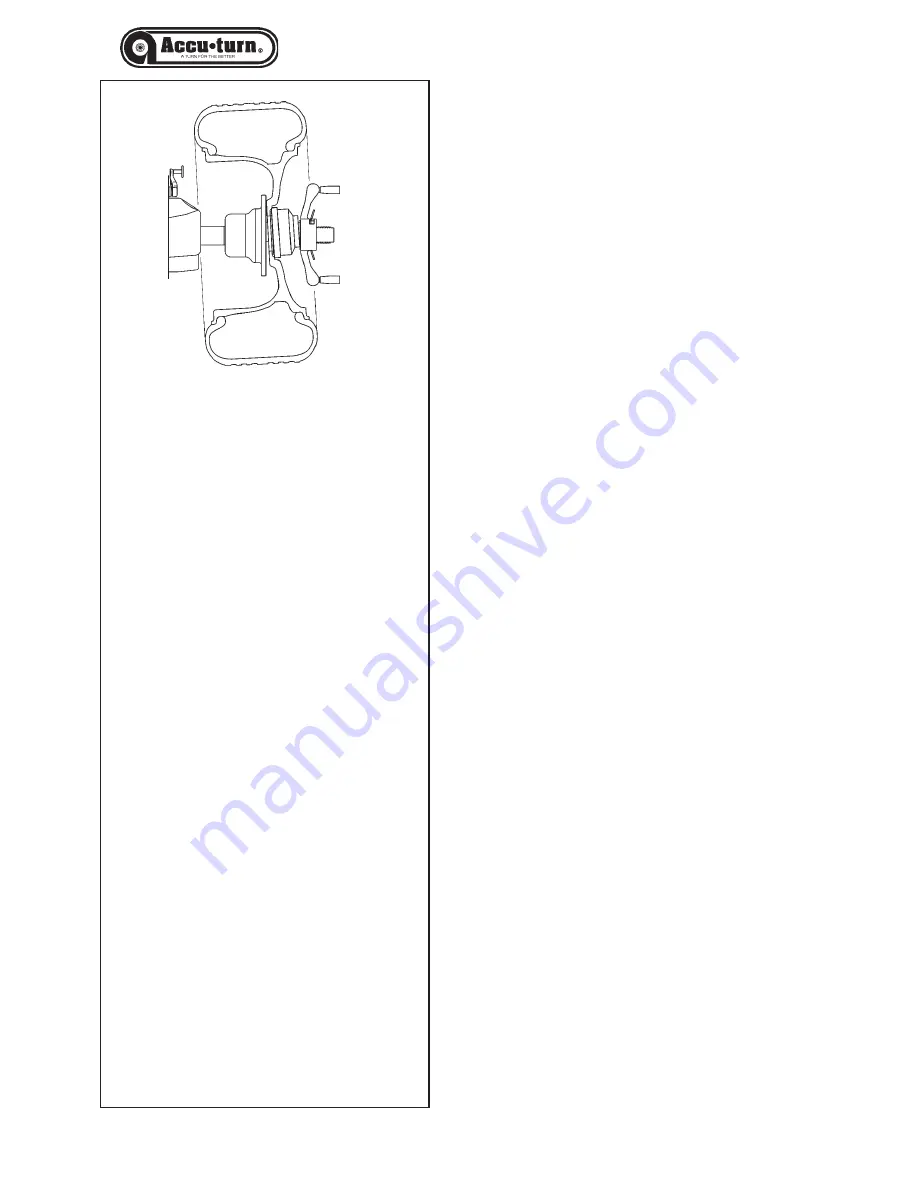
Refer to Figure 5.1.1-1.
Regardless of the mounting method used, the wheel
must be centered before balancing.

The wheel must be clean and free of debris, especially
where it mates with the cone or adapter and the
balancer flange.

Any dirt between the flange and the mating surface of
the wheel will cause misalignment on the shaft.
A misalignment equaling fractions of an inch will cause
an imbalance of 0.50 ounces or more on automobile
wheels and 1 ounce or more on light truck wheels.

It is also critical that the wheel be tightened securely
to prevent it from slipping in relation to the flange during
the measuring run. If the wheel slips on the balancer,
accurate weight measurement and location are
impossible and will cause customer dissatisfaction.

5.1.2

Wheel Repositioning Errors.

A mounted wheel has a specific position, related to
the balancer shaft reference point.
If the wheel is rotated 180 degrees from the initial
position on the stud and re-tightened, a different
imbalance reading may result.
This is caused by mechanical tolerance on the wheel
mounting stud and if it happens, is almost always with
hub centric wheels. A mechanical tolerance, between
shaft and cone or cone and the wheel center hole, of
0.1 mm may result in an imbalance of 10 grams (.5
oz).

To calculate the error due to wheel repositioning:

Select a NORMAL wheel type.

Spin the wheel. Note the imbalance.

Rotate the wheel 180 degrees from the initial

position.

Spin the wheel. Note the imbalance.

Subtract the readouts per plane.
The difference between the two readings could be
as much as 15 grams (0.50 ounces) for cone-
mounted automobile wheels and 60 grams (2
ounces) for light truck wheels.

If the difference is greater, check the shaft, cones

and the center hole of the rim for wear or damage. Try
different cones and/or rims to determine what causes
the repositioning error.

If the repositioning error cannot be removed, call

Technical Service.
The actual imbalance error is one-half of the
repositioning error.

5.1.1

Wheel Mounting Errors.

Refer to Figure 5.1.1-1.
Regardless of the mounting method used, the wheel
must be centered before balancing.

The wheel must be clean and free of debris, especially
where it mates with the cone or adapter and the
balancer flange.

Any dirt between the flange and the mating surface of
the wheel will cause misalignment on the shaft.
A misalignment equaling fractions of an inch will cause
an imbalance of 0.50 ounces or more on automobile
wheels and 1 ounce or more on light truck wheels.

It is also critical that the wheel be tightened securely
to prevent it from slipping in relation to the flange during
the measuring run. If the wheel slips on the balancer,
accurate weight measurement and location are
impossible and will cause customer dissatisfaction.

5.1.2

Wheel Repositioning Errors.

A mounted wheel has a specific position, related to
the balancer shaft reference point.
If the wheel is rotated 180 degrees from the initial
position on the stud and re-tightened, a different
imbalance reading may result.
This is caused by mechanical tolerance on the wheel
mounting stud and if it happens, is almost always with
hub centric wheels. A mechanical tolerance, between
shaft and cone or cone and the wheel center hole, of
0.1 mm may result in an imbalance of 10 grams (.5
oz).

To calculate the error due to wheel repositioning:

Select a NORMAL wheel type.

Spin the wheel. Note the imbalance.

Rotate the wheel 180 degrees from the initial

position.

Spin the wheel. Note the imbalance.

Subtract the readouts per plane.
The difference between the two readings could be
as much as 15 grams (0.50 ounces) for cone-
mounted automobile wheels and 60 grams (2
ounces) for light truck wheels.

If the difference is greater, check the shaft, cones

and the center hole of the rim for wear or damage. Try
different cones and/or rims to determine what causes
the repositioning error.

If the repositioning error cannot be removed, call

Accu Service.
The actual imbalance error is one-half of the
repositioning error.

Содержание 1220

Страница 1: ...OPERATOR S MANUAL GB FR ES Machine quilibrer MANUEL DE L OP RATEUR Equilibradora MANUAL PARA EL OPERADOR OPERATOR S MANUAL SPARE PARTS EXPLODED VIEWS MANUEL DE L OP RATEUR FIGURES PIECES DE RECHANGE...

Страница 2: ...relates was acquired increasesinanywaytheliabilitytothecustomer or to third parties TO THE READER While every effort has been made to ensure that the information contained in this manual is correct c...

Страница 3: ...cau tions de s curit Toutes les informations figurant dans le pr sent manuel ont t fournies par le fabricant de l quipement VENCIMIENTO DE LA GARANT A Y LIMITACIONES DE RESPONSABILIDAD A pesar de que...

Страница 4: ...2 C codes 68 8 Disposal 70 9 Appendices 70 Appendix Installation Instructions 73 Table of Contents Table of Contents 1 Safety 6 1 1 Format of this Manual 6 2 Specifications 8 2 1 Conditions 8 3 Intro...

Страница 5: ...el Sistema 67 7 1 1 C digos E 67 7 1 2 C digos C 69 8 Deshacerse 71 9 Anexos 71 Anexo Instrucciones Instalaci n 73 ndice Tabla de contenido 1 S curit 7 1 1 Typographie 7 2 Sp cifications 9 2 1 Conditi...

Страница 6: ...ic warnings and cautions when possible dangerous situations may be encountered during the procedures described 1 1 Format of this Manual This manual contains text styles which make you pay extra atten...

Страница 7: ...NTE RISQUE DE CAUSER DES BLESSURES SERIEUSES AL OPERATEUR OU AUTRES Liste puces Indique que l op rateur doit effectuer une action avant de pouvoir passer l tape suivante de la s quence 1 Seguridad En...

Страница 8: ...ications Power Power Motor power Electrical consumption Fuses Protection class Measurements Cycle time wheel D 14 Speed of rotation range Offset Increments inches 10 mm Wheel dimensions Max width Max...

Страница 9: ...sions de roue Largeur max Diam tre max Poids max Largeur de la jante Diam tre de la jante NORMAL ALU STATIQUE Arbre et c nes Diam tre de bout d arbre C ne petit C ne moyen C ne grand Dimensions Poids...

Страница 10: ...surface of the wheel be clean and free of debris prior to mounting to the balancer Application The off the vehicle wheel balancer is designed for dynamic and static balancing of passenger car and lig...

Страница 11: ...utilis par le personnel de maintenance seulement Instructions pour l installation Les instructions pour l Installation se trouvent au Ch 9 Annexes 3 Introducci n Esta equilibradora de ruedas combina u...

Страница 12: ...0025517 0025516 4025821 0025415 525011 4007580 3 1 Accessories Refer to Figure 3 1 1 The standard accessories are Quick Release Hub Nut Spacer ring Universal drum Universal drum cushion Large cone Med...

Страница 13: ...1 Les accessoires standard sont Manivelle de serrage rapide Disque de distance Coupelle plastique Joint protection de la coupelle Grand c ne C ne moyen Petit c ne Arbre Embout de vissage arbre Masse d...

Страница 14: ...iption of the unit 1 Display Refer to Chapter 4 1 2 Control panel Refer to Chapter 4 2 3 Gauge arm The gauge arm is a tool for measuring the rim 4 Flange 5 Stub shaft 6 Brake pedal 7 Weight compartmen...

Страница 15: ...Zones de stockage pour c nes et accessoires 9 Capot de s curit protection roue mobile Se reporter la Figure 4 2 1 Interrupteur secteur MARCHE ARRET 4 Disposici n Consultar Figura 4 1 Descripci n funci...

Страница 16: ...ghts error codes etc 3 7 Weight position indicator Fit a clip on weight at the rim position indicated when the relative WAP indicator lights up 4 5 6 Weight position indicator Fit a stick on weight at...

Страница 17: ...nore lorsqu une erreur est d tect e et affiche g n ralement un message Pour tous les autres signaux sonores reportez vous au Chapitre 7 car ces signaux indiquent des erreurs 4 1 La Pantalla Ver Figura...

Страница 18: ...gh the values 6 Rim Diameter and mm inch Key Press to reduce the rim diameter value shown on the display Hold down to rapidly scroll through the values In combination with the F key toggles between re...

Страница 19: ...ion de la roue apr s avoir abaiss le capot de s curit 11 Touche STOP Presser pour arr ter la rotation de la roue 4 2 El panel de entrada Consultar la Figura 4 2 1 1 Tecla Distancia Llanta Sirve para i...

Страница 20: ...may undergo design revisions Always check for compatibility between the devices and the balancer Refer to the supplied technical information The method used to mount a wheel depends on the way the whe...

Страница 21: ...lorsque vous serrez la manivelle Retenir la roue et faites tourner la manivelle de serrage AVERTISSEMENT ASSUREZ VOUS QUE LAROUE REPOSE BIEN CONTRE LE PLATEAU D INSTALLATION ET QUE LES FILETS DE LA M...

Страница 22: ...leu of the drum C Front Cone Mounting The cone centers the wheel from outside D Front Cone Mounting with an optional extension adapter 4026401 in order to elminate the wheel or tire from touching the...

Страница 23: ...re Remarque L installation double c ne peut tre utilis e avec certaines roues sp ciales Le c ne arri re se centre sur l paullement de la roue et le c ne avant sur le trou central Ajuste el amortiguad...

Страница 24: ...01 For mounting light truck wheels with a center hole of diameter 120 to 174mm C Motorcycle Rapid Flange D 14 14026397 Remove the threaded shaft then fit the adapter Fit the motorcycle wheel using the...

Страница 25: ...nstaller l adaptateur apr s avoir d mont l arbre filet Montaje de los Adaptadores a petici n Ver Figura 5 1 3 En la misma se indica de arriba a abajo A Adaptador Rueda Universal 4026608 Montar el adap...

Страница 26: ...g 56 5 58 6 x shaft D 40 10026445 Tapered centering ring 63 3 65 x shaft D 40 10026446 Tapered centering ring 71 2 74 2 x shaft D 40 10026447 Tapered centering ring 58 8 60 4 x shaft D 40 10026448 Tap...

Страница 27: ...onique de centrage 52 54 2 x arbre D 40 0026452 Utiliser la place du c ne arri re pour une plus grande pr cision du centrage Fig 5 1 2 L Kit Conos Suzuki NTV 4026219 Debe utilizarse con el cono de f c...

Страница 28: ...repositioning error cannot be removed call Technical Service The actual imbalance error is one half of the repositioning error 5 1 1 Wheel Mounting Errors Refer to Figure 5 1 1 1 Regardless of the mo...

Страница 29: ...rotaci n Si no puede eliminar el error de rotaci n ll me al servicio t cnico El error de desequilibrio real es la mitad del error de rotaci n 5 1 1 Erreurs de montage de roue Se reporter la Figure 5...

Страница 30: ...unexpected Read the relevant chapters again Prepare the balancer for a restart switch off the balancer wait 20 seconds 5 2 Preparation The operator should be familiar with the warnings and cautions Th...

Страница 31: ...proceso especial Hizo la unidad algo inesperado Lea de nuevo los cap tulos relevantes Prepare la unidad para el encendido apague la unidad 5 2 Pr paration L op rateur doit se familiariser avec les ave...

Страница 32: ...one you want refer to Chapter 5 3 2 At power up the units of measurement are ounces for weight imbalance and inches for wheel parameters Carefully repeat the commands with the manual at hand Call Acc...

Страница 33: ...halla programada con un tipo de colocaci n de pesos diferente consultar el cap tulo 5 3 2 Los valores por defecto de la m quina son en gramos y pulgadas attendre 20 secondes remettre la machine sous t...

Страница 34: ...e ALU Special functions are set Refer to Chapter 5 3 2 To manually enter the data read the wheel offset measurement on the graduated scale of the measurement arm rod then 5 3 Balancing procedure Selec...

Страница 35: ...de referencia del plano o de la llanta depende del tipo de rueda Consultar Cap tulo 5 3 2 Utilice el brazo de medida para medir e introducir el valor de desequilibro autom ticamente 5 3 Proc dure d qu...

Страница 36: ...splay will appear as Figure 5 3 2 0 1 Enter the dimensions Chapter 5 3 1 and spin the wheel Apply the clip on weights at the distance in positions indicated by the illuminated weight application light...

Страница 37: ...or seleccione las teclas apropiadas consultar Cap tulo 4 2 El ltimo valor visualizado antes de pasar a una dimensi n diferente o antes de efectuar un giro ser el valor o valores adoptados por la m qui...

Страница 38: ...place the weight on this plane you will need to increase or reduce the weight amount the balancer is requesting dependent on which direction you must move the weight Refer to Figure 5 3 2 2 6 After e...

Страница 39: ...icheur appara t comme sur la Figure 5 3 2 3 1 Entrer les dimensions Ch 5 3 1 et faire tourner la roue Placer les masses sur les plans indiqu s par les leds dans la position MIDI Effectuer un lancement...

Страница 40: ...is applied on the rim median so as not to provoke dynamic unbalances When finished perform a check spin 5 3 2 6 Motorcycle Static Balancing Mode Install the motorcycle rapid flange as indicated in Ch...

Страница 41: ...afficheur est pr t pour entrer les dimensions en mm comme l exige ce type de roue Suivez les instructions op rationnelles indiqu es ci dessus pour les roues ALU4 5 3 2 4 Modo Equilibrado Est tico 1 S...

Страница 42: ...n The motor will start automatically the wheel will spin The measurement is completed as soon as the direction indicators light up The unit will beep The brake will be applied automatically stopping t...

Страница 43: ...nt indiqu s sur l affichage Pour un affichage au gramme pr s Appuyer sur la touche Fine Relever compl tement le carter de s curit 5 3 3 Girar la rueda El tipo y las dimensiones de la rueda deber an ha...

Страница 44: ...f the illuminated indicators are lit Figure 5 3 4 2 Press the foot brake to lock the wheel The weight to be applied in that plane is shown on the display Attaching a clip on weight Refer to Figure 5 3...

Страница 45: ...poids en deux valeurs identiques et poser sym triquement par rapport au plan milieu 5 3 4 Colocaci n del peso Los siguientes tipos de peso y colocaci n est n disponibles pesos de sujeci n Colocar siem...

Страница 46: ...een NORMAL ALU and STATIC no additional steps required To have a recalculation done Select the required wheel type Check and or edit rim or plane data when necessary Rotate the wheel to the left plane...

Страница 47: ...le secteur U ajouter une masse correspondant au poids indiqu sur l afficheur ou remplacer la masse par une masse plus lourde R p ter la m me op ration pour le plan interne 5 3 5 Comprobar giro Es una...

Страница 48: ...with the next step During minimization the left display shows the steps in the following sequence Step 1 Figure 5 4 2 2 Rotate the valve to the 12 o clock position Select the F key Step 2 Figure 5 4 2...

Страница 49: ...Appuyer sur la touche F Etape 5 Figure 5 4 2 3 Lancer la roue La machine v rifie si une minimisation suppl mentaire est n cessaire 5 4 Modos especiales Al seleccionar la tecla F permite que el operad...

Страница 50: ...4 2 2 Rotate the valve to the 12 o clock position Select the F key Step 8 Figure 5 4 2 3 Spin the wheel Step 9 Figure 5 4 2 9 The unit will display the result Minimization successfully completed EEE M...

Страница 51: ...c e la touche F et presser la touche mm inch R p ter la proc dure pour revenir la visualisation en pouce inch Paso 6 Minimizaci n completada Figura 5 4 2 7 Salir Modo de Minimizaci n Continuar Minimiz...

Страница 52: ...at the moment you accessed the function Operation Press the F FINE keys simultaneously The display shows SEL ECt Hold down until BAL Sht appears accompanied by an acoustic signal Press the or key to...

Страница 53: ...s LEDs d application des contrepoids signalent le mode Equilibrage normal poids clip interne externe 5 4 4 Contadores de Control En este cap tulo se describe c mo usar los contadores que sirven para a...

Страница 54: ...ith a letter relating to the first operator index A b After a short time the Offset and diameter data previously set appears again You can now perform two operations 1 Save the current data 2 Retrieve...

Страница 55: ...sage OPE et par le code de l op rateur accompagn s de deux signaux sonores Pour quitter la fonction multi op rateur presser F 5 4 5 Selecci n Multi Operador En este cap tulo se describe c mo varios op...

Страница 56: ...he initial condition repeat the operations you used to activate it Power up the machine When the power up stage is complete press the ALU button for at least three seconds then release it Start the op...

Страница 57: ...iquement les plus fr quentes Nota bene L tat activ d sactiv de la fonction sera m moris exclusivement apr s l ex cution d un lancement 5 4 6 Acceso r pido a ALU S La funci n permite programar la m qui...

Страница 58: ...or longer prepare the balancer correctly Shut down the balancer properly refer to Chapter 5 2 3 Remove the threaded shaft from the balancer Apply a light non corrosive oil onto all threads and cones W...

Страница 59: ...tirer vers le haut Retirer le porte fusible 1 Remplacer le fusible par un autre de valeur identique Replacer le porte fusible dans la machine 6 2 Cambiar el fusible de la red el ctrica Consultar la Fi...

Страница 60: ...mpensation This section indicates how to compensate for imbalances caused by weights added to the wheel shaft before fitting the wheel The machine can perform an automatic calibration operation to all...

Страница 61: ...s pour obtenir de nouveau BAL 0 Presser deux fois la touche STOP 6 3 Procedimiento de Calibrado En este cap tulo se incluyen los procedimiento de calibrado a los que el usuario puede acceder Nota No s...

Страница 62: ...call the Service team 7 Trouble shooting If a problem with the wheel balancer occurs proceed in the following order to solve the problem 1 Rethink the last steps taken Did you work according to the m...

Страница 63: ...o sucede frecuentemente compruebe el sistema el ctrico Si est bien llame al servicio t cnico La rueda no gira autom ticamente 7 D pannage En cas de probl me avec l quilibreuse proc der comme suit pour...

Страница 64: ...usly shown on the display 1 A brown out power dip may have occurred Switch off the unit Wait for 20 seconds switch on the unit Call the Service team Call ACCU Service Gauge arm input differs from rim...

Страница 65: ...un indicador 1 Quiz s haya ocurrido un apag n Apague la unidad Espere durante 20 segundos encienda la unidad Llame al servicio t cnico Les r sultats d quilibrage sont contradictoires 1 Mauvais fonctio...

Страница 66: ...all Technical Service perform the steps described The format of this chapter is Code Description Step s to be performed 7 1 System messages The wheel balancer can show messages to the operator These m...

Страница 67: ...Servicio t cnico Realice los pasos descritos La estructura de este cap tulo es la siguiente C digo Descripci n Paso s a realizar 7 1 Messages du syst me L quilibreuse peut afficher des messages pour l...

Страница 68: ...de respect the factory calibration Attach the User Calibration Weight correctly on the left side of the flange Redo Calibration Call Technical Service Call Accu Service E51 Calibration failed Switch u...

Страница 69: ...E51 Calibraci n fall Apague la unidad espere 20 segundos Encienda la unidad Vuelva a intentar calibrar de lo contrario Llame al Servicio T cnico E52 Peso calibrado en lado opuesto a la calibraci n de...

Страница 70: ...a quote or the disposal regulations which apply to the unit 9 Appendices This chapter contains additional information about the machine If reference is made to the exact configuration of the unit plea...

Страница 71: ...l me concernant la configuration exacte de la machine veuillez noter que la configuration exacte peut diff rer dans votre pays Se reporter au bon de commande pour de plus amples renseignements 8 Desha...

Страница 72: ...72 ACCU 1220...

Страница 73: ...73 ACCU 1220 Appendix Installation Instructions Annexe Instructions pour l Installation Anexo Instrucciones Instalaci n...

Страница 74: ...ght of the balancer as stated in Chapter 2 of the Operator s Manual The floor on which the balancer will be installed should not relay vibrations from other devices or from outside the building Extern...

Страница 75: ...PRISE SECTEUR CONFORME EST DISPONIBLE AVERTISSEMENT NE JAMAIS POSER DE C BLE SECTEUR SUR LE SOL SANS UNE GAINE DE PROTECTION CONFORME En este anexo se describen los requisitos y procedimientos de ins...

Страница 76: ...plied parts Check the contents of the shipment Contents The shipment contains a wheel balancer a Declaration of Conformity CE the accessories as mentioned in Chapter 3 of the Operator s Manual 4 suppo...

Страница 77: ...ote Pour manipuler l unit utilisez de pr f rence les crochets de stockage mont s conform ment au Chapitre iii et ou l arbre du couvre roue si pr sent ii Manipulaci n desempaque y contenido Manipulaci...

Страница 78: ...4 threaded accessory supports and disks Refer to Figure iii 1 Mount the 4 threaded supports and disks Stub shaft Clean the stub shaft and the main shaft Refer to Figure iii 2 Position the stub shaft...

Страница 79: ...re droit C nes Placez les c nes sur les crochets de stockage Appareils de serrage Placez les appareils de serrage sur les crochets de stockage iii Procedimiento de Instalaci n Unidad Consulte el gr fi...

Страница 80: ...4 Fit the two black screws on the front 4 Fig iii 4 and tighten it normally on the case Control panel Connect the multi track cable to the connector behind the panel Connect the earth cable to the fr...

Страница 81: ...r l unit Expliquer la fa on d effectuer un arr t d urgence Expliquer la fa on de s lectionner un mode d entrer les donn es et de placer les masses iv Procedimiento de comprobaci n Equilibre la rueda c...

Страница 82: ...82 ACCU 1220 090 c May03...

Страница 83: ...83 ACCU 1220 090 c May03 ACCU TURN 1220 SPARE PARTS EXPLODED VIEWS Digital Wheel Balancer Machine quilibrer Equilibradora FIGURES PIECES DE RECHANGE TABLA DE REPUESTOS...

Страница 84: ...e c digo de la pieza requerida y su cantidad All ordine specificare tipo macchina e matri cola codice e quantit del particolare Bei Auftragserteilung anzugeben Maschinen type Serinnummer Artikelcode M...

Страница 85: ...ES PARA USO EXCLUSIVO POR PESSOAL ESPECIALIZADO ED AUTORIZATO A LA MANUTEN AO DIESER ABSCHNITT IST AUSSCHLIESSLICH DEM WARTUNGSFACH UND KUNDENDIENSTPERSONAL VORBEHALTEN DENNE DEL ER BEREGNET TIL BRUK...

Страница 86: ...86 ACCU 1220 090 c May03...

Страница 87: ...87 ACCU 1220 090 c May03...

Страница 88: ...88 ACCU 1220 090 c May03...

Страница 89: ...89 ACCU 1220 090 c May03...

Страница 90: ......

Страница 91: ......

Страница 92: ...92 ACCU 1220 090 c May03...

Страница 93: ...93 ACCU 1220 090 c May03...

Страница 94: ...94 ACCU 1220 090 c May03 BLANK PAGE...

Страница 95: ...95 ACCU 1220 090 c May03 BLANK PAGE...

Страница 96: ...ACCU TURN 1220 Rev E...

Отзывы: