28
3. Instructions for the installer
3.1. Installation rules
This boiler is of category II2H3B / P and must be installed according to the following laws and standards in force which are understood to
be fully transcribed here:
- Law n° 46 of 05/03/90
- Law n° 186 of 01/03/68
- Legislative Decree No. 192 of 08/19/2005
- Legislative Decree n° 311 of 29/12/2006
- DPR n° 551 of 21/12/1999
- Presidential Decree No. 412 of 08/26/1993
- UNI 7129 standard
- UNI 7131 standard
- UNI 11071 standard
- CEI 64/8 standard
ATTENTION
If several boilers are installed in the same residential unit or in the same room, for a total heat output exceeding 35 kW, the
systems must be designed and built in compliance with:
- Ministerial Decree 12/04/96 regarding fire prevention;
- DM 01/12/75 and collection R connected with regard to safety.
3.2. Installation
For both installation and maintenance and possible replacement of components, use only original accessories and
spare parts supplied by the manufacturer.
If original accessories and spare parts are not used, correct operation of the boiler is not guaranteed.
3.2.1. Packing
The boiler is supplied packed in a sturdy cardboard box.
After unpacking the boiler, make sure it is perfectly intact.
The packaging materials are recyclable: therefore convey them to the appropriate collection areas.
Do not leave packaging that can, by their nature, be a source of danger at the mercy of children.
The manufacturer declines all responsibility for damage to people, animals and property resulting from non-compliance
with the above.
The packaging contains:
-
wall fixing bracket (already mounted on the boiler);
-
bag containing:
a) this manual for installation, use and maintenance of the boiler;
b) the inspection certificate;
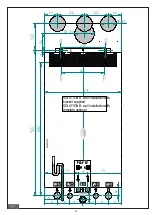
c) the template for fixing the boiler to the wall (fig. 7).
3.2.2. Choice of the place of installation of the boiler
When determining the place to install the boiler, take the following into account:
- the indications contained in paragraph “3.2.6. Air intake / flue gas exhaust system "and its subparagraphs;
- check that the masonry structure is suitable, avoiding fixing on inconsistent partitions;
- avoid mounting the boiler on top of an appliance which, during use, may in some way compromise its proper functioning (kitchens that
give rise to the formation of greasy vapors, washing machines, shower rooms or bathtubs, etc. .).
3.2.3. Positioning of the boiler
Each device is equipped with a special paper template contained in the packaging (fig. 7).
This template allows the preparation of the connection pipes to the heating system, to the domestic water, to the gas network and to the
air intake / flue gas pipes at the time of making the plumbing system and before installing the boiler.
This template, consisting of a sturdy sheet of paper, must be fixed to the wall chosen for the installation of the boiler with the help of a
bubble and shows all the information necessary to drill the holes for fixing the boiler to the wall which is done by means of two screws.
with expansion plugs.
The lower part of the template allows you to mark the exact point where the fittings for connecting the gas supply pipe, the cold water
supply pipe, the hot water outlet, the delivery and the heating return.
The upper part allows you to mark the points where the air intake / flue gas exhaust pipes must be positioned.
Since the temperature of the walls on which the boiler is installed and the external temperature of the coaxial intake
and exhaust ducts are lower than 60 ° C, it is not necessary to respect minimum distances from flammable walls.
For boilers with split intake and exhaust ducts, in the case of flammable walls and crossings, interpose insulation
between the wall and the flue gas exhaust pipe.
Содержание PLAY 24
Страница 45: ...45 3 6 3 Wiring diagram fig 21...
Страница 52: ......
Страница 53: ......
Страница 55: ...2...

