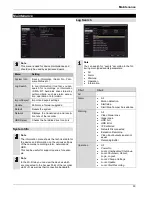
Abus TVVR36500 Скачать руководство пользователя страница 51


Information 


All 


HDD Information 


HDD S.M.A.R.T. 


Start Recording 


Stop Recording 


Delete Expired Record 


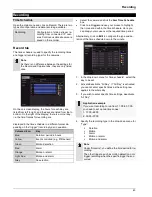
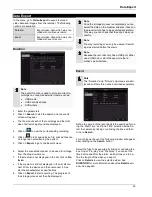
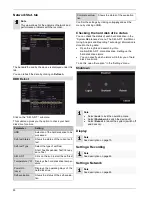
1.  Select the event you wish to search for in the log and 

then select a sub-parameter. 

2.  Enter the date and time under Start Time and End 

Time, then click on 

Search

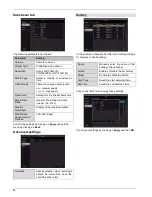
3.  The results will then be displayed:  


You can change the page using the navigation bar: 


Click on the “Details” icon for more information. 


Click on the “Play” icon to start the recording for the 
event as required. 


Click on 

Export

 to save the log file on a USB me-

dium. 

Import/Export 


Note 

The configuration data contains all of the settings 
for the device that have been adjusted since it was 
started up. Because the recorder only has a USB 
port, either use a USB hub or start the import/ex-
port via the recorder’s web interface. 
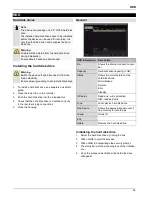
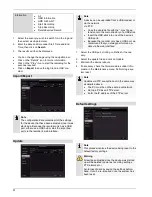
 

Update 


Note 

A device can be upgraded from a USB medium or 
via the network 

 via FTP. 


Copy the upgrade file with the *.mav file ex-
tension onto the main directory of a USB stick. 


Insert the USB stick into one of the device’s 
USB ports. 


Because the recorder only has a USB port, we 
recommend that you always perform an up-
date via the web interface. 

1.  Select the USB port, clicking on Refresh, if neces-

sary. 

2.  Select the update file and click on Update. 

3.  Wait until the device reboots. 

4.  If necessary, check the firmware status under Infor-

mation in the Maintenance menu. Performing a sys-
tem reset 


Note 

Updates via FTP are carried out in the same way 
as detailed above.  


The PC must be on the same local network. 


Set up a PC as an FTP server. 


Enter the IP address of the FTP server.   


Default settings 


Note 

This process involves the device being reset to the 
default factory settings. 


Warning 

All settings adjusted since the device was started 
up will be deleted (cameras, recording settings, 
PTZ, alarms etc.) 

Avoid loss of data by saving the settings before-
hand. It can be re-imported once the system has 
been reset. 


51 

Содержание TVVR36500

Страница 1: ...ABUS Wi Fi Network Video Recorder TVVR36500 User guide Version 1 1 03 08 2017...

Страница 2: ...allation and opera tion information Make sure that this user guide is handed over when the product is given to other persons Keep this user guide to consult later You will find a list of contents with...

Страница 3: ...ting with a mouse 11 On screen keyboard 11 Quickstart guide 12 Before you start 12 Connections at the back of the device 12 Installing the hard disk drive 12 Make the connections 12 Starting the devic...

Страница 4: ...26 Configuration 27 General settings 27 General network 29 Network configuration 30 Wi Fi 33 Alarm 33 Exceptions 35 User 35 Camera 37 Camera 37 OSD 38 Image 39 PTZ 39 Motion 39 Private Zone 41 Tamper...

Страница 5: ...Detect 53 Shutdown 53 Fault rectification 54 Technical data 55 Disposal 56 Notes on EC directives for waste electrical and electronic equipment 56 Notes on RoHS EU Directive 56 Glossary 57 Technical...

Страница 6: ...e familiar with the use of elec tronic devices Warning All guarantee claims are invalid in the event of damage caused by non compliance with this user guide We cannot be held liable for resulting dama...

Страница 7: ...h other cables All cables should be laid so that they cannot be trod den on or cause a hazard Damaged power cables can cause fire or electric shock Check the power cable from time to time Do not modif...

Страница 8: ...aintenance tasks must be carried out by author ised companies Inadequate repair work can cause a fatal hazard for the user Accessories Only connect devices that are expressly suitable for the intended...

Страница 9: ...ponsible for direct or indirect damage resulting from the equipment performance and use of this product No guarantee is made for the contents of this document General information To use the device pro...

Страница 10: ...Contents Device overview Front Rear 10...

Страница 11: ...in the menu activation of an input field or a tab display of the Quick Set menu Double click Switch between the screen display of single and multiple images in the live view and dur ing playback Click...

Страница 12: ...der s plug connections 5 Close the housing Note Only use hard disk drives that are authorised for video recording and 24 7 operation Make the connections Note Observe the minimum radius when laying th...

Страница 13: ...ote Later alteration of date and time can lead to loss of data Note the explanation of Description PAGE10 Live view PAGE18 Playback PAGE23 Network PAGE29 Recording PAGE43 Data export PAGE49 Fault rect...

Страница 14: ...sword for your recorder Pursuant to the description this must be made up of 8 16 characters and fulfil two of the three specified criteria Then press Ok to save the changes Camera password note Each t...

Страница 15: ...lick on The following query appears Click on Next to start the wizard Note After the system has been set up the checkbox can be deactivated the tick is hidden and the wiz ard no longer starts automati...

Страница 16: ...ernatively you can also enter the address of the DNS server which is required for email dis patch A typical address assignment could appear as fol lows IPv4 address 192 168 0 50 IPv4 subnet mask 255 2...

Страница 17: ...on with the re corder Only one camera can be connected during each WPS procedure Note If the installation via WPS function was not properly functioning for a camera the alternative ist to connect the...

Страница 18: ...y opened by a double click on the entry Login At the start of the setup wizard first log in with the preset user User name admin Password 12345 Warning Note down the admin password The preset password...

Страница 19: ...breakdown shows you the included points Click on Continue Administrator set up 1 Click on the input field and enter the admin pass word If you have already changed the password enter the password you...

Страница 20: ...mera and the re corder To do this click on the WPS key and follow the instructions Before you can then search for and add the camera wait the two minutes as displayed until the camera has established...

Страница 21: ...f the device Symbol Meaning R R Yellow motion recording recording only upon motion detection Blue Recording continuous recording Pop up menu with mouse operation Note Right click when the mouse pointe...

Страница 22: ...e connection where the set tings are changed Live View Mode Various camera layouts 1x1 2x2 1 5 Dwell Time Switching time between the individual cameras during auto switch Enable Audio Output Activates...

Страница 23: ...k to the previous next event Data export Pressing one of the buttons switches playback to the previous next file Note It is possible to start playback on up to four cam era channels with 1080p or six...

Страница 24: ...ow motion 8x 1x 16 Fast forward 1x 8x 17 Previous day 18 Next day 19 Reduce time bar section 20 Increase time bar section Selecting playback type Selecting the playback type 5 allows various types of...

Страница 25: ...ording HDD and Playback menus Playback Parameter controlled search for video or image recordings which were triggered by events such as motion detection as well as tags set in playback Video export Pa...

Страница 26: ...parameters OSD configuration image mode motion detection private zone tamper monitoring and video loss Recording Menu for setting recording parameters time schedule camera resolution holiday etc HDD U...

Страница 27: ...IP cameras Live view Display settings and assignment of the event output Exceptions Response of the device in exceptional cases hard disk drive full network dis connected etc User Adding and changing...

Страница 28: ...box is ticked a specific start end date can be selected From to Start end date for daylight saving time DST bias Daylight Saving Time bias correction of daylight saving time to reference time More Se...

Страница 29: ...NS searches for the corresponding IP address of the server and forwards the query on to it The IP of the provider s DNS can be en tered here However it is often sufficient to select the IP of the gate...

Страница 30: ...e DHCP Tick the box if the IP addresses on the network are assigned dynamically via DHCP DHCP enabled subsequent entry fields are set to disabled because pa rameters are obtained via DHCP Note If the...

Страница 31: ...ing Enable Server Authentication Tick the box when logged onto the in ternet provider s server User name Email account with the provider Password Password used to protect the email account SMTP Server...

Страница 32: ...ransferred to the ABUS server provided that ABUS DDNS is enabled Mapping type For manual settings the network ports can be manually defined using the Edit button For auto settings the recorder checks...

Страница 33: ...nnel for your recorder Alarm Alarm Status tab Here you can see a list of all the alarm inputs and out puts and their current status Alarm Input tab Parameter Setting Alarm Input No Select the alarm in...

Страница 34: ...The camera is displayed in full screen in live view Audible Warning The device does not have an audible warning Notify Surveillance Cen tre The CMS emits an audible warning tone Send Email An email i...

Страница 35: ...clicking on Back Exceptions Set the response of the recorder for warning messages and system events here To do this activate the Enable Event Hint setting You can trigger a warning for the following e...

Страница 36: ...ructions below on assigning access rights Setting permissions Control the access permission of the user by clicking on the Permission icon Only the access data of users added manually can be changed N...

Страница 37: ...camera model num ber Click on Refresh to display the cameras on your net work Click on Update to start the camera s firmware update storage medium with firmware is required Click on Delete to delete...

Страница 38: ...the Webinterface of the camera There you can setup the WiFi con nection to the recorder manually in the Configura tion advanced settings network WiFI menu IP Camera Import Export tab Here you can expo...

Страница 39: ...tem the recorder automatically sets a standard setting for motion detection directly on the IP camera web inter face The settings therefore have to be manually ad justed on the camera s web interface...

Страница 40: ...tion detection you must set up the time schedule under Record Note The sensitivity settings for motion detection need to be adjusted on the camera web interface 3 Confirm the settings by clicking on A...

Страница 41: ...s between 00 00 and 00 00 can be defined in each case but the individual time slots must not overlap 2 Under Copy select whether or not the setting should be applied to every day of the week and the h...

Страница 42: ...every day of the week and the holiday settings 6 Confirm the settings by clicking on Apply and exit the menu by clicking on OK Linkage Action tab Here you can configure the response of the recorder du...

Страница 43: ...Green Motion detection Red Alarm Orange Motion or alarm Light blue Motion and alarm Grey No selection Select the camera and tick the Arm Time Schedule box Click on a trigger and use your mouse to hig...

Страница 44: ...Resolution Resolution of the camera Bit Rate Select a variable or constant bi trate Video Quality There are various quality levels medium quality high quality Frame rate Settings for the stream frame...

Страница 45: ...trate Max Bitrate Range Recom mended 192 320 Kbps Confirm the settings by clicking on Apply and exit the menu by clicking on Back Advanced settings Overwrite Specify whether older recordings should be...

Страница 46: ...the intended slot 4 Check that the hard disk drive is mounted correctly to the recorder s plug connections 5 Close the housing General HDD Information Description No Shows the internal connection num...

Страница 47: ...een the total number of data storage devices connected and written onto them Camera Select the camera channel to be processed Used Video Ca pacity Video storage space currently in use on the linked da...

Страница 48: ...ellow Off red Manual continuous recording is stopped and if a time schedule has been configured for the camera it will be activated automatically green Parameter Description Duration Click on the icon...

Страница 49: ...ee also the manufacturer s specifications 8 Click on Export to start exporting The progress of the storage process will then be displayed Note Once the storage process is completed you can select the...

Страница 50: ...data for the device and information on the various settings of the cameras recording alarm network and HDD This can be useful for support queries for exam ple Note In the Wi Fi tab you can view the d...

Страница 51: ...via the network via FTP Copy the upgrade file with the mav file ex tension onto the main directory of a USB stick Insert the USB stick into one of the device s USB ports Because the recorder only has...

Страница 52: ...tch off camera chan nels Network Detection tab Under Network Test you can check the connection to another device such as a computer pinging Enter the network address of the device to be checked e g 19...

Страница 53: ...lf evaluation Shows the status of the self evalua tion Complete evalua tion Shows the status of the evaluation Confirm the settings by clicking on Apply and exit the menu by clicking on OK Checking th...

Страница 54: ...stream type from Video to Video Audio in the parameter settings Hard disk drive not function ing Hard disk drive has not been inserted properly Check connection Hard disk drive faulty or incompatible...

Страница 55: ...e medium 1 x 2 5 S ATA HDD Storage Web Views 1 4 5 1 Recording modes Manual time schedule motion detection alarm Search modes By event date and time S M A R T User levels 2 max 31 users Network access...

Страница 56: ...al author ity responsible for disposal Information on col lection points for waste equipment can be ob tained from the local or district authorities local waste disposal companies or the dealer Notes...

Страница 57: ...nking and Synchronisation signal The most simple variant of video signals also called Compo site Signal Picture Quality is comparatively low H 264 MPEG 4 AVC standard for high efficiency compression o...

Страница 58: ...transmission process for establishing connection via dial up lines that are used with ADSL connections for example PROGRESSIVE Scanning by line or image display as opposed to line skip or Interlaced R...

Страница 59: ...switch Do not move the device immediately after switching it off To move the device carry out the following steps 1 Wait at least two minutes after the OFF no tification device display 2 Unplug from t...

Страница 60: ...ABUS 4 Channel Wi Fi Network Video Recorder TVVR36500 Manufacturer ABUS Security Center GmbH Co KG Linker Kreuthweg 5 86444 Affing Germany...

Отзывы: