2-14
Chapter2
CX6
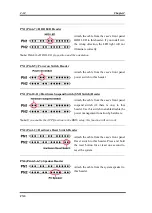
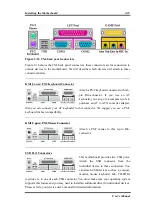
PN1 (Pin 6-7): HDD LED Header
Attach the cable from the case’s front panel
HDD LED to this header. If you install it in
the wrong direction, the LED light will not
illuminate correctly.
Note:
Watch the HDD LED pin position and the orientation.
PN1 (Pin 8-9): Power on Switch Header
Attach the cable from the case’s front panel
power switch to this header.
PN1 (Pin 10-11): Hardware Suspend Switch (SMI Switch) Header
Attach the cable from the case’s front panel
suspend switch (if there is one) to this
header. Use this switch to enable/disable the
power management function by hardware.
Note:
If you enable the ACPI function
in the BIOS setup, this function will not work.
PN2 (Pin 1-2): Hardware Reset Switch Header
Attach the cable from the case’s front panel
Reset switch to this header. Press and hold
the reset button for at least one second to
reset the system.
PN2 (Pin 4-5-6-7): Speaker Header
Attach the cable from the system speaker to
this header.
Содержание AB-CX6
Страница 2: ......
Страница 13: ...Introduction of CX6 Features 1 9 User s Manual 1 3 Layout Diagram Figure 1 1 Motherboard component location ...
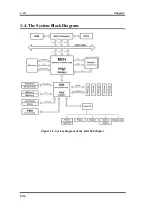
Страница 14: ...1 10 Chapter1 CX6 1 4 The System Block Diagram Figure 1 2 System diagram of the Intel 820 chipset ...
Страница 78: ...3 44 Chapter3 CX6 ...
Страница 84: ...B 4 Appendix B CX6 ...
Страница 90: ...D 4 Appendix D CX6 ...
Страница 96: ...E 6 Appendix E CX6 ...
Страница 104: ...G 4 Appendix G CX6 ...
Страница 110: ...H 6 Appendix H CX6 ...

