2-8
Chapter2
CX6
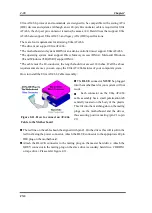
ATX: ATX Power Input Connector
Caution
If the power supply connectors are not properly attached to the ATX power supply, the
power supply or add-on cards may be damaged.
Attach the connector from the power supply
to the ATX connector here. Remember you
have to push the connector from the ATX
power supply firmly to the end with the
ATX connector, insuring that you have a
good connection.
Note:
Watch the pin position and the
orientation
FAN1, FAN2 & FAN3: FAN header
Attach the connector from the individual
CPU fan to the header named FAN2, and
attach the connector from the chassis fan to
FAN3 or FAN1 header.
You must attach the CPU fan to the
processor, or your processor will work
abnormally or may be damaged by
overheating. Also, if you want the computer
case’s internal temperature to be kept steady
and not too high, you had better connect the
chassis fan to reach this goal.
Note:
Watch the pin position and the orientation
Содержание AB-CX6
Страница 2: ......
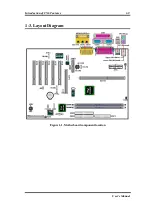
Страница 13: ...Introduction of CX6 Features 1 9 User s Manual 1 3 Layout Diagram Figure 1 1 Motherboard component location ...
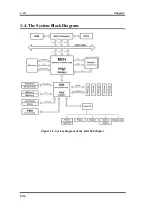
Страница 14: ...1 10 Chapter1 CX6 1 4 The System Block Diagram Figure 1 2 System diagram of the Intel 820 chipset ...
Страница 78: ...3 44 Chapter3 CX6 ...
Страница 84: ...B 4 Appendix B CX6 ...
Страница 90: ...D 4 Appendix D CX6 ...
Страница 96: ...E 6 Appendix E CX6 ...
Страница 104: ...G 4 Appendix G CX6 ...
Страница 110: ...H 6 Appendix H CX6 ...

