


22
UAV- M I CROPORTA B LE A N A LY ZE R S |
G L A 1 3 3 SER I E S | U M/G L A 1 3 3 - EN R E V. B
Transfer Data Files
To transfer data files from the analyzer solid-state drive (SSD)
to a USB storage device:
1
Click the
Files
button on the
Control Bar (Figure 21) to access
the
File Transfer menu . (Figure 29)
2
Insert a USB storage device into the USB port on the side
panel of the analyzer .
3
Click the
Mount USB
button . (Figure 29)
4
Transfer data files from the analyzer SSD to a USB storage
device by dragging and dropping the files from the hard
drive pane to the USB device pane . Use the left mouse
button to highlight one or multiple files in the window .
• The directory windows default to the local hard drive on the
left screen and the USB memory device on the right .
• Navigate through folders, create new folders, and delete
files and folders .
When you have finished transferring files:
5
Click the
Unmount USB
button, then wait for the
Safe to
Remove USB Memory Device message, before removing the
USB memory device .
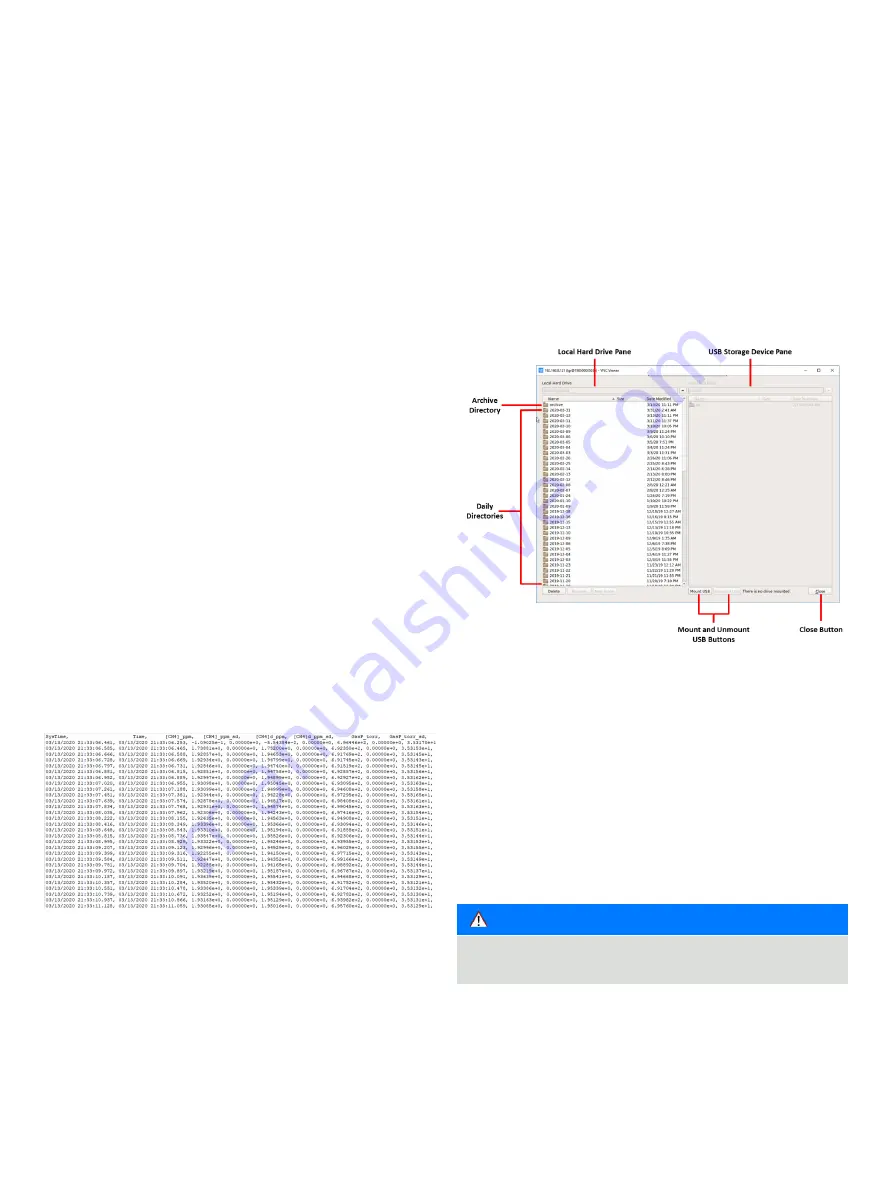
File Transfer Menu
Use the
File Transfer menu to access data collected by the
analyzer .
• Each time the analyzer is re-started, the most recent file
name is displayed in the form: DJI_ Analyzer Serial
Number_2023-12-29_f0001 .txt, where the:
–
First set of characters represent the analyzer model (DJI).
– Next set of characters represent the analyzer serial number
– Next set of characters represent the date (yyyy-mm-dd) .
– Last set of characters give the data file name (fxxxx .txt),
where xxxx is the serial number .
• The serial number counts upward to provide up to 10,000
unique file names each day .
• If the analyzer is left in continuous operation, a new data file
is automatically created every 24 hours to keep data file sizes
manageable .
Standard Data File
Data files are written in text (ASCII) format and contain labeled
columns displaying:
• Timestamp of each recorded measurement
• Gas concentration
• Cell pressure (Torr)
• Cell temperature (Celsius)
• Ambient temperature (Celsius)
• Ringdown time (microseconds)
The format can be changed in the
Time/Files menu of the Setup
panel . (Figure 33)
Figure 28 shows a typical data file .
. . .7 User Interface Operation
Figure 28 Beginning of a Typical Data File
Figure 29 File Transfer Menu: Local Hard Drive
(Left Pane) and USB Flash Drive (Right Pane)
For each measurement there is an adjacent column reporting
the standard deviation of the measurement (with sd suffix) .
• The standard deviation is zero when the analyzer is running at
1 Hz, because no averaging of data has occurred .
• At speeds slower than 1 Hz, the standard error of the average
is reported .
• At the end of each data file, an encoded list of settings used
by the analyzer for that data file may be inserted . These
settings are typically stored for diagnostic or troubleshooting
purposes . This output is suppressed by default .
NOTE
USB drives should be no larger than 8 GB . They must be
FAT32 .


