3ware Hardware Installation
18
3ware Escalade ATA RAID Controller User Guide
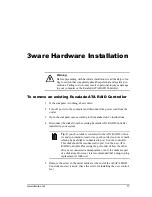
6 Gently remove the ATA RAID Controller from the PCI slot.
7 Remove the cables from the ATA RAID Controller and discard.
Reusing interface cables is not recommended.
Installing a Parallel ATA RAID Controller
Note:
If you are not installing a Parallel ATA RAID Controller,
continue to page 21 “Installing a Serial ATA RAID Controller”.
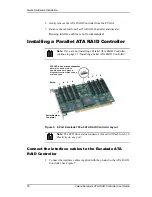
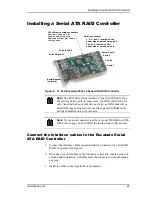
Figure 5. 8-Port Escalade 750x-8 ATA RAID Controller Layout
Note:
The LED drive status connector, if used, will flash for any I/
O activity on any port.
Connect the interface cables to the Escalade ATA
RAID Controller
1
Connect the interface cables supplied with the product to the ATA RAID
Controller. See Figure 5.
Serial Number
(on plate)
0
2
4
6
JP2 LED drive status connector
Note: Pin 1 and 4 are 3.3V
and pin 2 and 3 are ground
Plug cable to either pins 1 and 2
or pins 3 and 4.
Ports:
7
5
0
1
3
Содержание 3W-7410 - Escalade 7410 RAID Controller
Страница 6: ...iv 3ware Escalade ATA RAID Controller User Guide ...
Страница 14: ...Before You Begin 6 3ware Escalade ATA RAID Controller User Guide ...
Страница 22: ...Quick Installation Guide 14 3ware Escalade ATA RAID Controller User Guide Quick Installation Guide ...
Страница 24: ...Quick Installation Guide 16 3ware Escalade ATA RAID Controller User Guide ...
Страница 68: ...Windows Installation 60 3ware Escalade ATA RAID Controller User Guide ...
Страница 86: ...FreeBSD Installation 78 3ware Escalade ATA RAID Controller User Guide ...
Страница 104: ...3DM Disk Management Utility 96 3ware Escalade ATA RAID Controller User Guide ...
Страница 116: ...Troubleshooting Problems and Solutions 108 3ware Escalade ATA RAID Controller User Guide ...
Страница 122: ...Appendix B Warranty Technical Support and Service 114 3ware Escalade ATA RAID Controller User Guide ...
Страница 126: ...Index 118 3ware Escalade ATA RAID Controller User Guide ...


