background image

94

C

HAPTER

 5: P

LANNING


THE

 3C

OM

 M

OBILITY

 S

YSTEM

For best performance and simpler planning, 3Com recommends that you 
hide or remove unnecessary layers and remove unnecessary objects. The 
Clean Layout option automatically deletes all objects that meet the 
cleanup criteria, which you can modify. (See “Cleaning Up a Drawing” on 
page 95.) You also can select and delete individual objects. 

Hiding Layers

With the drawing displayed in the Content panel, click Layers in the 
Organizer panel to bring up a list of the layers in the drawing. Click the 
checkbox next to the layer name to show or hide the layer. 

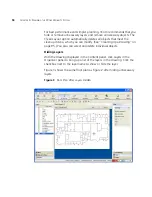
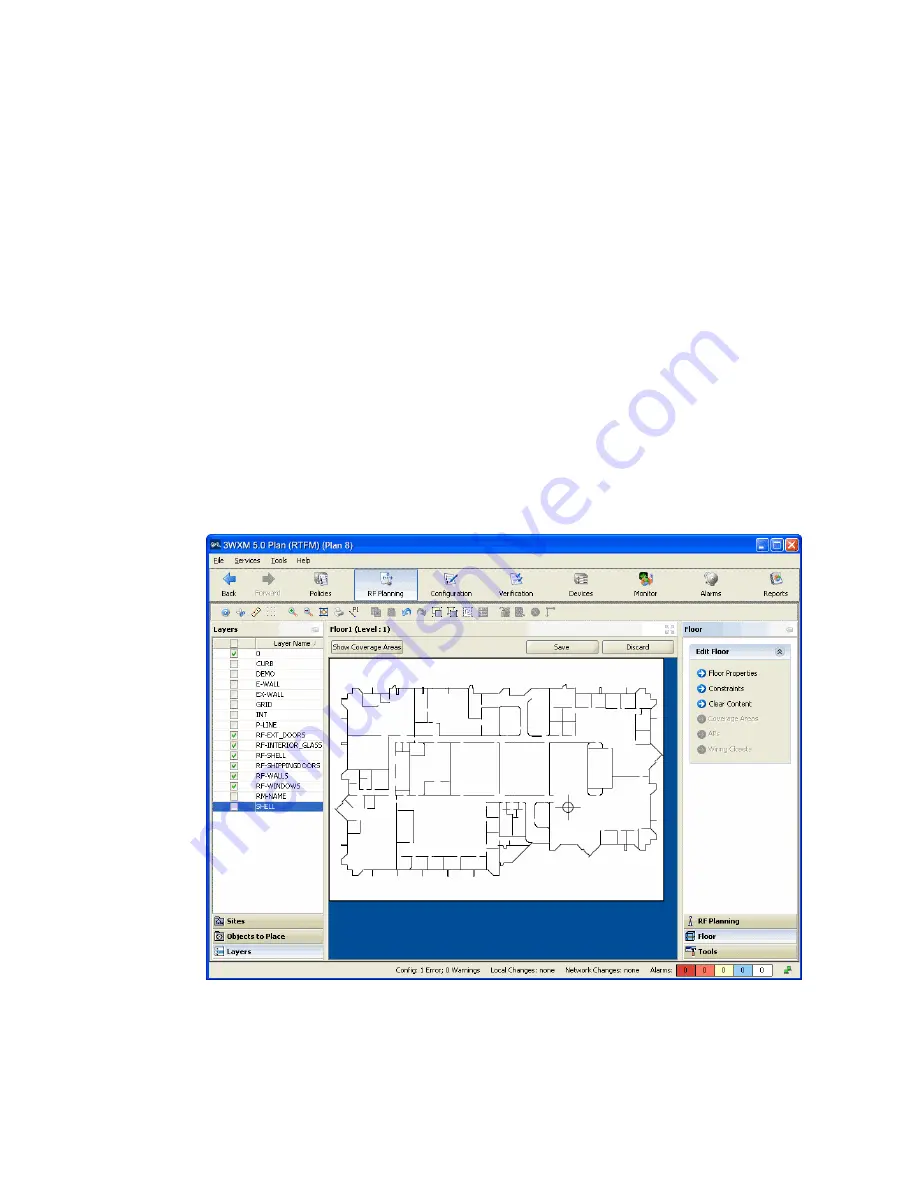
Figure 3 shows the same floor plan as Figure 2 after hiding unnecessary 
layers.

Figure 3   

Floor Plan After Layers Hidden

Содержание OfficeConnect WX4400

Страница 1: ...tp www 3Com com Part No 10015905 Published June 2007 Wireless LAN Mobility System Wireless Switch Manager Reference Manual WX4400 3CRWX440095A WX2200 3CRWX220095A WX1200 3CRWX120695A WXR100 3CRWXR1009...

Страница 2: ...June 1987 whichever is applicable You agree not to remove or deface any portion of any legend provided on any licensed program or documentation contained in or delivered to you in conjunction with th...

Страница 3: ...ileges 24 Serial Number and License Key 24 Installing 3WXM 25 Installing 3WXM on Windows Systems 25 Installing 3WXM on Linux Systems 27 Installation Log File 28 Installing Web Start Client 29 System R...

Страница 4: ...g 3WXM User Accounts 56 Disabling Access Control 56 4 WORKING WITH NETWORK PLANS Creating a Network Plan 58 Managing Network Plans 59 Saving a Network Plan 59 Opening a Network Plan 60 Importing a Net...

Страница 5: ...ning Up a Drawing 95 Drawing Floor Objects Manually 99 Specifying the RF Characteristics of a Floor 100 Recommendations 100 Converting Objects into RF Obstacles 101 Drawing RF Obstacles 103 Importing...

Страница 6: ...171 Configuring Basic and Advanced Settings 172 Reviewing and Deploying Changes 172 Reviewing Changes 172 Deploying Changes 172 Using the Create Wireless Switch Wizard 173 Setting Up a Switch 175 Modi...

Страница 7: ...VLANs 215 Viewing VLANs 216 Creating a VLAN 216 Changing VLAN Membership 218 Changing VLAN Spanning Tree Settings 219 Changing VLAN IGMP Settings 223 Restricting Layer 2 Traffic Among Clients in a VLA...

Страница 8: ...tings and Access Rules 269 Viewing and Configuring Radio Profiles 272 Viewing Radio Profile Settings 272 Creating a Radio Profile 273 Moving Radios Back to the Default Radio Profile 273 Configuring Ad...

Страница 9: ...To It 302 Creating a MAC User 303 Creating a MAC User Group and Assigning Users To It 304 Authorization Attributes 305 Viewing and Configuring RADIUS Settings 311 Viewing RADIUS Settings Servers and S...

Страница 10: ...338 Viewing and Changing Location Policy Rules 339 Viewing Location Policy Rules 339 Creating a Location Policy Rule 340 Viewing and Changing Mobility Profiles 342 Viewing Mobility Profiles 342 Creati...

Страница 11: ...Nonmatching Changes 368 Distributing System Images 369 Using the Image Repository 369 Distributing System Images 369 Rebooting WX Switches or MAP Access Points 371 Enabling or Disabling Management of...

Страница 12: ...to Switches 389 14 MANAGING ALARMS Setting Up the Fault Management System 391 Classifying and Organizing Alarms 393 Search Capabilities 394 Fault States 396 Managing Faults 397 Alarm Summary 398 Top...

Страница 13: ...lient Details Report 424 Generating a Client Errors Report 425 Generating an RF Network Usage Report 426 Generating an RF Summary Report 427 Generating a Radio Details Report 428 Generating a Traffic...

Страница 14: ...Monitor 466 On Demand Statistics Monitoring 467 Viewing Performance Data 467 Creating and Viewing Reports 467 18 DETECTING AND COMBATTING ROGUE DEVICES Overview 469 Rogue Detection Requirements 470 M...

Страница 15: ...s 493 Changing Certificate Management Options 494 Changing Options for RF Planning 495 Configuring the Transmit Power of a Typical Client 495 Changing Colors 495 Changing 3WXM Logging Options 499 B CH...

Страница 16: ...erver to Another 515 Deleting a Plan Backup 515 C OBTAINING SUPPORT FOR YOUR 3COM PRODUCTS Register Your Product to Gain Service Benefits 517 Solve Problems Online 517 Purchase Extended Warranty and P...

Страница 17: ...ion in this guide follow the instructions in the release notes Most user guides and release notes are available in Adobe Acrobat Reader Portable Document Format PDF or HTML on the 3Com World Wide Web...

Страница 18: ...tions Convention Description Menu Name Command Indicates a menu item that you select For example File New indicates that you select New from the File menu M onos pacet ext Sets off command syntax or s...

Страница 19: ...Controller Hardware Installation Guide This guide provides instructions and specifications for installing a WX wireless switch in a Mobility System WLAN Wireless LAN Switch and Controller Configuratio...

Страница 20: ...de Part number 730 9502 0071 Revision B Page 25 Please note that we can only respond to comments and questions about 3Com product documentation at this e mail address Questions related to Technical Su...

Страница 21: ...3WXM Monitoring Service on Windows and Linux platforms Table 3 Hardware Requirements for Running 3WXM Client Minimum Recommended Processor Intel Pentium 4 2 GHz or equivalent Intel Pentium 4 3 GHz or...

Страница 22: ...sessions which requires more RAM and storage Hard drive space available 1 GB 2 GB Monitor resolution 1024x768 pixels 24 bit color 1600x1200 pixels 32 bit color CD ROM drive CD ROM or equivalent CD ROM...

Страница 23: ...nager Reference Manual and release notes Web browser for example Microsoft Internet Explorer 5 x or 6 x or Netscape Navigator 6 x or 7 x For displaying 3WXM work orders and inventory reports Preparing...

Страница 24: ...with a base license key which is provided on the CD cover To use 3WXM Services you need to enter the base key and an activation key which you obtain from 3Com The base key and activation key enable y...

Страница 25: ...n to install the 3WXM Services only 1 Insert the 3WXM CD in the CD ROM drive If Autorun is enabled wait briefly for the install program to start If Autorun is disabled follow these steps a In Windows...

Страница 26: ...nstallation the 3Com Wireless Switch Manager installation wizard minimizes 6 When the installation is complete maximize the 3Com Wireless Switch Manager installation wizard screen and then press the C...

Страница 27: ...ow type sh install bin The Introduction page of the 3WXM installation wizard appears 8 Click Next to display the Choose Installation Type page of the installation wizard and go to Using the Installati...

Страница 28: ...port 443 and the same host also runs Microsoft Internet Information Services IIS on its default HTTPS port 443 there will be a conflict over the port 3WXM clients will not be able to communicate with...

Страница 29: ...Start client simply by browsing to the server and clicking an option You do not need to install from the product CD or an installation executable stored on a file server The appearance and options in...

Страница 30: ...se key from the License Information dialog box which you access by selecting Help Licensing from the main 3WXM window You can also save a copy of the license information by starting 3WXM and clicking...

Страница 31: ...ot delete the serial number unless specifically asked to do so by 3Com Technical Support Your license s to use this software are registered against this serial number If you delete the serial number t...

Страница 32: ...rData 4 At the prompt enter Uninstall_3WXM The Uninstall wizard appears 5 Click Uninstall The 3WXM Uninstall Options dialog appears By default all 3WXM removes the following options Network plans Acce...

Страница 33: ...pter describes how to use the 3Com Wireless Switch Manager 3WXM interface Overview When you start 3WXM client and log into 3WXM Services the network plan is displayed by the 3WXM Client Toolbar Organi...

Страница 34: ...n coverage and capacity needs Alternatively add new or existing switches and access points individually Planning and equipment configuration and network management are described in detail in other cha...

Страница 35: ...cies tool bar option The set of device configuration policies included in your network plan Equipment displayed by the Configuration tool bar option The set of devices in your network plan This includ...

Страница 36: ...d configure settings for that object For more information about the tool bar options see Tool Bar Options on page 42 Saving or Discarding Configuration Changes When you select the Policies RF Planning...

Страница 37: ...iguration changes from the network plan to the actual switches in the network The following options in the Task List panel allow you to review and deploy changes Review Displays a categorized list of...

Страница 38: ...the configuration wizard required to perform that task The Task List panel is located to the right of the Content panel Here is an example of the task list for a network plan Configuration Wizards Whe...

Страница 39: ...ones that rarely need to be changed select the object in the table and then click Properties Resizing a Display Panel Click and drag the panel border or click the resize icons where applicable to res...

Страница 40: ...nizer and Task List panels are maximized and the Content panel is restored to its former size between the other two panels This option applies only to the Content panel Table 6 Resize Icons continued...

Страница 41: ...he message then use the Details tab See Displaying the Event Log on page 411 Import Import an WX configuration file into the currently open network plan Export Export an WX configuration file from the...

Страница 42: ...d policies in the Organizer panel To display the configuration settings in a policy click on the policy The settings appear in the Content panel To create a new policy click Policy in the Task List pa...

Страница 43: ...tribute certificates use the Device tab To review and either allow or disallow local and network changes or to schedule configuration deployment use the Changes tab To manage and distribute MSS softwa...

Страница 44: ...See Verifying Configuration Changes on page 377 Local Changes Lists the number of WX switch configuration changes that have occurred in 3WXM in the network plan since the last time the switches in the...

Страница 45: ...so can copy and paste objects listed in tables in the Content panel using the copy and paste icons See Copy and Paste in the Content Panel on page 46 To delete an object in a table select the object t...

Страница 46: ...zer Panel To replace an object with the Copy and Paste Replace options 1 Select the object you want to copy in the Organizer panel 2 Right click on the object and select Copy 3 Select the object you w...

Страница 47: ...board shortcut mnemonics also called action mnemonics in 3WXM underline shortcut characters in action names in toolbars and menus When a character is underlined you can press the corresponding letter...

Страница 48: ...4 Clear the box labeled Hide underlined letters for keyboard navigation until I press the Alt key Clearing this option allows programs to show the underlined character for mnemonics in 3WXM 5 Click O...

Страница 49: ...ollowing steps describe how to start 3WXM You must install a license key and activation key for the server before you can connect to the server and work with network plans To license a server you must...

Страница 50: ...you have not previously activated your licences a license message appears If you have already activated the license s you can do one of the following Edit the currently loaded network plan If this is...

Страница 51: ...encrypted and secure 802 1X wireless access For more information see the Wireless LAN Switch and Controller Quick Start Guide StarterKit Contains a simple rectangle as a floor plan but with one WX swi...

Страница 52: ...ter your registration information and the license key if you are licensing a purchased copy in order to obtain an activation key 9 Copy the activation key from the web page and paste it onto the Activ...

Страница 53: ...dialog box enter the IP address of a host running 3WXM Services leave this as 127 0 0 1 if the services are being run on this host and then click Next 17 After a connection is established to the spec...

Страница 54: ...vices Setup dialog box are unavailable Monitor User This account can only monitor the network When users with a monitor account open a network plan they can see configuration changes that have been de...

Страница 55: ...administrator account 1 Select Tools 3WXM Services Setup The 3WXM Services Setup dialog box appears 2 Click Access Control in the left column to display the Access Control page 3 Under Add User type a...

Страница 56: ...Type the administrator password again for verification 7 Click Save Deleting 3WXM User Accounts To delete a 3WXM user account 1 Select Services Setup to access the 3WXM Services Setup page 2 Click Acc...

Страница 57: ...de network You also can define a physical representation of the network sites buildings and floors In this case you can import drawings of your floor plans into the network plan or draw plan details m...

Страница 58: ...the box next to Open this Plan to open the plan in 3WXM after it is created 6 Click Create to save the network plan on the server The network plan settings appear in the Content panel and the followi...

Страница 59: ...ork plan is created in the config db directory of the 3WXM installation directory on the 3WXM Services host Each time you save a configuration change 3WXM saves the changes to the network plan You do...

Страница 60: ...connecting to the 3WXM Services host where the plan resides selecting Services Plan Management then specifying the name of the plan in the dialog The network plan is then opened in the 3WXM main windo...

Страница 61: ...object object name exists in both plans the copy of the object in the imported plan replaces the object in the open plan If both plans have the same floor name the floor in the plan you are importing...

Страница 62: ...uest to close the plan or exit the application Do one of the following Select Apply to save the changes and close the plan Select Discard to close the plan without saving the changes Select Cancel to...

Страница 63: ...o override another user s lock 1 Select Services Lock Management to access the 3WXM Lock Information page 2 A list of objects that have been locked appears 3 Select the object whose lock you want to d...

Страница 64: ...you can upload the configurations of the switches to 3WXM to have them included in a Mobility Domain Roaming Behavior For a client session to be considered a roaming session and not a new session the...

Страница 65: ...has little impact on roaming If the timeout lapses 802 1X processing is performed on the existing association Accounting and roaming history are not affected if the reauthentication is successful bec...

Страница 66: ...IP TCP 6 443 SSL management of a WX via Web View Port 443 is also the default port used by 3WXM Clients to communicate with a 3WXM server IP TCP 6 8821 Network Domain and Mobility Domain management T...

Страница 67: ...the Mobility Domain 7 Click Next 8 Select the switch to act as the seed switch for the Mobility Domain 9 Click Finish Enabling WX WX Security You can enable secure management communication among the...

Страница 68: ...el The Create Third Party AP wizard appears 4 In the Name box type a name for the access point You can use 1 to 32 characters with no punctuation except the following period hyphen or underscore _ 5 O...

Страница 69: ...smit power for the radio 17 To enable the radio select Enabled The radio for the access point must be enabled to be considered in channel allocation 18 In the SSID box type the service set identifier...

Страница 70: ...Network Plan If RF Auto Tuning is running on MAP radios in the network you can update the radios in the network plan with the channel and power settings currently in effect on the same radios in the n...

Страница 71: ...tool bar option 2 In the Task List panel select Upload WX 3 In the IP Address box type the IP address for the WX switch 4 In the Enable Password box type the enable password for the WX switch This pa...

Страница 72: ...re listed 4 Select the MAPs you want to convert into statically configured MAPs 5 Click Next 6 Select the temporary connections you want to convert into static connections 7 Click Finish Creating a Ne...

Страница 73: ...box type the name for the Network Domain 1 to 60 characters with no spaces or tabs 5 Click Next 6 In the Available Devices list select the WX switches you want to use as the Network Domain seeds 7 Cl...

Страница 74: ...74 CHAPTER 4 WORKING WITH NETWORK PLANS...

Страница 75: ...nt and generate RF network design information RF Planning Overview The 3WXM planning tools calculate the 3Com equipment you need how to configure it and where to install it all based on the informatio...

Страница 76: ...Organizer panel and select Create Building in the Task List panel If you are modifying an existing building click on the plus sign next to the site name to expand it then click on the name of the buil...

Страница 77: ...objects Undo last change Redo last change Group selected objects Ungroup selected objects Select all visible objects Assign layers to selected objects Create RF obstacle Edit properties Remove RF obs...

Страница 78: ...t panel A series of dialog boxes prompts you for information about the new site If you are modifying an existing site click on the plus sign next to the network plan to expand it then click on the nam...

Страница 79: ...nel then in the Change Country Code dialog select the country where the network is to be deployed 3 In the Channel Set 802 11b g list select the set of operating channels for any 802 11b g MAP radios...

Страница 80: ...u are modifying an existing building select the building name in the Content panel for the site then click Properties A dialog box allows you to edit the building properties In the Organizer panel cli...

Страница 81: ...want to model only certain floors in a building To enter a list of floors use commas to separate the floor numbers example 1 3 7 To enter a range use a hyphen example 8 12 6 Click OK to close the dia...

Страница 82: ...of the following If you are creating a new floor click on the building name in the Organizer panel and select Create Floor in the Task List panel A series of dialog boxes prompts you for information...

Страница 83: ...ing the floor specify the RF characteristics of the floor by specifying the attenuation of obstacles such as walls doors windows and others The attenuation of an object indicates how much the object a...

Страница 84: ...the first format you try does not import easily A GIF or JPG file is a raster graphics file a screenshot or background image which is not made of lines To add RF obstacle information you must manuall...

Страница 85: ...mation to the master file by selecting Insert Xref Manager selecting the file then clicking Bind Adding information from referenced files can increase the file size If the information you will need to...

Страница 86: ...d drag around all of the visible objects to select them Delete the objects CAUTION Do not use Ctrl A Select All in AutoCAD to select the objects to delete This option selects all of the objects in the...

Страница 87: ...r in TurboCAD 9 select Options Layers In AutoCAD select Format Layer To move objects to the new RF layers click drag to select objects select Modify Properties and change the objects layer Save the dr...

Страница 88: ...select Import Floor Layout 4 After navigating to the directory containing the drawing select it and click Open The drawing appears After importing a drawing 3WXM remembers the chosen directory If you...

Страница 89: ...d space and objects around the floor For example if the drawing includes parking lot information you can easily remove the parking lot by cropping CAUTION All objects that are outside the area you sel...

Страница 90: ...cancel the crop request click No If you click Yes all objects and paper space outside the area you selected are removed and the image is resized to fill the removed space Figure 1 on page 89 shows the...

Страница 91: ...lculating RF coverage 3WXM needs to understand where MAP access points on adjacent floors are located so that 3WXM can take RF from those MAPs into account when assigning channels If an imported drawi...

Страница 92: ...92 CHAPTER 5 PLANNING THE 3COM MOBILITY SYSTEM Origin point...

Страница 93: ...RF obstacles Generally only some layers contain details relevant to RF planning 3WXM allows you to hide layers to simplify a drawing 3WXM performs RF calculations only with information in visible laye...

Страница 94: ...anup criteria which you can modify See Cleaning Up a Drawing on page 95 You also can select and delete individual objects Hiding Layers With the drawing displayed in the Content panel click Layers in...

Страница 95: ...e down arrow to display the list of layers in the drawing and select the layer to which you want to move the object s 4 Click OK Cleaning Up a Drawing 3WXM can simplify an imported CAD drawing by remo...

Страница 96: ...from the drawing during cleanup 3WXM removes all these items by default 4 To change the short line length type the new length in the Short Line Length box 3WXM removes all lines that are this length...

Страница 97: ...ect the layers you want to clean up You can select individual layers or all layers 3WXM removes the specified objects only from the layers you select By default no layers are selected 8 Click Next The...

Страница 98: ...PLANNING THE 3COM MOBILITY SYSTEM 10 Perform one of the following Click Finish to accept the changes Click Previous to change the cleanup constraints Go back to step 2 on page 81 Click Cancel to cance...

Страница 99: ...he Free Draw area under Layout click one of the icons and draw the object as described in the following table Object Action circle Diagonally drag the cursor over the area where you want the circle to...

Страница 100: ...stacles and assign attenuation values to them This method is available for any floor plan See Drawing RF Obstacles on page 103 Import RF measurements from a site survey This method requires the Ekahau...

Страница 101: ...st of the layers in the drawing 2 Right click the list of layers in the Organizer panel 3 Select Create RF Obstacles from the menu that is displayed The Create RF Obstacle dialog box appears 4 Go to T...

Страница 102: ...up objects icon on the toolbar The grouped objects now appear as one object group 4 Right click and select Create RF Obstacle The Create RF Obstacle dialog box appears See To use the Create RF Obstacl...

Страница 103: ...RF obstacles for grouped objects each grouped object is converted into a single RF obstacle Drawing RF Obstacles 1 Display the floor plan in the Content panel 2 In the Task List panel click Tools 3 In...

Страница 104: ...method of adding RF obstacle data requires the following tools 3WXM 4 1 or higher Ekahau Site Survey Tool www ekahau com and a laptop PC on which to run the tool when you take measurements An AP on w...

Страница 105: ...ing LOS Points on page 106 You can place the LOS points at the places where you are thinking of installing the permanent MAPs but this is not a requirement 3 In 3WXM generate a site survey order The s...

Страница 106: ...MAC address for multiple locations the RF measurement data will be inaccurate While conducting the survey Walk slowly and evenly and click at each turn Walk completely around the area you are surveyi...

Страница 107: ...acteristics of a Floor 107 5 Click Yes next to File 6 In the File Format listbox select Ekahau 7 Click Choose to navigate to the csv file that contains the LOS points 8 Click Next The MAC addresses of...

Страница 108: ...dio types Select the MAC addresses for the radio types you want to use in the network 10 Click Finish 11 Place the LOS points on the floor plan Click Objects to Place in the Organizer panel to display...

Страница 109: ...Organizer Panel To create LOS points in 3WXM 1 Display the floor plan in the Content panel 2 In the Task List panel click Tools 3 Under Site Survey click the icon 4 On the floor plan click on the loca...

Страница 110: ...ype or model of AP you plan to use for the portable AP If the model is not listed select AP Dual Radio for a dual radio AP or AP Single Radio for a single radio AP 7 In the Radio Type listbox select t...

Страница 111: ...1 In the MAC Address box type the MAC address you want to use for this position of the AP To ensure valid site survey results you must use a unique MAC address for each LOS point 12 If the AP model yo...

Страница 112: ...2 Move the cursor to the floor location where you want to place the LOS 3 Click to place the LOS You cannot delete an LOS point directly from the Objects To Place tab To delete an LOS point place the...

Страница 113: ...lect the language for the site survey order English German 6 To specify the output directory for the site survey order click the button below Output Directory and navigate to the directory where you w...

Страница 114: ...order to set up the survey When you import the floor map into the site survey tool make sure you use the map name specified in the work order The site survey data will not appear when you import RF m...

Страница 115: ...me must match the name specified in the site survey work order and must be the same map name used in the site survey tool 8 Click Next The import progress is displayed When the import is done check th...

Страница 116: ...they are measurements between MAP radios The Total number of objects that will be corrected line indicates the number of measurements that did experience attenuation For existing RF objects 3WXM corre...

Страница 117: ...eas For areas requiring multiple wireless technologies two completely overlapping coverage areas are created one for 802 11a and one for 802 11b g You define coverage by creating the following items W...

Страница 118: ...or in the building To create a wiring closet 1 Display the floor plan in the Content panel 2 In the Task List panel click Tools 3 In the Wiring Closer Misc area under Coverage Area click the Insert Wi...

Страница 119: ...ically on your floor plan You perform the following tasks to define a coverage area 1 Drawing a Coverage Area on page 121 2 Specifying the Wireless Technology for a Coverage Area on page 123 3 Specify...

Страница 120: ...eparate nonshared coverage areas can overlap Figure 6 Unsupported Shared Coverage Area Example Keep the following in mind when planning shared coverage areas Two coverage areas using the same wireless...

Страница 121: ...with a less complicated shape When drawing a coverage area make sure it extends just short of external walls If the coverage area includes external walls 3WXM accounts for the external walls when comp...

Страница 122: ...sh polygon 1 Click at a vertex then move the cursor to the next vertex 2 Repeat until the polygon takes the shape you want For a polygon with n sides click n 1 additional times at the vertices For exa...

Страница 123: ...lect 802 11a and 802 11g if the area requires 802 11a and 802 11g coverage When you specify a coverage area requiring different technologies 3WXM creates two areas that completely overlap each other o...

Страница 124: ...ation rate for typical clients in this coverage area 3 For 802 11g to prevent the association of 802 11b clients to any radio in this coverage area select Exclude 802 11b clients To allow 802 11b clie...

Страница 125: ...s for the coverage area if they are different from the defaults for the floor 1 To change the ceiling height specify the new height in the Height of the Ceiling box 2 To change the height where MAPs a...

Страница 126: ...e listed 3 To change the MAP connection type select the type from the AP Connection Type list Direct MAPs are directly attached to dedicated WX switch ports Distributed MAPs can be indirectly attached...

Страница 127: ...ecifying Redundancy Computation for MAPs in the Coverage Area on page 127 If you selected Distributed Auto in the AP Connection Type list the Capacity Planning for Data page appears Go to Configuring...

Страница 128: ...ibuted from the MAP Connection Type list WX4400 switches support indirect MAP connections only 3 To change the number of redundant connections for the distributed connection type type the number in th...

Страница 129: ...ions 2 In the Per Station Throughput list specify the throughput combined transmit and receive in kilobits per second Kbps for a station The throughput value cannot exceed the value you selected for t...

Страница 130: ...calculations and selects the calculation that results in more MAPs 1 To calculate MAP placement and configuration based on both coverage and on capacity for voice over IP enable Use Capacity Calculati...

Страница 131: ...o be in the coverage area 5 In the Handset Oversubscription Ratio list select the ratio for the average transmit behavior of the voice over IP phones The handset oversubscription ratio is the ratio of...

Страница 132: ...loset that contains the WX switch or switches to be connected to the shared MAP access points If the MAPs will be directly connected to WX switches a wiring closet is required A wiring closet is not r...

Страница 133: ...lick Properties The Coverage Area Properties dialog for the selected coverage area appears You can also display this dialog by displaying the floor plan selecting Coverage Areas in the Organizer panel...

Страница 134: ...Under the Capacity tab you can do the following To calculate MAP placement and configuration based on coverage and on capacity for data enable Use Capacity Calculation for Data In the Per Station Thr...

Страница 135: ...listed If you select default the default radio profile settings are applied to the coverage area For information about policies see Configuring and Applying Policies on page 387 In the Shared Area lis...

Страница 136: ...that assigns a Distributed MAP number and name to the MAP from among the unused valid MAP numbers available on the switch The profile also configures the MAP with the MAP and radio parameter settings...

Страница 137: ...ox This assumes that the network plan already has a WX switch defined If you are planning a new installation you do not need to specify a WX switch to use 11 When you have finished editing the propert...

Страница 138: ...AP 4 On the floor plan click on the location where you want to place the AP You must click in a coverage area 3WXM removes the AP from the Objects to Place list and places an icon for it on the floor...

Страница 139: ...1 to 30 characters with no spaces 7 In the Product ID box type the product identification for the access point 1 to 30 characters with no spaces 8 In the IP Address box type the IP address for the acc...

Страница 140: ...of the following AP Dual Radio 802 11a and 802 11b or 802 11b g AP Single Radio 802 11a 802 11b or 802 11g 13 In the Radio Type drop down list select one of the following 11a 11b 11g The choices avai...

Страница 141: ...dio 18 To enable the radio select Enabled For channel allocation to be considered enable the radio of the access point 19 In the SSID box type the service set identifier SSID for the radio 20 In the M...

Страница 142: ...r click the Network Verification tab and upload the MAP configuration into 3WXM See Verifying Configuration Changes on page 377 2 Select the RF Planning option in the main 3WXM tool bar and display th...

Страница 143: ...rage area 3WXM shows the expected simulated coverage of the completed design and allows you to see how the coverage changes when you make adjustments to MAP location or power levels Computing and Plac...

Страница 144: ...pute and place MAPs 1 Specify design constraints See To specify design constraints 2 Compute and place MAPs See To compute and place MAPs on page 147 3 Review coverage area computation progress See To...

Страница 145: ...er required select Allow Deletion of Locked MAPs A locked MAP is a MAP that is already associated with the coverage area For example if you computed and placed MAPs in this coverage area on a previous...

Страница 146: ...efault behavior preserves any constraint changes you make to individual areas when you configure them 14 Select the coverage areas for which you want to apply constraints To select a coverage area cli...

Страница 147: ...iring closet for directly attached MAP access points Specifying the primary wiring closet for distributed MAPs is optional 6 To specify the redundant wiring closet for a coverage area click in the Red...

Страница 148: ...rage area computation To review coverage area computation 1 Review the number of MAPs required for each coverage area and the overriding criterion used coverage or capacity 2 Click Finish to apply the...

Страница 149: ...logy you chose for the coverage area The following graphic shows an example of the 802 11b coverage for an area 3 To see the RF coverage area for a specific MAP or radio right click the MAP or radio a...

Страница 150: ...age area 3WXM automatically locks the area Unlock the coverage area if you need to move or resize it To unlock a coverage area 1 Select the coverage area on the floor or from the Coverage Areas list i...

Страница 151: ...ock You can no longer move the MAP Assigning MAP Channels If you do not plan to use the RF Auto Tuning feature to automatically set the channels on the MAPs after deployment and installation use the A...

Страница 152: ...must be lower than or equal to the starting floor number 5 To change the radio type for which to assign channels select the radio type from the Technology list By default 3WXM assigns channels for all...

Страница 153: ...oyed and managed by 3WXM the channel number is changed to match the results of channel assignment However the channel is not changed for MAPs that are running in the live network and are being managed...

Страница 154: ...Computing Optimal Power If you do not plan to use the RF Auto Tuning feature to automatically set the power levels on the MAPs after deployment and installation use the Compute Optimal Power option t...

Страница 155: ...overage not capacity Unless you disabled the option to place MAPs based on capacity do not select the Optimize AP Count option 4 Select Compute Power for the areas for which you want to compute power...

Страница 156: ...t each of the data transmit rates supported by the radio These rates are standard for each radio type RSSI Coverage is shown based on the received signal strength indication RSSI heard by other radios...

Страница 157: ...do the following 3 In the Coverage Areas section of the Organizer panel navigate to the floor 4 Expand the floor to display its coverage areas 5 Right click on a coverage area and select DIsplay RF C...

Страница 158: ...the floor 3 Modify the coverage area so that the capacity requirements are higher If you manually add MAPs to a coverage area they might be moved or removed when you next perform Compute and Place If...

Страница 159: ...ers 6 In the RSSI Options box select display options for the dialog box To list access points that cannot be detected from this RF measurement point select Show Unreachable MAPs To list disabled acces...

Страница 160: ...l strengths for any location on the floor To use the RF interactive measurement mode 1 Click the icon in the toolbar 2 Click any location on the floor Received signal strength indication RSSI measurem...

Страница 161: ...anel Show Unreachable APs Show MAPs that are too far away to accurately measure signal strength Show Disabled APs Show all disabled MAPs Show APs on Other Floors Show the MAPs located on other floors...

Страница 162: ...rk order shows where the MAPs should be installed WX initial setup configuration information and projected RSSI information that is useful when verifying the installation After deployment you can gene...

Страница 163: ...click Choose The Select dialog box appears 7 Navigate to the directory you want and click Select 3WXM uses this directory when generating subsequent reports 8 Click Generate Work Order The work order...

Страница 164: ...164 CHAPTER 5 PLANNING THE 3COM MOBILITY SYSTEM...

Страница 165: ...you are planning to use 3WXM to configure switches in a remote office see Configuring WX Switches Remotely on page 345 WX Switch Configuration Objects Configuration objects for WX switches are organiz...

Страница 166: ...es Telnet Controls Telnet management access to the WX switches SSH Controls Secure Shell SSH management access to the WX switches Web Portal Controls web based login of network users clients SNMP Conf...

Страница 167: ...Wireless Services Settings for SSIDs to provide network services Wizards are provided for configuring the following types of services 802 1X voice Web Portal open access and custom See Viewing and Co...

Страница 168: ...ings on page 317 802 1X Access Rules Access rules for 802 1X clients See Viewing and Configuring 802 1X Network Access Rules on page 320 MAC Access Rules Access rules for MAC clients See Viewing and C...

Страница 169: ...stem on page 75 Creating a WX Switch Using the Create Wireless Switch Wizard 1 Select the Configuration tool bar option 2 In the Organizer panel select the network plan name 3 In the Task List panel s...

Страница 170: ...nes the interface or source IP address MSS uses for system tasks including the following Mobility Domain operations Topology reporting for dual homed MAP access points Default source IP address used i...

Страница 171: ...es and close the wizard 15 Edit other parameters as required See the rest of this chapter and the following two chapters Adding a Switch by Uploading its Configuration from the Network If you have alr...

Страница 172: ...he port state in the dialog and then close the dialog The changes take effect on of all the selected ports Reviewing and Deploying Changes 3WXM does not automatically deploy switch configuration chang...

Страница 173: ...5 In the Enable Password box type the enable password for the WX This password must match the enable password that was defined on the switch using the CLI command set enablepass For more information s...

Страница 174: ...ility Domain finish creating the switch then create the Mobility Domain Select the switch in the Organizer panel to display its basic settings in the Content panel and select the Mobility Domain from...

Страница 175: ...option 2 In the Organizer panel select the WX switch 3 In the Task List panel select System Setup The System Setup wizard appears 4 Read the first page then click Next 5 Optionally create a static rou...

Страница 176: ...ribed in SNMPv3 RFCs AuthRequest UnsecuredNotify SNMP message exchanges are authenticated but are not encrypted and notifications are neither authenticated nor encrypted The only security level suppor...

Страница 177: ...tions read write notify An SNMP management application using the string can get and set object values on the switch The switch can use the string to send notifications i Click Next 8 Configure VLANs V...

Страница 178: ...Profile Provides wireless access to clients without requiring them to log in Custom Service Profile Provides wireless access based on the combination of options you choose Use this option only if non...

Страница 179: ...eporting for dual homed MAP access points Default source IP address used in unsolicited communications such as AAA accounting reports and SNMP notifications 6 To enable the switch to be managed by 3WX...

Страница 180: ...To change the wiring closet membership for the switch select the closet from the Wiring Closet drop down list To leave the switch out of all wiring closets select Not Assigned 11 Click Save Changing...

Страница 181: ...ct the number of hours between 23 and 23 to subtract from or add to UTC 6 Optionally in the Offset Minutes box select the number of minutes between 59 to 59 to subtract from or add to UTC 7 In the DST...

Страница 182: ...System Information wizard appears 4 In the Contact box type the contact name for the WX 5 In the Location box type the location of the WX 6 In the Prompt box type the CLI prompt for the WX If you do...

Страница 183: ...ool bar option 2 In the Organizer panel select the WX switch 3 In the Task List panel select Convert Auto APs The Convert Auto APs wizard appears The MAPs that were configured using a Distributed MAP...

Страница 184: ...gh the network by 3WXM Services This option also requires the Managed option for the switch to be enabled See step 6 in Modifying Basic Switch Parameters on page 179 1 Select the Configuration tool ba...

Страница 185: ...ettings appear in the Content panel The 10 100 Ethernet ports and the gigabit Ethernet ports if the switch has them are listed separately Changing Port Settings To change settings for a port edit the...

Страница 186: ...interface RJ45 Enables the copper interface and disables the fiber interface The port supports only the physical interface you select The other interface is disabled The port cannot dynamically switc...

Страница 187: ...lect AP 2 To change the name edit the string in the Name field The name can contain up to 16 alphanumeric characters with no spaces or tabs 3 Click Next 4 To change the model select the model from the...

Страница 188: ...rohibits a client from sending traffic directly to the MAC address of an authenticator until the client is authenticated Instead of sending traffic to the MAC address of an authenticator the client se...

Страница 189: ...ly if the switch does not have an 802 1X or MAC authentication rule for wired access that matches the username or MAC address of the client and the client is not denied by either method Web Portal req...

Страница 190: ...dd i Click Finish j Click Next 6 To use MAC authentication to control access to the port create or select a MAC authentication rule Otherwise go to step 7 If a MAC access rule for this port has alread...

Страница 191: ...ser is authenticated the ACEs are not used If you need to add ACEs continue with this step Otherwise go to step 9 To add an ACE click Add Rule 3WXM adds an ACE to the end of the list The ACE matches o...

Страница 192: ...en Access in step 2 select the VLAN to which you want the switch to assign users Otherwise go to step 12 Click Finish to close the wizard and save the changes You are finished with this procedure 12 C...

Страница 193: ...before it failed continues to be assigned to other ports Layer 2 configuration changes apply collectively to a port group as a whole but not to individual ports within the group For example Spanning...

Страница 194: ...ck Finish Changing a Port Group To change a port group 1 In the Content panel select the row for the port group 2 Click Properties The Port Group Properties wizard appears 3 To add a port to the port...

Страница 195: ...to the WX switch 3 Click the plus sign next to System 4 Select Management Services The management services and their settings appear in the Content panel Changing Management Service Settings To chang...

Страница 196: ...d 3WXM Services as an SNMP notification target to the switch For simple configuration of 3WXM Services as an SNMP notification target see Setting Up a Switch on page 175 1 Click the checkbox next to S...

Страница 197: ...If you enable SNMP service on the WX 3Com recommends that you do not use the well known strings public for READ or private for WRITE These strings are commonly used and can easily be guessed 3 Select...

Страница 198: ...et them The switch can use the string to send notifications notify only The switch can use the string to send notifications read write An SNMP management application using the string can get and set o...

Страница 199: ...format type a 16 byte hexadecimal string for MD5 or a 20 byte hexadecimal string for SHA If you selected Pass Phrase as the format type a string at least 8 characters long 7 Select the encryption typ...

Страница 200: ...To enable all notification types click the Enable checkbox at the top of the list 4 Click Finish Configuring a Notification Target A notification target is a remote device to which MSS sends SNMP noti...

Страница 201: ...ion profile The name can be 1 to 32 alphanumeric characters with no spaces or tabs c Click Next d Click the checkbox next to each notification type you want to enable To enable all notification types...

Страница 202: ...ice on the WX 3Com recommends that you do not use the well known strings public for READ or private for WRITE These strings are commonly used and can easily be guessed c Select the access type read no...

Страница 203: ...S calculates the engine ID based on the address LocalID Uses the value computed from the system IP address for the switch To send informs you must specify the engine ID of the inform receiver To send...

Страница 204: ...get on page 200 Configuring 3WXM Services as a Notification Target 1 Access the Setup 3WXM Notification Target wizard a Select the Configuration tool bar option b In the Organizer panel click the plus...

Страница 205: ...community string a If a list of community string is displayed select Create new Community and click Next b In the Community String box type the name of the community The name can be 1 to 32 alphanumer...

Страница 206: ...nly The switch can use the string to send notifications notify read write An SNMP management application using the string can get and set object values on the switch The switch can use the string to s...

Страница 207: ...keyword such as authentication or sm to trace activity for a particular feature such as authentication or the session manager CAUTION Setting traces can have adverse effects on system performance 3Com...

Страница 208: ...b In the Severity Filter list select the lowest level of severity of the event or condition to be logged see the list in step 2 The default severity level is Error 4 Configure logging to the current...

Страница 209: ...rity of the event or condition to be logged see the list in step 2 on page 207 The default severity level is Error 4 To map all the facilities to a standard local facility select Facility Mapping Some...

Страница 210: ...ess to trace Specify a MAC address using colons to separate the octets for example 00 11 22 aa bb cc 6 Optionally in the Port Name box type the port number to trace 7 Click Finish Viewing and Configur...

Страница 211: ...herwise MSS uses a default route For more information about static routes see the Configuring and Managing IP Routes section in the Configuring and Managing IP Interfaces and Services chapter of the W...

Страница 212: ...Host IP Address box type the IP address that the IP alias is mapped to 4 Click Finish Configuring DNS You can configure the WX switch to resolve hostnames to their IP addresses by querying a Domain N...

Страница 213: ...NTP polls network time servers at regular intervals and synchronizes the system date and time with the servers By default NTP is not enabled You can specify up to three NTP servers If NTP is configure...

Страница 214: ...age out and remain in the table even after the WX is rebooted In addition to adding permanent ARP entries you can set the amount of time unused dynamic entries remain in the table before they are remo...

Страница 215: ...Users who require authentication connect through WX ports that are configured for MAPs or wired authentication access Users are assigned to VLANs automatically through authentication and authorizatio...

Страница 216: ...the user is assigned to the switch can tunnel traffic for the user through another switch that is a member of the VLAN For more information about Mobility Domains see Defining a Mobility Domain on pag...

Страница 217: ...ber of a VLAN the VLAN name is listed in the VLAN s column To select multiple VLANs press Shift while clicking to select contiguous items or press Control while clicking to select noncontiguous items...

Страница 218: ...ports the IEEE 802 1Q tag type described in the IEEE 802 1Q specification The tagging capabilities of the WX are flexible You can assign 802 1Q tag values on a per VLAN per port basis The same VLAN ca...

Страница 219: ...Tag Value field By default the tag value of a port or port group the same as the VLAN ID 8 Click OK Changing VLAN Spanning Tree Settings The purpose of the Spanning Tree Protocol STP is to maintain a...

Страница 220: ...P features for an individual VLAN but does not configure fast convergence features which are global See Enabling STP Fast Convergence Features on page 222 4 To enable STP click Enabled 5 In the Bridge...

Страница 221: ...f STP is enabled on the VLAN spanning tree packets are dropped at the port If STP is disabled on the VLAN spanning tree packets are forwarded transparently through the VLAN to and from that port 6 In...

Страница 222: ...t is not directly connected to the link does not detect the link change until the maximum age timer expires Backbone fast convergence enables the WX switch to listen for bridge protocol data units BPD...

Страница 223: ...f the group IGMP is especially useful for WLANs because bandwidth is relatively constrained The WX listens for multicast packets and maintains a table of multicast groups as well as their sources and...

Страница 224: ...response to a group query after receiving a leave message for that group before removing the group The default value is 10 tenths of a second 1 second 11 In the Robustness Value box specify the robus...

Страница 225: ...t traffic To add or remove static multicast router and receiver ports 1 Access the VLAN table a Select the Configuration tool bar option b In the Organizer panel click the plus sign next to the WX swi...

Страница 226: ...specified default routers You can specify up to four default router MAC addresses The addresses must be unicast not multicast or broadcast For networks with IP only clients you can restrict client to...

Страница 227: ...VLAN WX switches configured to comprise a Mobility Domain allow users to roam seamlessly across MAP access points and across WX switches Although a WX that is not a member of a user s VLAN cannot dire...

Страница 228: ...uick Start Optionally you can configure the DHCP server to also provide IP addresses to Distributed MAPs and to clients Use of the MSS DHCP server to allocate client addresses is intended for temporar...

Страница 229: ...ho receive IP addresses from this VLAN enter the domain name in the DNS Name box 9 To specify the default router gateway for hosts who receive IP addresses from this VLAN enter the address in the Defa...

Страница 230: ...ts access in an ACL no traffic will be allowed The implicit deny all rule is always the last ACE of an ACL You can choose to count the number of times an ACE is matched This hit count is useful for tr...

Страница 231: ...ettings on page 235 The ACL table might contain an ACL named portalacl This ACL is created automatically if you enable Web Portal be changing the fallthru authentication type on a service profile or w...

Страница 232: ...nning at the top Because the action in the first ACE that matches a packet is used the order the ACEs appear in is important You can reorder them See step 13 4 Specify the source IP address by clickin...

Страница 233: ...t Number box IP Protocol Number Protocol 1 Internet Control Message Protocol ICMP 2 Internet Group Management Protocol IGMP 6 Transmission Control Protocol TCP 9 Any private interior gateway used by C...

Страница 234: ...e 0 Packets with routine precedence are filtered Priority 1 Packets with priority precedence are filtered Immediate 2 Packets with immediate precedence are filtered Flash 3 Packets with flash preceden...

Страница 235: ...CoS box By default the CoS value is 1 any 12 Repeat step 3 to step 11 for each ACE 13 To reorder the ACEs select an ACE and click the up or down arrow to move it 14 Click OK to save the ACL The ACL a...

Страница 236: ...ype the number of seconds between updates in the Hit Sample Rate box 3 Click OK To enable the hit counter for an ACE You can enable the hit counter on an individual ACE basis 1 Select the ACE in the A...

Страница 237: ...this rule unless you are certain you need to do so If the rule does not have the capture option the Web Portal user never receives a login page Table 17 ICMP Messages and Codes ICMP Message Type Numb...

Страница 238: ...n ACL to a MAP port or a wired authentication port You also can map ACLs to user by configuring the filter in and filter out user attributes User based ACLs are more specific than ACLs applied to inte...

Страница 239: ...st select the port to which you want to map the ACL You cannot map an ACL to a MAP port or a wired authentication port c In the Direction list select In to filter incoming packets or Out to filter out...

Страница 240: ...Individual ACE from an ACL To delete an individual ACE from an ACL 1 Access the ACL table a Select the Configuration tool bar option b In the Organizer panel click the plus sign next to the WX switch...

Страница 241: ...hen forward the traffic based on the priority MSS performs classification on ingress to determine the CoS value This CoS value is used to mark the packet at the egress interface The classification and...

Страница 242: ...In the CoS column of the DSCP to CoS table use the arrows to select the new value or type the new value 3 Click Save Changing a CoS to DSCP Mapping To change the mapping between an internal CoS value...

Страница 243: ...SCP list select the lower DSCP value in the range 4 In the Last DSCP list select the upper DSCP value in the range 5 In the CoS value list select the internal CoS value to which you want MSS to map al...

Страница 244: ...244 CHAPTER 6 CONFIGURING WX SYSTEM PARAMETERS...

Страница 245: ...izards to configure the following types of wireless services 802 1X Service Profile Provides wireless access to 802 1X clients Voice Service Profile Provides wireless access to Voice over IP VoIP devi...

Страница 246: ...Based on service profile type Secure 802 1x Voice Web Portal Open Custom service profiles do not have a default name SSID name SSID name with wireless clients will associate Blank no default value SS...

Страница 247: ...tandard AES with Counter Mode with Cipher Block Chaining Message Authentication Code Protocol CCMP Temporal Key Integrity Protocol TKIP WEP with 104 bit keys WEP with 40 bit keys TKIP Authentication m...

Страница 248: ...e You can restrict access by specifying part of the username or MAC address along with a wildcard In this case only the usernames or MAC addresses that match the partial username or address are allowe...

Страница 249: ...amples of using wildcards in MAC addresses all MAC addresses 00 00 01 00 01 02 00 01 02 03 00 01 02 03 04 00 01 02 03 04 0 To view the access rules of a service profile see Viewing SSID Encryption Set...

Страница 250: ...fic to a RADIUS server for EAP processing If you select PEAP the EAP Sub Protocol is MS CHAPV2 For other protocols the EAP Sub Protocol is None Other access types do not use EAP AAA Methods RADIUS Ser...

Страница 251: ...Wireless Services The service profiles appear in the Content panel Each row in the table shows settings for an individual service profile To display all settings for a service profile select the serv...

Страница 252: ...CCMP Usually used with RSN WPA2 TKIP Usually used with WPA WEP 104 Used with dynamic WEP WEP 40 Used with dynamic WEP 9 Click Next 10 Select the EAP type EAP MD5 Offload PEAP Offload Local EAP TLS Ext...

Страница 253: ...s you want to manage with the radio profile and click Move to move them to the Current Members list If you have not planned RF coverage or configured any MAPs in the network plan yet no radios are lis...

Страница 254: ...VP or Avaya phones 7 Click Next The next step depends on the encryption type you selected in step 5 If you selected Encrypted go to step 8 If you selected Clear go to step 18 8 Select the access type...

Страница 255: ...ither type of packet select the key number in the WEP Unicast Key Index or WEP Multicast Key Index box 17 Click Next 18 Select or type the name of the VLAN into which you want the switch to place voic...

Страница 256: ...radio profile and go to step 23 To create a new radio profile a Select Create new Radio Profile and click Next b Type the radio profile name in the Name box and click Next c Select the radios you want...

Страница 257: ...5 configure the encryption settings Go to step 7 If you selected Clear in step 5 go to step 15 7 Select the security modes you want the SSID to support You can select one or more of the following RSN...

Страница 258: ...r the Web Portal service are listed The ACEs are required to allow DHCP traffic while blocking all other traffic while a user is being authenticated These ACEs are used only during authentication Afte...

Страница 259: ...page 299 20 Select or create the radio profile to map to this service profile By default the default radio profile is selected To map the service profile to the default radio profile leave default sel...

Страница 260: ...g on the switch 4 Type the SSID name in the SSID box 5 Select the SSID type from the SSID Type drop down list Encrypted Traffic on the SSID is encrypted Clear Traffic on the SSID is unencrypted 6 Clic...

Страница 261: ...ing the access rules you can leave the VLAN Name box blank 16 Select or create the radio profile to map to this service profile By default the default radio profile is selected To map the service prof...

Страница 262: ...dify the following service profile settings in the Wireless Service Profiles table itself SSID name SSID type encrypted or clear Beacon state advertisement of the SSID Radio profile maps MAP radios to...

Страница 263: ...ler Configuration Guide WPA RSN Tab Most of the settings on the WPA RSN tab are explained in the sections on the service profile wizards The TKIP Countermeasures Time specifies how many ms the switch...

Страница 264: ...ARP requests for their IP addresses DHCP Restrict WX captures and does not forward any traffic except DHCP traffic for a wireless client who is still being authenticated and authorized No Broadcast Se...

Страница 265: ...y selected for Vocera voice service profiles Max Sessions When the CAC mode is Sessions it specifies the maximum number of active sessions radios can have for the SSID The default is 12 Short Retry Co...

Страница 266: ...e at which the radio sends beacon SSID advertisement frames and probe response frames The valid rates depend on the radio type and are the same as the mandatory rates However you cannot set the beacon...

Страница 267: ...ure SODA is an endpoint security solution that allows enterprises to enforce security policies on client devices without having to install any special software on the client machines WX switches can b...

Страница 268: ...ption settings and access rules of an SSID from the Service Profile table 1 Display the Wireless Service Profiles table a In the Organizer panel click on the plus sign next to the WX switch on which t...

Страница 269: ...lick Properties A Network Access Properties wizard containing the configuration settings for the access rule appears Modifying SSID Encryption Settings and Access Rules You can create access rules for...

Страница 270: ...box and click Generate 4 Click Next 5 Select the encryption algorithms to use AES CCMP Usually used with RSN WPA2 TKIP Usually used with WPA WEP 104 Used with dynamic WEP WEP 40 Used with dynamic WEP...

Страница 271: ...ant to modify and edit or select the new value For information about ACE settings see Viewing and Configuring ACLs on page 230 Do not change the deny rule at the bottom of the ACL This rule must be pr...

Страница 272: ...o profile as part of a domain policy and apply it to MAPs on different WX switches 3Com recommends that you create a new radio profile and leave the default radio profile unchanged as a backup The def...

Страница 273: ...adio Profile 2 In the Name box type the name of the radio profile 1 to 16 characters with no spaces or tabs 3 Click Next 4 To add radios to the profile a Select the radios in the Available Members lis...

Страница 274: ...abs Radio Profile 802 11 Attributes Auto Tune Service Profile Selection Radio Selection Voice Configuration Radio Profile Tab The Radio Profile tab lists settings for the following options Name Radio...

Страница 275: ...olicit probe responses from other access points Radios also passively scan by listening for beacons and probe responses When active scan is disabled radios perform passive scanning only Enable RFID En...

Страница 276: ...adios Auto Tune Tab The Auto Tune tab lists settings for RF Auto Tuning Tune Channel Automatically configures and tunes the channel This feature is enabled by default RF Auto Tuning of channels on 802...

Страница 277: ...pecify from 0 to 65535 seconds The default channel interval is 900 seconds Tx Power Backoff Timer Interval at which radios reduce power after temporarily increasing the power to maintain the minimum d...

Страница 278: ...ing a Directly Connected MAP on page 284 and Creating a Distributed MAP on page 282 After configuring the MAPs return to this wizard page to apply the radio profile to radios Voice Configuration Tab T...

Страница 279: ...ol SSIDs encryption parameters or any other parameters managed by service profiles You still need to configure a service profile separately for each SSID A WX switch can have one Auto DAP profile View...

Страница 280: ...MAP selects the switch that has only 50 active MAPs Bias applies only to WX switches that are indirectly attached to the MAP through an intermediate Layer 2 or Layer 3 network A MAP always attempts to...

Страница 281: ...rt The WX 10 100 port provides PoE to the MAP The WX also forwards data only to and from the configured MAP on that port The port numbers on the WX configured for directly attached MAPs reference a pa...

Страница 282: ...n to a WX or indirectly through other Layer 2 or Layer 3 wired networking devices Configure a Distributed MAP for each indirectly connected MAP Table 20 lists how many MAPs you can configure on a WX s...

Страница 283: ...of the encryption fingerprint for the MAP Use either of the following formats 11 22 33 44 55 66 77 88 99 aa bb cc dd ee ff 00 1122 3344 5566 7788 99aa bbcc ddee ff00 The fingerprint for a MAP is the h...

Страница 284: ...lick Finish Configuring a Directly Connected MAP MAPs contain radios that provide networking between your wired network and IEEE 802 11 wireless users A MAP can connect to the wired network through a...

Страница 285: ...ct Directly Connect AP 3 Select the WX port the MAP will be connected to from the Available Ports drop down list Configuring a directly connected MAP in a port converts the port to a MAP access port I...

Страница 286: ...his step for the other radio Otherwise go to step 11 11 Click Finish Setting Up AP Redundancy You can configure redundant WX connections for MAPs in the network Only AP models that have two Ethernet p...

Страница 287: ...elect the WX switch the MAP will use for a redundant connection and click OK 3 To remove all redundant connections for an MAP select the MAP and click Clear Connections 4 To create a direct redundant...

Страница 288: ...the Task List panel select AP model 2 Select the new MAP model number from the drop down list 3 Click OK Changing the Radio Type for an MAP To change the radio type for an MAP 1 Access the Change AP M...

Страница 289: ...the switch A change to this setting affects only new management sessions established after deploying the change to the switch The change does not affect existing sessions Configuring Advanced MAP Set...

Страница 290: ...te Layer 2 or Layer 3 network A MAP always attempts to boot on MAP port 1 first and if the MAP is directly attached to a WX switch on MAP port 1 it boots from that switch regardless of the bias settin...

Страница 291: ...icated by an arrow To show the RF coverage for the antenna select the MAP right click and select Display RF Coverage and the radio type from the drop down list To adjust the coverage select the MAP ri...

Страница 292: ...can view or change radio settings after the MAPs are configured Viewing Radio Settings To view radio settings 1 Select the Configuration tool bar option 2 In the Organizer panel click the plus sign n...

Страница 293: ...ermit lists the ignore list and the black list However you must enter the SSID Organizationally Unique Identifier OUI or MAC address you are adding to a list To add a value to a list by selecting it u...

Страница 294: ...panel Go to step 6 6 Edit the OUI in the Vendor OUI box 7 Select the device type from the Type drop down list Client AP or All both client and AP 8 Click OK 9 Click Add to move the OUIs to the Permit...

Страница 295: ...the RF detection settings a Select the Configuration tool bar option b In the Organizer panel click the plus sign next to the WX switch c Click the plus sign next to Wireless d Select RF Detection 2 I...

Страница 296: ...ce if no client connected to the device has been detected communicating with any network entity listed in the forwarding database FDB of any WX switch in the Mobility Domain Although the interfering d...

Страница 297: ...at MAP to MSS If someone attempts to spoof management packets from a 3Com MAP MSS can detect the spoof attempt 1 Access the RF detection settings a Select the Configuration tool bar option b In the Or...

Страница 298: ...298 CHAPTER 7 CONFIGURING WIRELESS PARAMETERS...

Страница 299: ...for clients of third party APs Location policies for overriding authorization parameters assigned by AAA to network clients Mobility profiles for controlling network client access to specific MAP por...

Страница 300: ...u can configure authorization attributes for users Authorization attributes specify the network resources the user can access The most commonly used attribute is VLAN Name which specifies the VLAN to...

Страница 301: ...group If you do select a user group you only need to specify a password for the user All other attributes are obtained from the user group 5 To set authorization attributes for the user click Next and...

Страница 302: ...ttributes in another way such as configuring default AAA attribute values for the SSID the user will access click Finish 3 In the VLAN Name box select or type the VLAN that the user group belongs to 1...

Страница 303: ...gured 4 To set authorization attributes for the user click Next and go to step 5 Otherwise if you plan to set authorization attributes in another way such as adding the user to a group or configuring...

Страница 304: ...zation attributes in another way such as configuring default AAA attribute values for the SSID the user will access click Finish 4 In the VLAN Name box select or type the VLAN that the group belongs t...

Страница 305: ...access by the client Clients who attempt to use an unauthorized encryption method are rejected Encryption Type is a 3Com vendor specific attribute VSA The vendor ID is 43 and the vendor type is 3 One...

Страница 306: ...filter id can specify up to two ACLs Any of the following are valid filter id Profile acl1 filter id OutboundACL acl2 filter id Profile acl1 OutboundACL acl2 Each example goes on a single line on the...

Страница 307: ...2 Framed for network user access 6 Administrative for administrative access with authorization to access the enabled configuration mode The user must enter the enable command and the correct enable p...

Страница 308: ...and the service profile must be used by a radio profile assigned to 3Com radios in the Mobility Domain start date Date and time at which the user becomes eligible to access the network MSS does not au...

Страница 309: ...tions required and a time range in hhmm hhmm 4 digit 24 hour format optional mo Monday tu Tuesday we Wednesday th Thursday fr Friday sa Saturday su Sunday wk Any day between Monday and Friday Separate...

Страница 310: ...Name Name of a VLAN that you want the user to use The VLAN must be configured on a WX switch within the Mobility Domain to which this WX switch belongs acct interim interval lnterval in seconds betwe...

Страница 311: ...base on the WX switch to authenticate users 3Com recommends using RADIUS to accommodate the large number of users in an enterprise network For information about the RADIUS attributes supported by MSS...

Страница 312: ...port is 1813 8 In the Timeout box specify how long 1 to 65 535 seconds the WX switch must wait for a RADIUS server to respond before retransmitting The default is 5 seconds 9 In the Retry Count box sp...

Страница 313: ...itting The default is 5 seconds 5 In the Authentication Port box specify the UDP destination port to which the WX switch listens for authentication and authorization The default port is 1812 6 In the...

Страница 314: ...rd a Select the Configuration tool bar option b In the Organizer panel click the plus sign next to the WX switch c Click the plus sign next to AAA d Select RADIUS e In the Task List panel select RADIU...

Страница 315: ...et default values for certain RADIUS parameters that apply to RADIUS servers and server groups you create for an individual WX The following RADIUS parameters except system IP address are defined with...

Страница 316: ...y box type the password also known as a shared secret key used to authenticate to the RADIUS server You must provide the same password that is defined on the RADIUS server The password can be 1 to 64...

Страница 317: ...ties a Select the Configuration tool bar option b In the Organizer panel click the plus sign next to the WX switch c Click the plus sign next to AAA d Select RADIUS e In the Task List panel select Sys...

Страница 318: ...timeout value 0 to 65 535 seconds in the Quiet Period Timeout box The default is 60 seconds 4 To specify the number of seconds the WX switch waits before retransmitting an Extensible Authentication P...

Страница 319: ...the Reauthentication Attempts box The default is 2 attempts If the number of reauthentications for a wired authentication client is greater than the maximum number of reauthentications allowed MSS se...

Страница 320: ...ng and Configuring MAC Network Access Rules on page 324 Viewing and Configuring WebAAA Network Access Rules on page 327 Viewing and Configuring Last Resort Network Access Rules on page 330 To configur...

Страница 321: ...pe the name in the SSID box If the rule is for access through a wired authentication port select Wired CAUTION The default SSID name any matches on all SSID names If the SSID box contains any and you...

Страница 322: ...he EAP MD5 option does not work with Microsoft wired authentication clients PEAP Protected EAP with Microsoft Challenge Handshake Authentication Protocol Version 2 MS CHAP V2 Select this protocol for...

Страница 323: ...n are attempted with the other methods specified in the list If you specify LOCAL as the first method and a user is not in the local user database on the WX authentication and authorization are attemp...

Страница 324: ...h can be Web Open Access last resort or none This section assumes that you are familiar with the AAA options in MSS For detailed information see the Configuring AAA for Network Users chapter of the Wi...

Страница 325: ...access any SSID 3 In the User Glob box type a full or partial username to be matched during authentication MAC addresses must be specified with colons as the delimiters for example 00 11 22 33 44 55...

Страница 326: ...attempted with a RADIUS server group if one is defined in the method list The authentication methods you select are also used for authorization 7 Click Next 8 To enable this accounting rule for the S...

Страница 327: ...or MAC address glob in an 802 1X or MAC access rule and the rule also matches on the SSID or wired authentication port through which the user is trying to access the network In this case the 802 1X o...

Страница 328: ...is for access through a wired authentication port select Wired CAUTION The default SSID name any matches on all SSID names If the SSID box contains any and you do not change the SSID name the authenti...

Страница 329: ...or both MSS tries the methods in the order they appear in the Current RADIUS Server Groups list To reorder the methods select a method and click Up or Down If you specify a RADIUS server group as the...

Страница 330: ...chapter of the Wireless LAN Switch and Controller Configuration Guide Viewing Last Resort Network Access Rules To view last resort network access rules 1 Select the Configuration tool bar option 2 In...

Страница 331: ...dd it to the switch s configuration 5 Select the authentication method s in the Available RADIUS Server Groups list and click Add An authentication method specifies where the switch will look for user...

Страница 332: ...he same as those for authentication methods See step 5 10 Click Finish Viewing and Configuring WX Administrator Access Rules MSS supports administrative access to a WX switch through the serial consol...

Страница 333: ...ble RADIUS Server Groups list and click Add An authentication method specifies where the switch will look for user information to authenticate users You can select a RADIUS server group LOCAL the loca...

Страница 334: ...Click Finish Creating an Access Rule for Telnet or SSH Access To create an access rule for Telnet or SSH access 1 Access the Create Admin User wizard a Select the Configuration tool bar option b In t...

Страница 335: ...with a RADIUS server group if one is defined in the method list The authentication methods you select are also used for authorization 6 Click Next 7 To enable this accounting rule for the SSID select...

Страница 336: ...rd party AP For information about configuration requirements on the third party AP see the Configuring AAA for Users of Third Party APs section in the Configuring AAA for Network Users chapter of the...

Страница 337: ...3 Optionally edit the name in the SSID box CAUTION The default SSID name any matches on all SSID names If the SSID box contains any and you do not change the SSID name the rule allows clients who matc...

Страница 338: ...he Authentication Port box 4 To change the UDP port number on which the WX switch will listen for RADIUS stop accounting records from the AP edit the number in the Accounting Port box 5 Type the key w...

Страница 339: ...or change the Filter Id and VLAN Name authorization attributes obtained from AAA Conditions within a rule are ANDed All conditions in the rule must match in order for MSS to take the specified action...

Страница 340: ...user glob In the User Glob box type the user glob for the users to which the location policy does not apply Type the user glob in the box When specifying a user glob enter a username a double asteris...

Страница 341: ...ule are matched If you select Deny go to step 14 12 In the In ACL Name box type the name of the input ACL that applies if the location policy rules are matched The ACL name can be 1 to 32 alphanumeric...

Страница 342: ...US server You assign the name of the Mobility Profile by using the Mobility Profile RADIUS attribute which is a 3Com vendor specific attribute VSA Viewing Mobility Profiles To view mobility profiles 1...

Страница 343: ...elect Selected select the individual ports in the Available Physical Ports list and click Add 5 Click Next 6 In the Distributed MAPs drop down list select the Distributed MAPs to include in the Mobili...

Страница 344: ...344 CHAPTER 8 CONFIGURING AUTHENTICATION AUTHORIZATION AND ACCOUNTING PARAMETERS...

Страница 345: ...uto config then sending the switch to the remote office The switch contacts 3WXM Services in the corporate network to complete its configuration The drop ship option is supported only for the WXR100 T...

Страница 346: ...t the remote office where the switch is delivered physically installs the switch by connecting port 1 to the network If the switch will manage a directly connected MAP the MAP needs to be physically i...

Страница 347: ...installed The WXR100 sends a configuration request to 3WXM Services 8 3WXM receives the configuration request and looks in the currently selected network plan for a WXR100 configuration with the same...

Страница 348: ...is recommended if DNS is available If DNS is available an entry must be added to the DNS server that maps the IP address of the host where 3WXM Service are installed to the well known hostname wlan c...

Страница 349: ...the Network Verification tab The warning lists the serial number and IP address The network administrator can upload the switch into the network plan configure switch parameters and deploy the config...

Страница 350: ...ou can statically configure the information The IP address and DNS information are configured independently You can configure the combination of settings that work with the network resources available...

Страница 351: ...n hostname wlan config srv 1 Configure a VLAN W X1200 set vlan 1 port 7 s ucces s changeaccept ed 2 Configure an IP interface on the VLAN W X1200 set interface 1 ip 192 168 1 252 255 255 255 0 s ucces...

Страница 352: ...252 255 255 255 0 s ucces s changeaccept ed 3 Configure a default route through the local default router W X1200 set ip route default 192 168 1 1 0 s ucces s changeaccept ed 4 Configure the default D...

Страница 353: ...des the DNS configuration from the DHCP server 1 Configure a VLAN W X4400 set vlan 1 port 7 s ucces s changeaccept ed 2 Enable the DHCP client on VLAN 1 W X4400 set interface 1 ip dhcp client enable s...

Страница 354: ...List panel select Create Wireless Switch 8 Enter a name for the switch in the WX Name box 9 Select the switch model 10 Enter the serial number in the Serial Number box 11 Configure other deployment pa...

Страница 355: ...already filled in 5 Type the Enable password if one is configured on the switch If an Enable password has not been configured yet leave the Enable Password box blank 6 Click Finish 3WXM uploads the c...

Страница 356: ...lacement works only under the following conditions The new switch must be the same model as the one being replaced The new switch must run the same major MSS version for example 4 1 x as the one being...

Страница 357: ...on that matches the model and MSS version and has a management interface in the same subnet as the new switch 3WXM also notices that the serial number of the new switch does not match the serial numbe...

Страница 358: ...dicate the switch port numbers to which they are connected you might want to label them before unplugging them 3 Plug the network cables into the new switch 4 Plug the power cord into the new switch 5...

Страница 359: ...File Management Options in 3WXM Option Description Upload configuration Creates a new WX switch in a network plan by copying the configuration file from the live switch in the network See Adding a Swi...

Страница 360: ...e differences and either deploy the new changes to synchronize the configurations or undo the changes See Synchronizing Local and Network Changes on page 365 Save image in repository Adds a WX system...

Страница 361: ...guration changes that have occurred in 3WXM for the selected switch See Reviewing Switch Configuration Changes on page 365 Deploy Send the configuration changes to the same switch in the network See D...

Страница 362: ...Undo Remove the changes from the switch in the network See Undoing Local or Network Changes on page 366 Other Upload WX Add a WX switch to the network plan by copying its configuration from a live sw...

Страница 363: ...t Actions Reboot WXs Reboot a WX switch and the MAPs it is managing See Rebooting WX Switches or MAP Access Points on page 371 Reboot APs Reboot MAPs See Rebooting WX Switches or MAP Access Points on...

Страница 364: ...b See Viewing the Operation Log on page 373 Cancel Scheduled Operation Cancels a scheduled task such as an image deployment See Canceling a Scheduled Operation on page 373 Table 24 Devices Tasks conti...

Страница 365: ...tch that was changed A row of information is displayed for each switch The Local Status and Network Status columns indicate where changes have occurred Reviewing Switch Configuration Changes To review...

Страница 366: ...switches or Control for noncontiguous switches while clicking 4 In the Local Changes or Network Changes group in the Task List panel select Undo Selecting Undo in Local Changes reverses changes made...

Страница 367: ...is shown in the History window at the bottom left of the dialog box 3WXM performs verification of the changes If errors occur they are listed in the Selected Errors at the bottom right of the dialog b...

Страница 368: ...ferent you still can synchronize the changes The Devices tab indicates that both the network and the network plan have nonmatching changes in the following ways When you select the WX switch the links...

Страница 369: ...ry dialog box appears 5 Navigate to the directory containing the system image 6 Select the system image 7 Click Add to Repository The image is added to the image repository and appears in the Image Li...

Страница 370: ...Image Install 5 Click on Select an Image to display the list of images in the repository 6 Select the image and click Install To schedule installation of an image on WX switches 1 Select the Devices t...

Страница 371: ...to select noncontiguous items 4 In the Task List panel select Reboot WXs Information about the rebooting process is shown in the Status column 5 Click Close To reboot MAPs without rebooting the switch...

Страница 372: ...select Device Operations 3 In the Managed Devices list select the WX switches you want to manage To select more than one WX click Shift while clicking to select contiguous items or click Ctrl while cl...

Страница 373: ...ist select the WX switches with scheduled tasks you want to cancel To select more than one WX click Shift while clicking to select contiguous items or click Ctrl while clicking to select noncontiguous...

Страница 374: ...he switch to the network To enable 3WXM management of a switch see Modifying Basic Switch Parameters on page 179 To import a configuration 1 In the main 3WXM window select Tools Import The Import Conf...

Страница 375: ...gate to the directory you want to use as the output directory and click Select 4 To overwrite previously exported configuration files select Overwrite Existing Files If you do not select this option y...

Страница 376: ...e detection of configuration changes in the network make sure Enabled is selected next to Poll for configuration changes 4 To specify how often network checks occur specify the interval between checks...

Страница 377: ...ration or Network in the Alerts panel to display the Verification tabs in the Content panel The upper section of the panel lists error descriptions in red and lists warning descriptions in orange Erro...

Страница 378: ...it link 3WXM opens the configuration wizard for the configuration item For example if you create a new WX switch called dang wxr100 but you do not specify the system IP address of the switch the error...

Страница 379: ...r that error or warning You can disable rules on a per instance basis or globally for all instances If you disable a rule for a specific instance 3WXM stops alerting you about that particular instance...

Страница 380: ...rt configuration changes that cause error messages by default To change verification options 1 On the toolbar of the Verification panel click the Edit Verification Options icon The Verification Option...

Страница 381: ...or Rule headers to sort alphabetically by rule class or by rule name You also can filter the display to show only the rules in a specific class To filter the rule list based on class a Click Filter B...

Страница 382: ...you want to reenable Alternatively if you want to reenable all of the disabled instances click on the checkbox in the Enabled column 7 Go to step 10 8 Click on the checkbox in the Enabled column The...

Страница 383: ...ate the administrator s certificate Certificate authority certificate to validate user and the EAP server certificates When 3WXM connects to 3WXM Services or a WX switch the administrative certificate...

Страница 384: ...deal with the certificate required for secure communication The options you select in this dialog box apply to all HTTPS connections with the 3WXM Client For example the 3WXM Client also checks the va...

Страница 385: ...e certificate is valid and who issued the certificate To review certificate details 1 Select Tools Certificates from the menu bar in the main 3WXM window 2 Select a certificate from the list and click...

Страница 386: ...to select noncontiguous items 4 In the Task List panel select Distribute Certificates 5 Click Select PKCS12 File 6 Navigate to the PKCS 12 file and click Select PKCS12 File 7 In the PKCS12 Password b...

Страница 387: ...y with a switch all new switches that match the WX model and version number of the policy automatically receive the parameter settings in the policy New switches are switches created using the WX Swit...

Страница 388: ...g select the version from the WX Version Filter drop down list 5 Click Next 6 Select the feature areas you want to set in the policy When you apply the policy to a switch all parameter settings from a...

Страница 389: ...which the policy change will apply 6 Only the settings you change from their default values are listed 7 After reviewing the changes click Close 8 Correct any changes if needed then go to Applying Pol...

Страница 390: ...etection Settings on page 293 Viewing and Configuring Radio Profiles on page 272 RF Detection Detecting and Combatting Rogue Devices on page 469 AAA Features RADIUS Viewing and Configuring RADIUS Sett...

Страница 391: ...have different roles in setting up the Fault Management system These user types include users service administrators provisioning users and monitoring users These users can perform the following task...

Страница 392: ...Maintenance tab allows you to specify how many faults to store in the database and the number of days to keep uncleared faults In addition use this tab to specify the number of days to keep active Cr...

Страница 393: ...t table that allows you to view all fault related information including the fault s functional area and severity a description of the fault the source of the fault WX its current state and tasks inclu...

Страница 394: ...sterday Last Week or Last Month 3WXM can also sort faults based on Category Source Severity and Time Other standard commonly used filters are also available such as Current Hour Current Day and text s...

Страница 395: ...Classifying and Organizing Alarms 395 Menu items include the following options All Severities Critical Major Minor Info All Categories System Performance Client Security...

Страница 396: ...s allow you to see a variety of specific alarms for each device in the network Fault States Each fault has an associated state such as Active Acknowledged or Cleared Whenever the state of a fault is c...

Страница 397: ...n select those multiple faults and then perform the same appropriate fault management operation simultaneously If you have cleared or acknowledged a fault and a new event occurs that correlates to the...

Страница 398: ...icon or the graph icon as mentioned in Monitoring the Network on page 437 Alarm Summary Details The 3WXM displays Fault Management data in the Content panel when you click on the Alarms tool bar optio...

Страница 399: ...e chart and table views Viewing Alarm Summary Information in Table Format 1 To view a summary of alarm information in table format click the tabular icon By default the table displays statistics of fa...

Страница 400: ...list at the bottom left of the Alarm Summary screen select the Show Chart icon and then click Alarms by Category A pie chart displays a summary of alarms by category shown as follows 2 To view a summa...

Страница 401: ...ific WX switch in the network plan depicted in the following screen 2 Click the table icon to view the top 5 sources of alarms in table format 3WXM will display a table similar to the one shown in ste...

Страница 402: ...res chapter of the Wireless LAN Switch and Controller Configuration Guide CounterMeasureStart Indicates that MSS has begun countermeasures against a rogue AP CounterMeasureStop Indicates that MSS has...

Страница 403: ...table view that displays shown as follows hypertext numbers link to filtered lists that contain only the alarms for that row and column that contain the hypertext 3 To view a table of all alarms in 3W...

Страница 404: ...on of the 3WXM screen Performing this action produces the same effect as clicking the show table icon Storing Faults and Retrieving Fault History 3WXM stores fault information on the server database a...

Страница 405: ...rm in the tabular view 4 After clicking on a row 3WXM will display more information for the specific alarm in the lower pane Click a row in the lower pane to view all of the details for the alarm or c...

Страница 406: ...source severity or state Alarm History The Fault History report provides a list of all faults in the system that were active within a specified time period Users can sort the faults by source severity...

Страница 407: ...ilding Floor 3 Select the desired Report Scope Instance in the list 4 If necessary browse to the desired output directory by clicking in the Output Directory box Navigate to the desired location and c...

Страница 408: ...d on the right side of the Fault Management panel under Reports The following Alarm History Report dialog box will display 2 Select the desired Report Scope type from the list You can select one of th...

Страница 409: ...necessary browse to the desired output directory in the Output Directory box Navigate to the desired location and click Select 9 Click Generate in the bottom right corner 10 After generating the repor...

Страница 410: ...410 CHAPTER 14 MANAGING ALARMS...

Страница 411: ...n 3WXM window Event messages are displayed on top The bottom section allows you to filter the display By default only the messages generated by the 3WXM Client are displayed Messages are displayed for...

Страница 412: ...ab by using predefined filters in 3WXM or by specifying filter criteria based on content facility or severity You can save specified filter criteria as a stored filter Using Predefined Event Filters T...

Страница 413: ...elect this option if you enter more than one string and want to see messages that contain all of the strings contains at least one of the strings The filter looks for messages that contain one or more...

Страница 414: ...h and year Specify the starting time In the End box click the arrow to use the calendar to specify the day month and year Specify the end time 5 In the Show list select one of the following All To see...

Страница 415: ...blem exists Notice Events that potentially can cause system problems have occurred These are logged for diagnostic purposes Info Informational messages only No problems exist Debug Output from debuggi...

Страница 416: ...Stored Filters group box select the filter to be deleted 2 Click Delete The filter is deleted Exporting Filtered Data You can export the filtered data shown in Event Viewer to a comma delimited text c...

Страница 417: ...Errors Network Usage Radio Traffic RF Summary Radio Details Network Usage Port Traffic Rogue Details Rogue Summary Site Survey Work Order Alarm Summary Alarm History Security Client OUI When you gener...

Страница 418: ...n WX Configuration Client monitoring Client Summary Enable Client Session Collection Client Details Client Errors RF Network Usage Radio Traffic Enable Traffic RF Trending RF Summary Radio Details Net...

Страница 419: ...iguration Client monitoring reports Client Summary Client Details Client Errors Watch List Client RF reports Network Usage RF Summary Radio Details Rogue reports Rogue Details Rogue Summary RF Plannin...

Страница 420: ...To select or change the output directory for the report click Choose navigate to the new directory and click Select 6 To prevent 3WXM from replacing an existing report of the same type with this new r...

Страница 421: ...prevent 3WXM from replacing an existing report of the same type with this new report click next to Overwrite Existing Files to deselect this option 6 Click Generate 7 When the report is generated cli...

Страница 422: ...es to deselect this option 6 Click Generate 7 When the report is generated click the report link to view it Table 33 lists the sections in the report Table 33 WX Configuration Report Sections Section...

Страница 423: ...WXM from replacing an existing report of the same type with this new report click next to Overwrite Existing Files to deselect this option APs Directly connected MAPs configured on the WX switch Distr...

Страница 424: ...option 2 In the Reports list select Client Details 3 Click Add to add a report filter The filter configuration fields are activated 4 Click on the Select field and select one of the following from th...

Страница 425: ...ics Generating a Client Errors Report The client errors report lists error statistics for current client sessions 1 Select the Reports tool bar option 2 In the Reports list select Client Errors 3 Sele...

Страница 426: ...an RF Network Usage Report This network usage report shows radio traffic statistics 1 Select the Reports tool bar option 2 In the Reports list select Network Usage Radio Traffic 3 Select the scope typ...

Страница 427: ...switches Generating an RF Summary Report The RF summary report lists summary RF statistics 1 Select the Reports tool bar option 2 In the Reports list select RF Summary 3 Select the scope type of the r...

Страница 428: ...e radio details report lists details about an individual radio 1 Select the Reports tool bar option 2 In the Reports list select Radio Details 3 Select the radio for which you want the report The scop...

Страница 429: ...lect the instance for which you want the report For example if the scope is Mobility Domain select the Mobility Domain 5 Select the time period for the report 1 Hour 24 Hours 7 Days 30 Days 6 To selec...

Страница 430: ...r 8 To select or change the output directory for the report click Choose navigate to the new directory and click Select 9 To prevent 3WXM from replacing an existing report of the same type with this n...

Страница 431: ...lt is Rogue 7 To select or change the output directory for the report click on the button next to output directory navigate to the new directory and click Select 8 To prevent 3WXM from replacing an ex...

Страница 432: ...elect the language English German 5 To change the output directory for the report click on the button next to output directory navigate to the new directory and click Select 6 Click Generate 7 When th...

Страница 433: ...can select the network plan a site a building or an individual floor 4 Select the options you want to use for the report RF Coverage RSSI Projections Display Disabled MAPs only available if RSSI Proj...

Страница 434: ...4 Select the instance for which you want the report For example if the scope is Building select the building 5 To select or change the output directory for the report click Choose navigate to the new...

Страница 435: ...erwrite Existing Files to deselect this option 8 Click Generate 9 When the report is generated click the report link to view it Generating a Security Alarm Report The security alarm report provides in...

Страница 436: ...n the Reports list select Client OUI 3 To select or change the output directory for the report click Choose navigate to the new directory and click Select 4 To prevent 3WXM from replacing an existing...

Страница 437: ...connected to the service Optionally the service also receives SNMP traps generated by the WX switches and shows information based on those traps The Monitor tab displays information retrieved from th...

Страница 438: ...page 510 To enable SNMP traps on WX switches see Configuring SNMP on page 196 Network Types There are different types of networks and the requirements and expectations for network monitoring change de...

Страница 439: ...some fault and status information but can control what is collected and how often 3WXM polls the network With 3WXM the administrator of a distributed network can monitor and diagnose a single site or...

Страница 440: ...o examine data that 3WXM captures The monitor dashboard includes the following views Status Summary Alarm Summary Client Summary Traffic Summary Each view provides answers to specific questions for ex...

Страница 441: ...it collects data from the previously selected view In other words 3WXM will load selected data in the background so that you can view corresponding data in another section Refresh 3WXM data by clickin...

Страница 442: ...ing status modes for each of the previous alarms Information Minor Major Critical Client Summary The Client Summary view is located in the lower left corner of the Content panel and shows different gr...

Страница 443: ...and property details of equipment such as WX switches MAP access points and MAP radios For example an WX can show a list of APs or radios and the information for APs and radios can include the status...

Страница 444: ...inks to open the Status Monitor panel You can also click the Details button to switch the view from Status Summary to the Status Monitor panel The following screen shows the Status Monitor panel after...

Страница 445: ...Unlocked Operational State Up enabled Down disabled Usage State Active Idle Busy Availability Status Failed Degraded Powered Off Offline Not installed Alarm Status Critical Major Minor Combined the st...

Страница 446: ...view is the graphical representation of alarms Click the tabular icon or the graph icon to switch between the chart and table views The following screen shows the default Alarm Summary view Notice th...

Страница 447: ...ew to the Alarm Monitor panel or select Alarms from the navigation bar All three selections transfer the view from the Monitor dashboard to the Alarms dashboard In the Alarms dashboard you can navigat...

Страница 448: ...ORK By clicking the Details button the display will show the Alarms dashboard and your results will be unfiltered 3WXM will display all of the alarms in tabular format The results will be similar to t...

Страница 449: ...Using the Alarm Summary View 449 Click on a row to view the details of a specific alarm in the tabular view shown in the following screen...

Страница 450: ...ll display a window similar to the one shown in the following screen The Alarms dashboard contains a filter row which has four drop down lists and an entry field The drop down lists and entry field al...

Страница 451: ...lan name s These options allow you to see a variety of specific alarms for each device in the network Additional Alarm Options Additional alarm options are available from the Alarms dashboard These op...

Страница 452: ...List Create Third Party AP The options are either active or inactive for each alarm Click on an active option to see more information Inactive options will be gray The following screen provides a sam...

Страница 453: ...s by Radio Clients by SSID Clients by access type Clients by time Top clients Click the tabular icon or the graph icon to switch between the chart and table views The following screens provide samples...

Страница 454: ...the graphical or tabular representation to the Client Monitor dashboard In the Client Monitor dashboard you can examine current and trending data for client sessions and launch various actions on a se...

Страница 455: ...in the Task panel on the right side of the screen shown below and include the following View Client Session Session Details Top Clients Clients by WX Clients by SSID Clients by access type Clients by...

Страница 456: ...ta might not be available depending on the scope and the server setup options but you can retrieve and view details of current sessions Click on an active option to see more information Inactive optio...

Страница 457: ...Using the Client Summary View 457 The following screen provides a sample of the Top Clients option...

Страница 458: ...onitor one or more clients 1 From the Client Monitor choose Manage Find Client in the Task panel to display the Find Client search dialog shown below 2 Enter the desired search criteria select the sea...

Страница 459: ...age 3WXM retrieves information about the client s location 2 If three or more MAPs have not detected the client within 15 seconds of each other the Listeners Selection dialog box appears displaying a...

Страница 460: ...st of MAPs that detect the client click the Refresh Listeners button 5 To change the MAPs used for calculating the client s location click the Listeners tab and Select or deselect MAPs from the list t...

Страница 461: ...clients within the selected scope Performing an RF Link Test Running an RF Link Test can provide a quick simple summary and breakdown of basic RF statistics for troubleshooting wireless performance pr...

Страница 462: ...ata Using the Traffic Summary View The Traffic Summary view displays network usage and RF summary data 3WXM shows both traffic and RF statistics for Radio AP Floor Building and Site options but only t...

Страница 463: ...Radio 24 Hour Radio 7 Days Radio 30 Days Radio 1 Hour Traffic 24 Hour Traffic 7 Days Traffic 30 Days Traffic The following screens provide samples of the same information Traffic 1 Hour The first scr...

Страница 464: ...ETWORK Traffic Details Click the Details button to switch the view from the Traffic Monitor dashboard to the Traffic Details view The following screen is a sample of the data available for Traffic 1 H...

Страница 465: ...side of the screen and include the following Trends Bytes Packets In Out Packets Details Reports Traffic Other options may be available depending on the item selected in the Organizer panel Options ar...

Страница 466: ...of operational statistics such as RSSI re transmits SNR and signal level to determine problem areas To find an AP on the floor 1 Click on the Monitor option in the main 3WXM tool bar 2 Expand the Sit...

Страница 467: ...wing Performance Data 3WXM opens a separate window for the statistics panel and you can open multiple statistics panels You can keep the windows separate or group multiple statistic windows together b...

Страница 468: ...History Security Client OUI RF Planning reports Site Survey Order Work Order For each report use the wizard to configure the report scope type report scope instance and time period settings Some repor...

Страница 469: ...RF spectrum for other devices transmitting in the same spectrum The RF scans discover third party transmitters in addition to other 3Com radios MSS considers the third party transmitters to be device...

Страница 470: ...notifications RogueDetect Indicates that MSS has detected a rogue AP RFDetectRougeDisappear Indicates that MSS is no longer detecting a previously detected rogue AP RFDetectInterferingRogueAP Indicate...

Страница 471: ...switch from the member list on the seed CounterMeasureStop Indicates that MSS has stopped countermeasures against a rogue access point RFDetetSpoofedMacAP Indicates that MSS has detected a wireless p...

Страница 472: ...list from accessing the network through a WX switch If the client is placed on the black list dynamically by MSS due to an association reassociation or disassociation flood MSS generates a log message...

Страница 473: ...n SSID in Permitted Ignore List Device is not a threat SSID List Yes OUI in Permitted Vendor List No Source MAC in Attack List No Generate an alarm Classify device as a rogue No Yes Issue countermeasu...

Страница 474: ...the rogue appear in the Events Log For example if a rogue is detected during three polling intervals separate entries for each polling interval appear in the Events Log You can adjust the selection c...

Страница 475: ...essarily malicious but they do steal bandwidth from your infrastructure users Ad hoc clients are further categorized into rogues and interfering devices The word Rogue or Interfering appears in parent...

Страница 476: ...By The device that generated the alarm Alarm Object The device where the rogue alarm was detected Transmitter MAC address The MAC address used by the rogue to transmit data SSID SSID of the rogue Numb...

Страница 477: ...he rogue or noted its absence This column has data only if the radio that detected the rogue or its disappearance is modeled in a floor plan Floor Floor on which the rogue was detected or disappeared...

Страница 478: ...cal location of a rogue 3WXM displays the floor plan for the floor where the rogue is believed to be located and displays the areas where the rogue is probably located This option displays the likely...

Страница 479: ...and select or deselect MAPs from the list then click the Locate button To display the location of a client associated with the rogue 1 Select the rogue client in the alarm list 2 In the Task Panel und...

Страница 480: ...ND COMBATTING ROGUE DEVICES 3 To change the MAPs used for calculating the location of a client click the Listeners tab and select or deselect MAPs from the list then click the Locate button Rogue Clie...

Страница 481: ...of one or multiple switches To add a device to the ignore list 1 In the list of rogues on the Alarm screen select the devices you want to add to the ignore list 2 Click Add to Ignore List in the Task...

Страница 482: ...tack the devices on the list Converting a Rogue into a Third Party AP If a device in the alarm list belongs to a third party AP in your network you can convert the rogue into a third party AP When you...

Страница 483: ...the Organizer panel The third party APs are listed in the Content panel To remove a third party AP 1 Select the Configuration option in the main 3WXM tool bar and click on Third Party APs in the Organ...

Страница 484: ...Select Devices dialog is displayed 4 If the switch es on which you are configuring the black list are in a Mobility Domain select the Mobility Domain Otherwise select None 5 Click next to select all o...

Страница 485: ...timizing your network plan improves the accuracy of the model and provides more precise results when you visualize wireless coverage locate users and rogue devices and so on You also can use optimizat...

Страница 486: ...Choose to navigate to the csv file that contains the RF measurement data 5 In the Map Name field specify the map name The map name must match the name specified in the site survey work order and must...

Страница 487: ...WXM the description is auto generated and the obstacle type is Other You can edit these values by selecting the obstacle clicking the Edit properties icon to open the Modify RF Obstacle wizard and mod...

Страница 488: ...ant to display the coverage Baseline Association Rate Coverage is shown based on the MAP radio baseline association rate The baseline association rate is the typical data rate the radio is expected to...

Страница 489: ...ng Display RF Coverage Coverage for the selected scope s is displayed This example shows 802 11a coverage by transmit data rate for the coverage area CoverA To hide coverage again right click on the s...

Страница 490: ...Ps that Are Already Installed to the Network Plan If you installed a new MAP in the network and you want to add it to the network plan do the following 1 Select the Verification option in the main 3WX...

Страница 491: ...nstalled The preferences you set are valid only for that user on that system This chapter describes how to change 3WXM Client preferences To change monitoring service preferences see Changing 3WXM Ser...

Страница 492: ...ng to connect again specify the timeout 1 to 30 seconds in the Connect Timeout box The default is 5 seconds 4 To set the number of times 0 to 5 3WXM tries to reconnect to the WX after the original att...

Страница 493: ...e of the following 16x16 Change all icons to 16x16 pixels This is the default setting 20x20 Change all icons to 20x20 pixels 24x24 Change all icons to 24x24 pixels 6 Within Show Wizard Index select on...

Страница 494: ...e making changes Changing Certificate Management Options By default 3WXM does not accept self signed certificates from WX switches or from the monitoring service You can change this option in the Pref...

Страница 495: ...m which is a common client transmit power If you want to choose the color for an RF technology or obstacle see Changing Colors Changing Colors You can change the color schemes for showing the followin...

Страница 496: ...alette on page 496 For more information about using HSB see Defining a Color by Changing HSB Properties on page 497 For more information about using RGB see Defining a Color by Changing RGB Properties...

Страница 497: ...percentages with 0 percent indicating black and 100 percent indicating white To define a color by changing HSB 1 To specify a color by changing HSB click HSB in the Choose Color dialog box 2 To change...

Страница 498: ...Properties You can define a color by changing red blue and green RGB color properties 1 To specify a color by changing RGB click RGB in the Choose Color dialog box 2 Use the Red Green and Blue sliders...

Страница 499: ...t one of the following event levels Critical A critical condition has occurred that requires immediate resolution Warning An event that might require attention has occurred Info Informational messages...

Страница 500: ...500 CHAPTER A CHANGING 3WXM PREFERENCES...

Страница 501: ...bes how to change monitoring service preferences To change 3WXM Client preferences see Changing 3WXM Preferences on page 491 To configure access control for the 3WXM Client see Restricting Access to 3...

Страница 502: ...Windows systems 3WXM Services are started automatically when you complete installation and starts automatically whenever you restart your system Linux systems You can start and stop the service manual...

Страница 503: ...from within 3WXM or from Windows Services 1 Display the Services window Here is an example of the Services window in Windows XP The window might look differently on your system 2 Scroll down and sele...

Страница 504: ...suse ln s opt 3wxm bin 3wxm services 3wxm services suse insserv 3wxm services Linux Example Red Hat WS 3 The recommended way to add services to a Red Hat WS 3 system is with the chkconfig command Ente...

Страница 505: ...nfigured on the Service Settings tab See Changing Service Settings on page 508 5 To configure 3WXM Client to remember the username and password for 3WXM Services access select Remember user name and p...

Страница 506: ...Changing Service Settings on page 508 By default the 3WXM Client does not accept self signed certificates even from 3WXM Services Instead when 3WXM Services or another device presents a self signed c...

Страница 507: ...g that the 3WXM Client is Receiving Service Data If you are using a network plan that already contains equipment use the following procedure to verify that the 3WXM Client is receiving data for the eq...

Страница 508: ...on the new port number The HTTPS port number is automatically updated for the 3WXM Client you are using and your connection is automatically restored Other clients will need to use the Monitor Servic...

Страница 509: ...econds 3WXM Services waits for a TCP connection with a WX switch to reach the Connect stage type or select the value in the Connect Timeout box You can specify from 1 to 30 seconds The default is 15 s...

Страница 510: ...cepts a certificate from a WX switch only if the public key information for that certificate is in the key store file 8 Click Save to save the changes or Cancel to cancel the changes Changing Monitori...

Страница 511: ...ngs for monitoring of the log buffers on WX switches a Select Enable Log Monitoring This option is enabled by default b To change the number of minutes between queries of the WX switches log buffers c...

Страница 512: ...olling interval box You can specify 5 10 or 15 minutes The default is 5 minutes c To change the RF Threshold Settings enter new settings for the following statistics default settings are indicated in...

Страница 513: ...er window select Plan Management then select Backup Restore The backups that already exist for the network plan are listed Backups that are automatically created by 3WXM do not have names and their ty...

Страница 514: ...rvices Backup Restore If 3WXM Services is already open in the browser window select Plan Management then select Backup Restore 2 To change how often 3WXM automatically backs up network plans select Ho...

Страница 515: ...e the other instance of 3WXM Services is installed 3WXM Services must be running on the host to which you want to transfer the backup 5 If the port on which the other instance of 3WXM Services listens...

Страница 516: ...516 CHAPTER B CHANGING 3WXM SERVICES PREFERENCES...

Страница 517: ...ake advantage of warranty and other service benefits you must first register your product at http eSupport 3com com 3Com eSupport services are based on accounts that are created or that you are author...

Страница 518: ...access numbers later in this appendix Access Software Downloads You are entitled to bug fix maintenance releases for the version of software that you initially purchased with your 3Com product To obt...

Страница 519: ...serial number A list of system hardware and software including revision level Diagnostic error messages Details about recent configuration changes if applicable To send a product directly to 3Com for...

Страница 520: ...ation number RMA by FAX using this number 61 2 9937 5048 or send an email at this email address ap_rma_request 3com com Europe Middle East and Africa Telephone Technical Support and Repair From anywhe...

Страница 521: ...ezuela Virgin Islands AT T 800 998 2112 57 1 657 0888 AT T 800 998 2112 1 800 998 2112 571 657 0888 01 800 849CARE AT T 800 998 2112 AT T 800 998 2112 54 11 4894 1888 AT T 800 998 2112 1 800 998 2112...

Страница 522: ...522 APPENDIX C OBTAINING SUPPORT FOR YOUR 3COM PRODUCTS...

Страница 523: ...rms classifying and organizing 393 ARP Address Resolution Protocol configuring 214 assigning MAP channels 151 attributes reassigning with the location policy 339 authorization attributes 305 local dat...

Страница 524: ...ence 222 uplink fast convergence 222 fault management classifying alarms 393 managing faults 397 organizing alarms 393 setting up a system 391 Fault Management system 391 faults managing 397 reporting...

Страница 525: ...olors 507 monitor accounts creating 56 monitoring accessing monitored data 439 alarm options 451 alarm summary view 446 client summary view 453 creating an viewing reports 467 finding a client 458 fin...

Страница 526: ...ches 371 registering your product 517 518 519 repair authorization number by FAX Asia and Pacific Rim 520 repair services 519 repair support for Latin America 521 repair support for US and Canada 521...

Страница 527: ...ific Rim 520 telephone technical support Europe Middle East and Africa 520 Telnet management port 66 Telnet configuring 195 time zone configuring 181 traces caution about levels 207 running 207 tracin...

Страница 528: ...528 INDEX WX WX security enabling 67 X X 509 certificate types 383...

Отзывы: